LocostUSA.com

Learning how to build Lotus Seven replicas...together!
It is currently April 18, 2024, 11:49 pm

All times are UTC - 5 hours [ DST ]


Post new topic Reply to topic  [ 17 posts ]  Go to page 1, 2  Next
Author Message
PostPosted: March 21, 2012, 10:04 am 
Offline
User avatar

Joined: February 20, 2008, 1:24 am
Posts: 294
Location: Mahomet, Il
Starting off with a warning. This steering wheel is for off-road use only. Any pictures or accounts are for information only. If you chose to try something similar all liability is your own.

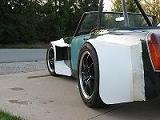
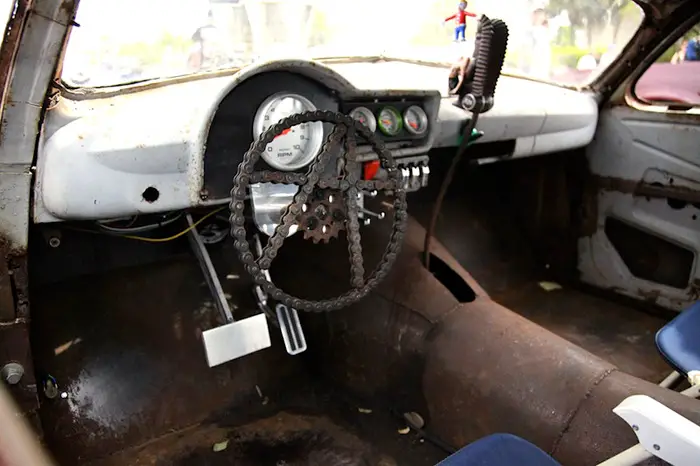
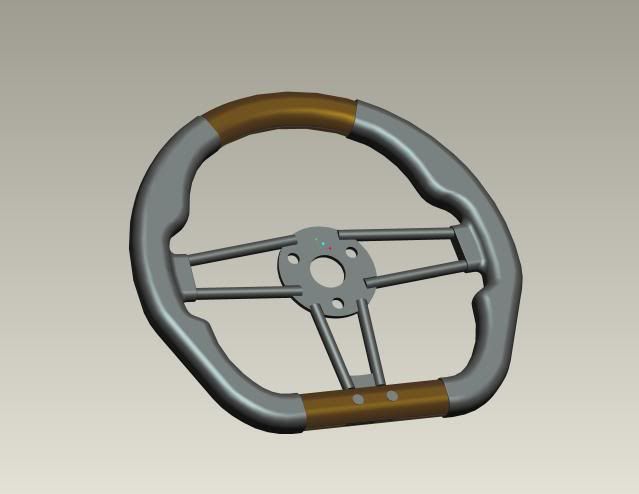
That said. I've decided to try to build a steering wheel. I have an old Nardi wood rim wheel that I've been using for my mockups that is ~14-15" OD. It's much to big. I nearly pulled the trigger on either a Kart wheel or a 10x9 Dshaped wheel but reviews on this site of those wheels for our aplication are not favorable. I owned a MKV GTI which has probably the best steering wheel I've ever used so I looked to it for my shape inspiration. The Nardi wheel provided my design inspiration.

The Nardi is basically a pice of aluminum with pieces of wood glued to the front and back of it. It has no fasteners/plugs and relys on glue to hold everything together. Mine has been through alot as it is at least 30 years old and has been completely submerged in a flood with very little ill effect. I would love to continue to use it but it's just to big and not very "sporty" feeling.

I like everyone like nice things and want the feel of a $300 aftermarket sport steering wheel but I'm decidedly low cost on this sort of thing. This post will take you through day 1 of this build. I am not done so you will be following along, however it is my intention to work on this until it is finished so it won't be but a week or so.

Step 1 was the concept.
Image

I origionally had it designed to use a flat sheet of aluminum as the hub. I then costed that out and found that that sheet of aluminum would be ~$30 from Mcmaster and decided I would just weld up the hub.

Image

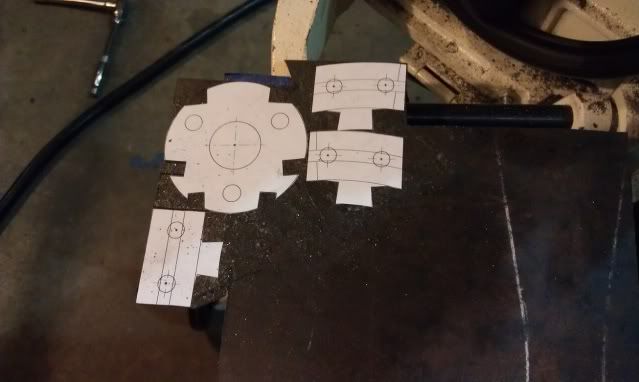
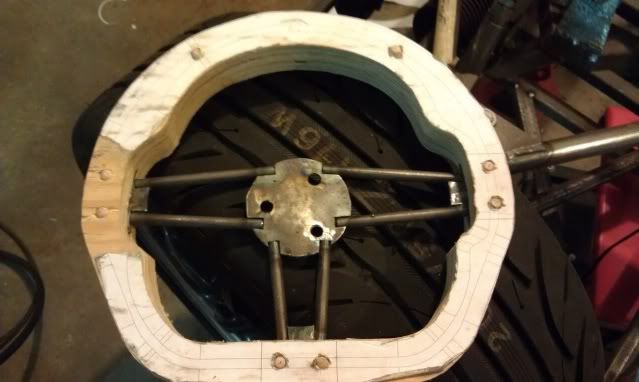
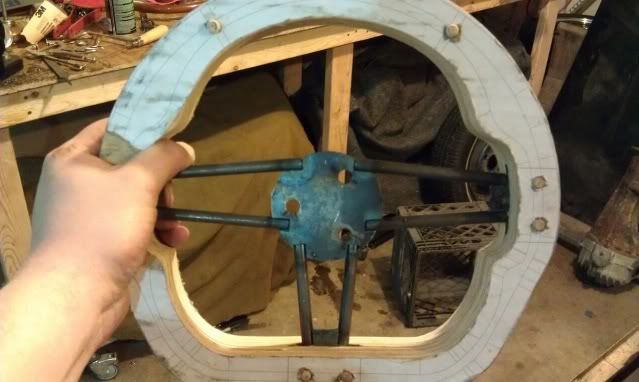
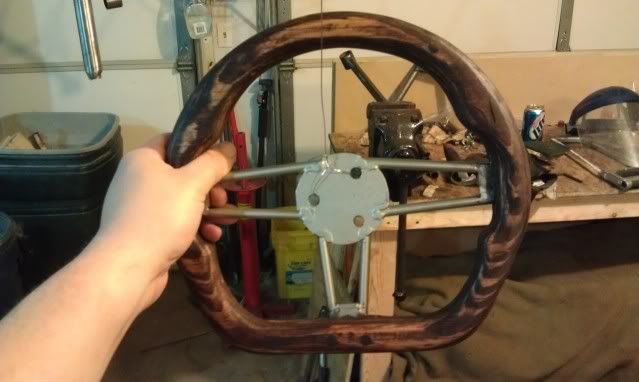
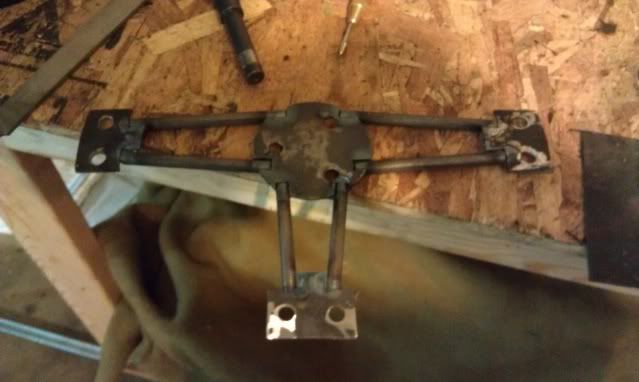
I built the hub up out of 5/16" rod and .125" steel plate. Total cost ~$6 as I had to buy the rod at Tractor supply. I am going to finish weld both sides but welded on 1 side the 3 prongs are in the right spot and flat.

Image

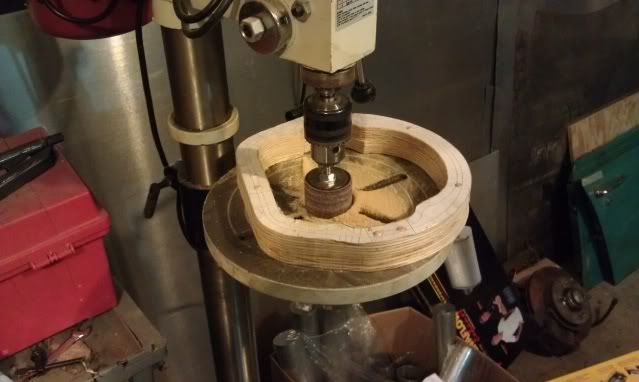
I then Glued the templates for the wood forms which will be glued together clamping the hub in the middle. I will use hardwood dowels ($1) to go through the two pieces of wood ($Scrap from flooring project) and the holes in the 3 tabs creating hopefully a solid stiff sandwich.

Image

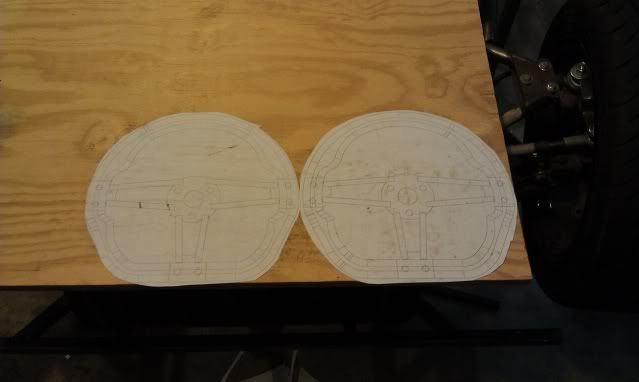
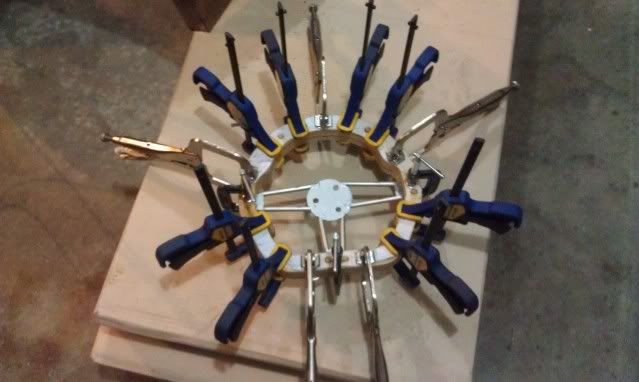
I cut out 1 template thus far leaving 1/6" or so for finish sanding. This should allow me to glue the two together and still have enough space to sand to my final desired shape.

Image

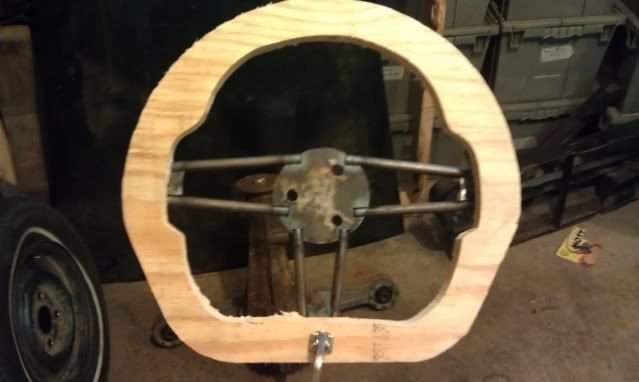
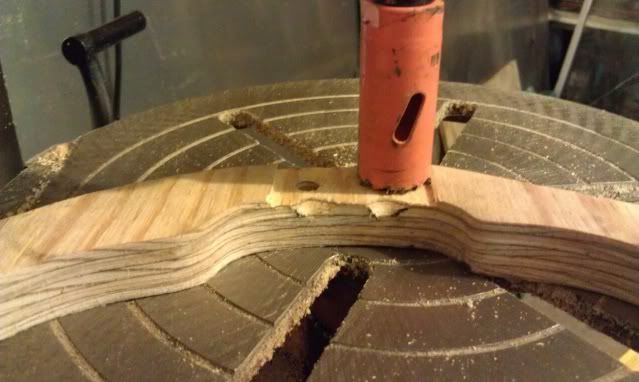
And here is the mockup. the gap between the botom bumps and the hub is a little small but I will enlarge is slightly when I get to the profile sanding phase.


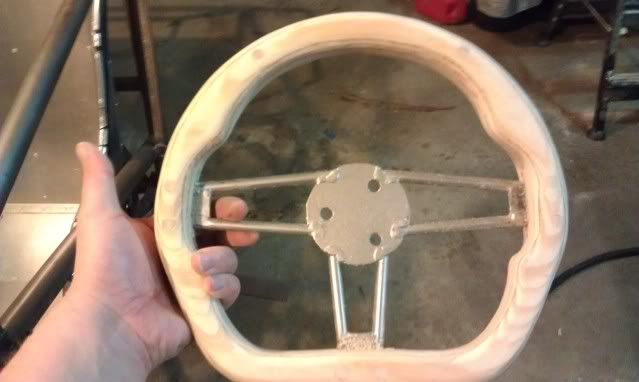
Next steps are cut out the other template. Relieve the wood for the metal thickness (1/6" per side so the metal is centered between the wood). Glue/Clamp it together with dowels inserted. Assess overall strength to determine if I want to move forward. Then sand/file/plane down the shape I want on all of the parts. Once that is done I will varnish/seal it and decide if I want to try to leather wrap it or leave it wood.

If I leather wrap it it will be with leather from an old jacket for max cost effectiveness.

So there you go. This will either be a display of how to succesfully build a nice steerign wheel or it will serve as a leason to others of something they should not attempt.

Thanks for looking,

Daniel

_________________
MG midget bodied Locostish car in progress


Top
 Profile  
Reply with quote  
PostPosted: March 21, 2012, 10:28 am 
Offline

Joined: December 29, 2007, 10:41 pm
Posts: 1008
Location: Vancouver, BC
Looks good. I did something similar to your nardi, though i had a shop water jet cut the aluminum centre section and went with varnished wood. I'm into my wheel for a whopping $80.


Top
 Profile  
Reply with quote  
PostPosted: March 22, 2012, 10:21 am 
Offline
User avatar

Joined: February 20, 2008, 1:24 am
Posts: 294
Location: Mahomet, Il
Daily Update

If you are on GrassrootsMotorsports you will see this posted there too. I appologize for Spamming both boards but I thought people from both groups may be interested.

I cut out the other half and clamped 1 half to the hub. I used a 5/16 drill bit on high speed to drill the holes to match the hub. I then clamped the two halfs together and drill through the holes in 1 half into the other. After that was complete I put hardwood furniture dowels in to hole it aligned. I was then ready to sand down the profile I had printed.

Image

As you can see I used the Harbor Freight $7.99 http://www.harborfreight.com/20-piece-sanding-drum-kit-42006.html. I use very light pressure and High speed. I also highly recomend the $6.99 Sanding Belt Cleaner http://www.harborfreight.com/sanding-belt-cleaner-30766.html as this works REALY good at cleaning the drums and can be used to clean files and all sorts of stuff.

Image

This shows how I milled reliefs for the hub metal, I don't own a router otherwise this would have been easy. I chucked up a center bitless hole saw and slowly fed the part in whith the drill running. I went slow in about 6 passes. Worked great.

Image

And here is the Mockup with the hub in place. Fits up good, the hub is flat and spins centered.

Image

Show with my Hand for scale.

I am happy with progress thus far. Next is glue/clamp it together and then start shapping it to my final desired shape.

I also painted the Hub in preparation for gluing together.

_________________
MG midget bodied Locostish car in progress


Top
 Profile  
Reply with quote  
PostPosted: March 23, 2012, 1:54 am 
Offline
User avatar

Joined: February 20, 2008, 1:24 am
Posts: 294
Location: Mahomet, Il
And just like that it is pretty well done.

Today over my lunch hour I came home to glue and clamp the wheel together. I put a mess of glue on and even more clamps.

Image

This evening after everyone was in bed I snuck out and started shapping. I used my drill press to hold the sanding drums swung the table out of the way and started sanding. I got the shape very close to what I wanted with 150 grit drums. I used the 2" 1" and .5" diameter drums to get the detail I wanted.

Image

Image

I then did some block sanding and some hand sanding to get the wood ready for stain. Wood finishing isn't my strongest activity but I threw some red mahogany on the wheel and will do a though polurethane job on it once it dries.

Image

Image

At this point really this project is done. The wheel took about 6 hours of spare time to build. It cost about $10. It's fairly light, stiff and is exactly the size/shape I wanted.

Can't wait to get it out in the sun and use it. I will update this if I decide to make any changes or attempt to wrap part of it.

Thanks for following along.

Daniel

_________________
MG midget bodied Locostish car in progress


Top
 Profile  
Reply with quote  
PostPosted: March 23, 2012, 5:51 pm 
Offline
Always Moore!
User avatar

Joined: November 9, 2007, 3:40 pm
Posts: 4075
Location: Pittsburgh, PA
Wow that looks slick. Very nice work. I can't wait to see the post polyurethane shots.

I figure if we're building everything else on the car, is it really any more risk to create a wheel?

_________________
-Andrew
Build Log
Youtube


Top
 Profile  
Reply with quote  
PostPosted: March 23, 2012, 8:53 pm 
Offline

Joined: October 19, 2009, 9:36 pm
Posts: 2199
Location: meadview arizona
there doesn't appear to be any steel in the rim, so when and i say again when it breaks you could loose a hand,

i can see it now, the wood breaks and that flange will whip round and slash you wrist or you will punch the windshield,

if you had put a 1/2" steel rod, curved to the shape of the wheel inside the wood, i would be happier

why does the hub have the holes off center?

you can't even hang it on the wall because it will not stay up straight.

_________________
this story shall the good man teach his son,
and chrispin chrispian shall ne'er go by,
from this day to the end of the world.
but we in it shall be remembered.


Top
 Profile  
Reply with quote  
PostPosted: March 23, 2012, 10:32 pm 
Offline
User avatar

Joined: February 20, 2008, 1:24 am
Posts: 294
Location: Mahomet, Il
The holes are off center on purpose. It puts the push pin style quick release knob straight up where it is very visible rather than obscured by a spoke. I am right handed and would tend to grab the wheel with my right hand. If the holes are "centered". The knob is off to the left and when I grab at the hub it would leave my pinky as the only sisters near the knob. With this orientation I can grab the hub with my eight hand and my index finger falls right on the button making it quick to release.

As to your other point I'm going to respond in another post to make it clear my intentions.

_________________
MG midget bodied Locostish car in progress


Top
 Profile  
Reply with quote  
PostPosted: March 23, 2012, 11:36 pm 
Offline
User avatar

Joined: February 20, 2008, 1:24 am
Posts: 294
Location: Mahomet, Il
I have decided this wheel will be used for mockup and light driving car show type things. This type of wheel will not be legal for SCCA road racing competition as I found out midway through the project. As near as I can tell it doesn't matter if I do the metal core or not SCCA just blanketly says no wood rimmed wheels. My mass produced nardi would not pass their yardstick. That alone is enough to have me rethink my use of this or any wood wheel for the purposes the car was built for.

I will probably be following this up with creation of a Road course legal wheel that will cost me more (.190 aluminum sheet core throughout the wheel, stiff foam for shape and then Carbon/Fiberglass over the foam).
I'm ok with failure I will have learned alot either way. I hope people get the feeling that this was an Idea being explored and not me trying to say this is how to make a wheel. This is simply how I am trying to make a wheel. If this would be the most dangerous thing on the car I will be a Happy happy man as I've done other stuff that has much higher potential for danger than a wood rimmed steering wheel.

That said I probably won't use it much more than to check size shape steering effort and bqsic mockup purposes. If someone else wants to try this and is comfortable with a wood wheel I would recomend going ahead and putting a steel core in the wheel if for nothing else than to make it more like the OEM wheels. I'll admit I was just lazy and didn't want to weld up a ring and cut the channel. Once the parts where glued it was either press on or restart. I thouht it worth finishing as it will serve my needs well and with the small edition of a steel ring other people could easily learn from my example to try theory own wheel.
I actually tried to break this after the glue and before I shapped it. I ended up with no deflection in the wood rim but bent the hub and steering shaft mount flange. I could see an impact type load may crack the wood before it bent the hub. Either way I am going to chock this one up to learning and try again but not out of wood.

It does look cool though.

_________________
MG midget bodied Locostish car in progress


Top
 Profile  
Reply with quote  
PostPosted: March 24, 2012, 3:20 am 
Offline
User avatar

Joined: April 26, 2008, 6:06 pm
Posts: 3268
Location: Under the weather. (Seattle)
It certainly looks great! In addition to being what I would consider rather successful experiment, it will serve as a fantastic starting-point and template for future improvements to the design and construction methods should you choose to do so!! :cheers:

_________________
-Justin

"Orville Wright did not have a pilots license." - Gordon MacKenzie


Top
 Profile  
Reply with quote  
PostPosted: March 24, 2012, 9:16 am 
Offline
We are Slotus!
User avatar

Joined: October 6, 2009, 9:29 am
Posts: 7651
Location: Tallahassee, FL (The Center of the Known Universe)
Quote:
It does look cool though.


I agree 100%, Bro... And with some poly and polishing and a trick paint job on the metal parts, it would be cool addition to the car at car shows.

Another one that shape, with different material to make it SCCA-legal would be a great project! If you decide to do that, please do post your progress. It's a great idea and a good lookin' product!

:cheers:

_________________
JD, father of Quinn, Son of a... Build Log
Quinn the Slotus:Ford 302 Powered, Mallock-Inspired, Tube Frame, Hillclimb Special
"Gonzo and friends: Last night must have been quite a night. Camelot moments, mechanical marvels, Rustoleum launches, flying squirrels, fru-fru tea cuppers, V8 envy, Ensure catch cans -- and it wasn't even a full moon." -- SeattleTom


Top
 Profile  
Reply with quote  
PostPosted: March 24, 2012, 11:49 am 
Offline

Joined: October 19, 2009, 9:36 pm
Posts: 2199
Location: meadview arizona
nocones,

sorry if i came off a bit strong on your wheel, but the intention was to discourage others from trying to make a wheel of this type,

the wood will break, and if as you say the spokes bent when you tried to brake it, what does that say about the overall construction,

old style wheels were designed to look cool, not to function in an accident, thats why modern steering wheels are made the way they are, cool or not,

go to a wrecking yard and look at how much metal there is in a modern wheel.

_________________
this story shall the good man teach his son,
and chrispin chrispian shall ne'er go by,
from this day to the end of the world.
but we in it shall be remembered.


Top
 Profile  
Reply with quote  
PostPosted: March 24, 2012, 1:55 pm 
Offline

Joined: December 29, 2007, 10:41 pm
Posts: 1008
Location: Vancouver, BC
Here's the before and after of mine, the hub came from a friends Lotus 7, and the wheel was patterened off the orginal Derrington wheel, albeit in wood not leather. The waterjet cut aluminum cost about $50. I had envisioned making another in leather, using poly as the core and wrapping it in leather. But, other projects have taken my time away from the Eleven.


Image

Image


Top
 Profile  
Reply with quote  
PostPosted: January 9, 2013, 4:02 am 
Offline
User avatar

Joined: January 8, 2012, 2:34 am
Posts: 285
Location: Niagara on the Lake Ontario Canada
...here is another take on wood laminating... I redid old British MG wheels for a few years....this was a step by step I put together for a few friends who wanted to do it themselves...
The whole process took about 12 hours over a week or so....(time for gluing to set, etc)....

http://gblandco.com/oldwheel/oldwheel.html

Bunch of later work for various people: http://gblandco.com


Attachment:
neelwheel copy.jpg


You do not have the required permissions to view the files attached to this post.

_________________
gblawson (Gordon)
......................................................
http://gblandco.com/gb/cent/cent.html


Top
 Profile  
Reply with quote  
PostPosted: August 27, 2013, 4:34 pm 
Offline

Joined: June 30, 2010, 3:31 pm
Posts: 6
Location: Rijeka (HR)
Nice job nocones!

Rat look but locost :)

Image

_________________
My You Tube channel. Cars, bikes - track days, motorsport, sim racing and more http://www.youtube.com/channel/UCNfdsS80-5KNzAzRtTRQwFA


Top
 Profile  
Reply with quote  
PostPosted: November 28, 2015, 1:35 am 
Offline
User avatar

Joined: March 30, 2011, 7:18 am
Posts: 1615
Location: central Arkansas
Another homemade steering wheel, from H.A.M.B.: http://www.jalopyjournal.com/forum/thre ... el.620824/

One from mgexp.com: http://www.mgexp.com/article/diy-wood-s ... eel-1.html

Modifying OEM steering wheels: http://www.secondchancegarage.com/public/93.cfm


Top
 Profile  
Reply with quote  
Display posts from previous:  Sort by  
Post new topic Reply to topic  [ 17 posts ]  Go to page 1, 2  Next

All times are UTC - 5 hours [ DST ]


Who is online

Users browsing this forum: No registered users and 6 guests


You cannot post new topics in this forum
You cannot reply to topics in this forum
You cannot edit your posts in this forum
You cannot delete your posts in this forum
You cannot post attachments in this forum

Jump to:  
POWERED_BY