LocostUSA.com

Learning how to build Lotus Seven replicas...together!
It is currently May 14, 2024, 7:48 am

All times are UTC - 5 hours [ DST ]


Post new topic Reply to topic  [ 53 posts ]  Go to page 1, 2, 3, 4  Next
Author Message
PostPosted: December 22, 2009, 2:39 pm 
Offline

Joined: March 1, 2008, 8:42 am
Posts: 103
1 - Please note I take no credit for this info, just I saw it in Pook's 3 wheeler post and it's exactly the type of info I personally think belongs in this sub-forum, so...

2 - I took the liberty of posting it here for all to find and benefit from

3 - I also took the liberty of spacing it out for an easier read

4 - Mods: Please feel free to delete my drivel or the entire post, or conversely make it a sticky in this section. No offense is taken on my part.

and 5 - To Pook: thank you very much for this information. I am realistically years away from starting the project that I want to with this info, but seeing it here and "knowing" what to do is strong motivation to rearrange a few priorities.

The question was asked as to how Pook went from this:

Image

To this:

Image


To which (in his BUILD THREAD) he replied:


pook wrote:
trial and error...lots of error!

I tried the boat builders for info on glass over foam and you can't really get much from those guy's (they argue about EVERYTHING!) and feel no one with less than 30 years experience shouldn't be allowed to order resin.

However the surfboard guy's are great! (if you can get past the Kewl...dude!) they start with a foam blank and glass over top. Here is what I've learned/learning:

- The cheap foam blue/pink stuff from the hardware store sands well, the problem is almost EVERYTHING melts it! I cut my shapes and glue it with 5 min two part epoxy and hold it together with paneling nails while it dries (they have little ribs and won't pull out until your ready to remove them). After 10 minutes or so I remove the nails and use an exacto knife to slice a v grove in the foam where the epoxy has squeezed out, if you don't then it won't sand like the foam and will leave high spots. After you sand everything to shape, I use 60 grit paper to scuff the entire surface, this lets the resin bite into the foam.

- I use epoxy resin, and lay two layers of 7 to 9oz glass at a time. The epoxy is good and bad, the good is it doesn't eat blue foam, it doesn't stink up the house and it's slow to set. the bad is it's slow to set...like 24 to 48 hours depending on the temp and hardener you use.

- I paint the foam with a coat of resin then lay the first layer of glass and wet it out by rolling a foam trim roller brush (this is also putting down another coat of resin for the next layer)

- After the second layer is on I use a bondo spreader to squeegee the surface (it pops any bubbles and pulls the excess resin off), then I wrap the edges (Wax paper, thumb tacks, what ever it takes). I trim all the edges with an exacto blade after 24 hours (too much longer or too many layers and it will take a saw to cut it)

- I sand down any high spots or puddles that may have formed and lay a 3rd and 4th layer of 7 or 9oz and do the same. After 48 hours I level and again and fill any low spots with more resin using the bondo spreader to build it up a little. Grab a block sander and let her rip.

- At this point a stray away from others do in that I use a light filler to build in any fillets or fill problem areas. After everything is sanded, I layer two more layers OVER the filler and finish with a layer of 4oz cloth (this gives a smoother top layer and encapsulates the filler).

- I apply 4 layers of 9oz cloth on the other side of the foam, and lay strips in corners high stress area's etc... Normally this would not be enough glass, but because it's a foam core layup it's VERY rigid! and pretty light just like a surfboard!!

- Remember to subtract about an 1/8th inch from the edges of the foam because the top layer will be about an 1/8th thick and the bottom under an 1/8th.

Here is two or three other things to remember:
1. chop strand can not be used with epoxy resin.

2. unlike poly resin epoxy is also a glue so the entire layup doesn't need to be done in one session as long as you scuff and wipe down the previous surface with acetone first.

3. poly resin won't dry over epoxy resin but epoxy will dry over poly? however poly fillers don't care as long as the epoxy has cured.

After it's done you end up with a surface that you can feel the cloth patten, normally this is blocked out by the gel or tooling coat but since it's built up backward and gel coat won't bond well, I use slick sand, It's a high build primer and is ready for paint once it's block sanded.

PooK


Top
 Profile  
Reply with quote  
PostPosted: December 22, 2009, 4:12 pm 
Offline
User avatar

Joined: January 2, 2009, 1:45 pm
Posts: 1322
Location: Halifax, Nova Scotia
This might be a duplicate post - I just did something odd and had the screen go blank...

An addition to this excellent description would be to add a peel-ply layer to the last laminate lay-up on the outside. This makes finishing much easier, both because of the effect of filling the 'pores' and because of the amine blush, which ends up on the peel ply rather than the last laminate. Of course, if the laminate has compound curvature, the peel ply may wrinkle, which does create some extra work.

Warren


Top
 Profile  
Reply with quote  
PostPosted: January 6, 2010, 9:26 am 
Offline

Joined: March 16, 2008, 4:49 pm
Posts: 721
Location: Richmond Kentucky
Hey guys, I've been getting some PM's about this so while I am NOT a fiberglass expert I figured I could answer here what I do know.
here are the questions:
1. Is this method strong? YES pound for pound it's is MUCH stronger than glass alone in bend and twist resistance.
I think the foam is able to spread what would be localized stresses through out a much greater area? (one of the engineer guy's can prob explain this much better than me)
2. Putting filler on the glass adds alot of weight? NO, There is no gel coat layer so it's kind of a push. I have a 1.75lb qt can of filler and have used about half the can on three panels, If you also take into account that 50% of the filler gets sanded off and lands on the floor it's not much weight ant all per panel.
3. Will it hold up to high speeds or is it flimsy? This method isn't new, "I think" it was invented by an airplane builder in the 70"s (check out the long EZ and many others) It's also used by boat, car, surfboard, etc....builders.
4. Why can't I use the cheap poly resin found in my local hardware/auto parts store? You can BUT, poly resin will eat the blue, pink, yellow (cheap) foam and leave a gooey nasty mess! (You don't want to know how I found this out :cry: :cry: ) You need to use urethane foam with poly resin.
Also Poly resin is not a glue so to speak, It bonds by a chemical means only if its all done at one time otherwise it is just a mechanical bond and may de-laminate if it's done wrong.
5. Can I peel out the foam? YES, however glassing the foam on BOTH sides is why it's strong in bend and twist, once the foam is out it will take many many layers of mat turned 45 deg to the previous layer to even get close to the same strength.

There are many books on this and because it's the way that works for me doesn't mean it's the absolute correct way!

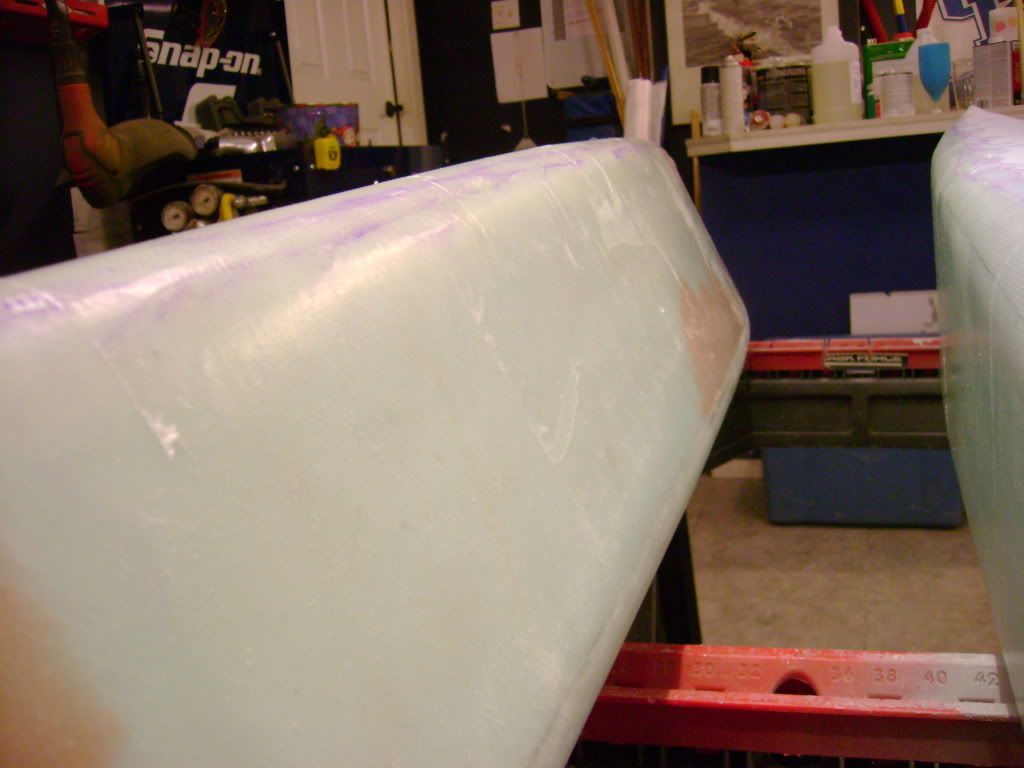
Warren is right about the peel ply but I've also found wax paper to work very well, here is a pic of a side pod with the wax paper just removed, It's very smooth and will require a very light surface sand and light filler (just like they do when they make a custom motorcycle fuel tank.)
PooK
Image

_________________
dpook317@att.net


Top
 Profile  
Reply with quote  
PostPosted: January 6, 2010, 9:39 am 
Offline

Joined: January 5, 2010, 12:13 pm
Posts: 26
Location: Little Rock, AR
This is pretty much the same method I used when I built the BlueOvalZ 240Z bodywork (every exterior panel sans the roof and B-pillar). Hot-glued foam over metal, sanded to shape, laid it up, popped if off, removed metal panels, attach fiberglass. The documentation of that is in the signature and I've got a lot of tips on the type of foam (that won't melt under the resin or clean-up Acetone) and on making small parts. The BOV bodywork lasted 15 years without any failures

Image

Image

Image

These same methods are what I'll employ when it's time to modify the Manta bodywork to better emulate the M8B body.

_________________
Terry
Cardomain photos

BlueOvalZ photo documentation
Image


Top
 Profile  
Reply with quote  
PostPosted: January 6, 2010, 10:07 am 
Offline

Joined: March 16, 2008, 4:49 pm
Posts: 721
Location: Richmond Kentucky
VERY NICE!!!! :cheers:
PooK

_________________
dpook317@att.net


Top
 Profile  
Reply with quote  
PostPosted: January 6, 2010, 10:51 am 
Offline
We are Slotus!
User avatar

Joined: October 6, 2009, 9:29 am
Posts: 7651
Location: Tallahassee, FL (The Center of the Known Universe)
Hi PooK-
Guilty as charged Yr Honor... I sent a PM... :oops: Sorry if I was a nuisance... Think of it as "Fan Mail"... :D

Thanks for posting this follow-up, it answers a lot of questions, including mine! Willingness to share info like this is why this forum is great!

BlueOval-
All I can say is.... "DAAAYUMMM!" You are an artist, Man!!!! Great work!

:cheers: to both of y'all!

JDK

_________________
JD, father of Quinn, Son of a... Build Log
Quinn the Slotus:Ford 302 Powered, Mallock-Inspired, Tube Frame, Hillclimb Special
"Gonzo and friends: Last night must have been quite a night. Camelot moments, mechanical marvels, Rustoleum launches, flying squirrels, fru-fru tea cuppers, V8 envy, Ensure catch cans -- and it wasn't even a full moon." -- SeattleTom


Top
 Profile  
Reply with quote  
PostPosted: January 6, 2010, 10:55 am 
Offline

Joined: March 16, 2008, 4:49 pm
Posts: 721
Location: Richmond Kentucky
No problem at all, It just dawned on me my explanation on my build log may have left more questions than it answered.
Anytime!
PooK

_________________
dpook317@att.net


Top
 Profile  
Reply with quote  
PostPosted: January 6, 2010, 2:18 pm 
Offline

Joined: June 9, 2009, 12:10 pm
Posts: 122
Try www.rqriley.com/frp-foam.htm. It's a detailed description on how to make a one-off fiberglass body. (I KNEW I remembered it from somewhere!)


Top
 Profile  
Reply with quote  
PostPosted: January 6, 2010, 2:40 pm 
Offline
The voice of reason
User avatar

Joined: January 10, 2008, 4:47 pm
Posts: 7652
Location: Massachusetts
Pook, you did very well with that foam. The foam that boat builders or surf board folks use is better for this though. It weighs more ( 5-6 lbs./ft.^3 compared to 2 lbs./ft.^3 ), but is much stronger. The styrofoam is especially good if you would like to cut it with a hot wire, so airfoils etc.

Check with boat builder supply places or Aircraft Spruce.

You could probably get away with less glass using those foams.

_________________
Marcus Barrow - Car9 an open design community supported sports car for home builders!
SketchUp collection for LocostUSA: "Dream it, Build it, Drive it!"
Car9 Roadster information - models, drawings, resources etc.


Top
 Profile  
Reply with quote  
PostPosted: January 6, 2010, 3:08 pm 
Offline

Joined: March 16, 2008, 4:49 pm
Posts: 721
Location: Richmond Kentucky
Thanks, And agreed, I chose the hardware store foam because it's a match to this foam sold by aircraft spruce
http://www.aircraftspruce.com/catalog/c ... rofoam.php
The other stuff was MUCH more expensive! I also agree that the more dense the foam he stronger the composite, so I don't build anything structural with it, just panels and lids etc, but it's still pretty strong, I can stand on my side pod.
PooK

_________________
dpook317@att.net


Top
 Profile  
Reply with quote  
PostPosted: January 6, 2010, 3:57 pm 
Offline
User avatar

Joined: January 2, 2009, 1:45 pm
Posts: 1322
Location: Halifax, Nova Scotia
Pook,

Yes, I agree that wax paper works too. I used it before I switched to peel-ply. The wax paper leaves a 'shinier' more resin-rich surface, but traps the amine blush. My personal preference is to accept the rougher texture after peel-ply in return for not having to deal with the sticky mess that amine blush leaves on sandpaper. (But 'Fantastic', 'Windex' or similar cleaners will removehe amine blush from cured epoxy, although I'm generally too impatient to wait long enough) Better yet, if you use peel ply on the intermediate laminations you don't need to sand before the next layup, apart from dealing with the after effects of the odd wrinkle.

Warren


Top
 Profile  
Reply with quote  
PostPosted: January 6, 2010, 4:02 pm 
Offline

Joined: March 16, 2008, 4:49 pm
Posts: 721
Location: Richmond Kentucky
Very cool thank you!
Does the peel ply work on corners? the wax paper is a pain on curved parts :cry:
PooK

_________________
dpook317@att.net


Top
 Profile  
Reply with quote  
PostPosted: January 6, 2010, 4:13 pm 
Offline
User avatar

Joined: February 20, 2008, 1:24 am
Posts: 294
Location: Mahomet, Il
Where do you get your supplies?

Daniel

_________________
MG midget bodied Locostish car in progress


Top
 Profile  
Reply with quote  
PostPosted: January 6, 2010, 4:30 pm 
Offline
User avatar

Joined: November 20, 2008, 10:20 am
Posts: 1014
Location: Subs of Detroit, MI
peel ply wont stretch naturally over corners. I have used some peel ply that has more stretch then others, but for corners i usually just make a cut into the area and overlap the ply to conform to the curve... kinda like a dart in female clothing (dont ask how i know these things :lol: )

_________________
2007 R1 Powered Mid Engine Street & Track Car
Build Log: viewtopic.php?t=4970
Quote:
On the cool points scale you rank just above Isaac Newton and just under Batman.


Top
 Profile  
Reply with quote  
PostPosted: January 6, 2010, 4:32 pm 
Offline

Joined: January 5, 2010, 12:13 pm
Posts: 26
Location: Little Rock, AR
For those small pieces and using poly resin, the green floral foam (very delicate, soft, and VERY easily sanded without loading the paper) is resistant to the resins and solvents. For brackets, braces, hinges, etc, I use these to shape the smaller parts, then drill and Helicoil the part if it's got to be bolted to something. Amazing what you can do with even the simple cheap composites. I was skeptical when I made an air filter holder (due to under-hood heat) that sat directly onto the carb base, but it never got soft from too much heat.

_________________
Terry
Cardomain photos

BlueOvalZ photo documentation
Image


Top
 Profile  
Reply with quote  
Display posts from previous:  Sort by  
Post new topic Reply to topic  [ 53 posts ]  Go to page 1, 2, 3, 4  Next

All times are UTC - 5 hours [ DST ]


Who is online

Users browsing this forum: No registered users and 8 guests


You cannot post new topics in this forum
You cannot reply to topics in this forum
You cannot edit your posts in this forum
You cannot delete your posts in this forum
You cannot post attachments in this forum

Jump to:  
POWERED_BY