LocostUSA.com

Learning how to build Lotus Seven replicas...together!
It is currently April 19, 2024, 6:18 pm

All times are UTC - 5 hours [ DST ]


Forum rules


Welcome to The Builders Logs. This area is for showing your current build/your completed car. Please only create a thread if you are currently building a car/showing off a finished project. Please do not create any other topics in this forum; any other subject should be posted in the correct forum. Please also only create one thread per user per project.


Post new topic Reply to topic  [ 61 posts ]  Go to page Previous  1, 2, 3, 4, 5  Next
Author Message
 Post subject:
PostPosted: October 4, 2006, 3:11 pm 
Hey, nice job!!! I'm in BC as well, and should be doing my registration process in the spring. I had a look on your website, but I didn't find the latest installment on the registration...fiasco...? I'm VERY interested in how this went. Any tips? So far, I have a "friendly" inspector ready (he's a buddy, an old-time race-car builder, and he owes me...), and I have a sturctural integrity inspector who has already looked at the frame/chassis and is perfectly happy with it. Apparently, the structural integrity inspection can't be done more than 30 days before final inspection, but has to be done before paint and bodywork are put on....leaving 30 days to do all these things. Is this right?? Thanks!


Top
  
Reply with quote  
 Post subject:
PostPosted: October 4, 2006, 11:40 pm 
Offline
User avatar

Joined: September 30, 2005, 1:28 am
Posts: 1330
Location: Sunny-Okanagan, Canada, eh?!
It's basically "I found another shop," but there were some other extenuating circumstances that required a more creative solution than it initially sounds like.

Regarding the Structural, mine was done LAST summer, so you should be good. Due to the nature of major structural body work, I think it's unreasonable to expect the car to be finished within 30 days of the structural. When you apply for a VIN, however, you have 30 days to have it affixed, but you can always re-apply (for another $25).

You're on the coast, aren't you? You may need to pass AirCare 2006 specs.

The biggest tip is to find a shop that is willing to inspect a homebuilt, and is willing to explore creative solutions.

Hope that helps!

G

_________________
The Lethal Locost
The Lethal Locost 2 - Even More Lethalerer


Top
 Profile  
Reply with quote  
 Post subject:
PostPosted: October 25, 2006, 9:00 pm 
Offline

Joined: May 25, 2006, 9:39 pm
Posts: 346
Ok, So I am in BC as well and am keen to go. I have the same doner as SkinnyG. My build table, steel , a welder. What I don't have is any clue as to what I have to do to satisfy the government. Who inspects the frame? How much does it cost? Who inspects the final car? I don't mind finding this out myself if someone would point me in the right direction. May be SkinnyG could post a little how to post. I know you are busy at school and all but it would help any BC'ers....thanks David

PS if this post should go elsewere please feel free to move i. Davidt


Top
 Profile  
Reply with quote  
 Post subject:
PostPosted: October 26, 2006, 1:16 am 
Offline
User avatar

Joined: September 30, 2005, 1:28 am
Posts: 1330
Location: Sunny-Okanagan, Canada, eh?!
I just updated the reggy details on my website:

www.geocities.com/g_wellwood/automotive ... ation.html

Any collision repair inspection facility can do the Structural, it's about $90.

Any designated inspection facility can do the Safety, it's about $90.

Knock on doors, bring pictures, be polite, all that. The KEY (and I cannot stress this enough), is to find shops willing to do it.

G

_________________
The Lethal Locost
The Lethal Locost 2 - Even More Lethalerer


Top
 Profile  
Reply with quote  
 Post subject:
PostPosted: October 26, 2006, 8:10 am 
As for inspectors, look for one that's a hot-rod enthusiast. They're more likely to be sympathetic to "creative" solutions that we all use in these builds. The guy I'm going to use is very interested in my project, and has built/raced lots of "claimer" and stock-car race cars. He's not interested in trying to force the car into a 2006 Toyota mold, and thinks anyone who insists that you have to fit energy-absorbing bumpers and dual catalytic converters onto something like this is an idiot. As long as it's going to have the primary things covered (brakes, suspension, brake lights, signals, etc.), he's a happy camper :D :D :D


Top
  
Reply with quote  
 Post subject:
PostPosted: October 26, 2006, 2:33 pm 
Offline

Joined: May 25, 2006, 9:39 pm
Posts: 346
Thanks guys, thats awsome. Just knowing it's possible makes me feel a lot better about all that crap in the carport :D


Top
 Profile  
Reply with quote  
 Post subject:
PostPosted: May 12, 2007, 11:53 pm 
Offline

Joined: April 30, 2007, 4:43 am
Posts: 26
This is one of the nicest looking Sevens out there. Proves that the book is inspirational but you can be successful in modifying things to suit YOUR intended outcome. Good job!

_________________
http://www.bikervoodoo.com
http://www.sevenbuilder.com


Top
 Profile  
Reply with quote  
 Post subject:
PostPosted: January 20, 2008, 1:25 pm 
Offline
User avatar

Joined: September 30, 2005, 1:28 am
Posts: 1330
Location: Sunny-Okanagan, Canada, eh?!
Update. Running shorter slicks changed roll centers. Lowering the front to fix roll centers lost bump travel. Modified control arms for more travel (and I like this much better than the book:

Before:

Image

After:

Image

Image

_________________
The Lethal Locost
The Lethal Locost 2 - Even More Lethalerer


Top
 Profile  
Reply with quote  
 Post subject: Shock mount on lower arm
PostPosted: January 20, 2008, 4:08 pm 
Offline
User avatar

Joined: September 22, 2005, 8:12 am
Posts: 1880
Location: 4AGE in S.E. Michigan
Skinny

That is a real nice clean installation. Looks like it even allows you to get closer to the BJ with the shock. How did you keep the tubes aligned. Did use one tube and then cut the center section out for the shock?

Looks like control arm design option 134, great work Dave W.


Top
 Profile  
Reply with quote  
 Post subject:
PostPosted: January 20, 2008, 8:43 pm 
Offline
User avatar

Joined: September 30, 2005, 1:28 am
Posts: 1330
Location: Sunny-Okanagan, Canada, eh?!
I machined a one-piece sleeve, welded it in, then cut out the "shock" section.

Be sure to weld it in with a bolt installed to prevent it from shrinking the hole smaller. I forgot, and had to modify a tap to get in there and fix the threads.

Used 3/8-16 allen head cap screw.

Threaded end was drilled 5/16" and tapped 3/8-16 about an inch from the end.

Depth up to threads was drilled 3/8.

Counterbore was drilled 9/16" to the depth of the head.

I'm very pleased with this method of mounting the shock - it's common Caterham practice now too (that's where I got the idea).

_________________
The Lethal Locost
The Lethal Locost 2 - Even More Lethalerer


Top
 Profile  
Reply with quote  
PostPosted: March 20, 2009, 5:56 pm 
Offline
User avatar

Joined: September 30, 2005, 1:28 am
Posts: 1330
Location: Sunny-Okanagan, Canada, eh?!
After two seasons with the car, I became annoyed with some of the limitations of the OEM fuel injection. It ran very rich for most of the time, and pig-rich at full throttle. The engine was fun below 4500rpm (the removed T-VIS switch point), and then something changed in the tuning and was a whole lot more fun from there to the redline.

I decided to go MegaSquirt. For a control-freak like me, having full control over everything excites me.

I ordered MegaSquirt II, V3.0 from DIY AutoTune and was very happy with their service as well as the product. Since I was going MegaSquirt, I might as well go to town, so I bought a set of GSX-R/600 Independant Throttle Bodies (ITB's) off eBay for about $60, and bought all the Ford EDIS stuff from Pick-and-Pull for about $30 more.

The MegaSquirt took about 10 hours to assemble, taking my time and checking everything every step of the way. I wired it for Ford EDIS, a GM stepper IAC (not installed) and flyback circuitry for low-impedance injectors (though I am using a resistor block with low-impedance injectors).

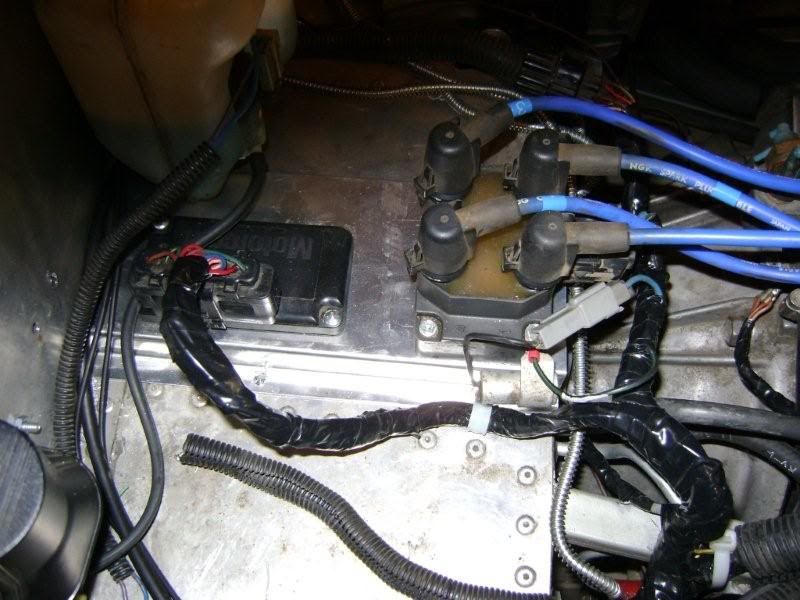
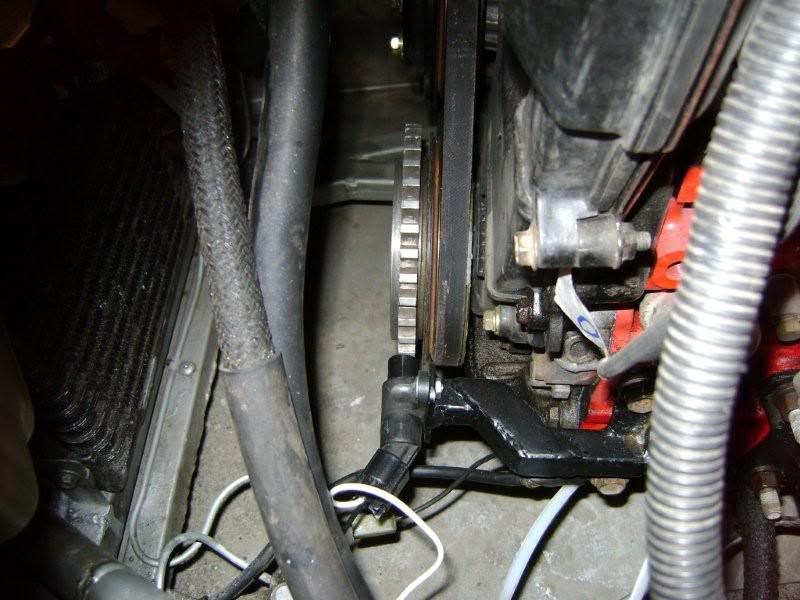
The EDIS parts were thieved from an early 90's Ford Escort. I machined the unused power-steering pulley grooves off the crank pulley, and machined the EDIS 36-1 wheel bore to a 0.0015" interference fit. I put the pulley in the freezer, and boiled the wheel, and then quickly got it into place by gentle tapping with a dead-blow hammer.

I made a sensor bracket that mounts on some unused engine block bosses, and places the sensor roughly horizontal, even with the crankshaft. The trigger wheel was placed with the missing tooth 90° ahead of the sensor.

Image

A metric-size frost plug was also pounded into the old distributer hole in the cylinder head using Aviation Form-A-Gasket as a sealer.
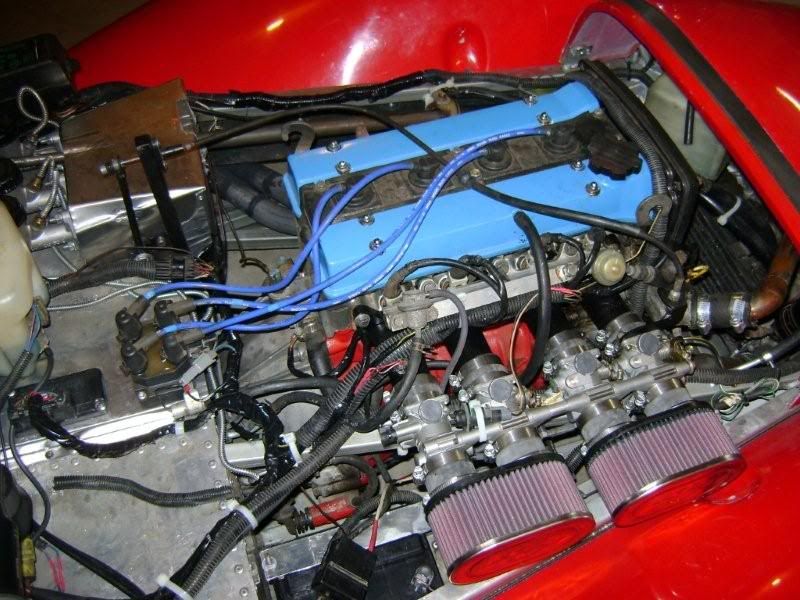
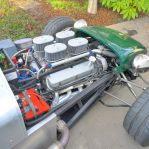
Modifying and Mounting the ITB's

I lopped the plenum off my previously fabricated intake manifold, and tweaked tubes #1 and #4 to match the spacing of the GSX-R/600 ITB's. I had to machine spacers to spread TB's 1 & 2 from 3 & 4 about 3/4", and I made longer bolts using 1/4" rod - I welded a nut on one end, and threaded the other for the metric threads inside the Suzuki TB's. I've seen people use Redi-Rod and some cobbled-together nuts and washers for that, but personally I think it looks like poo when it's done that way.

Image

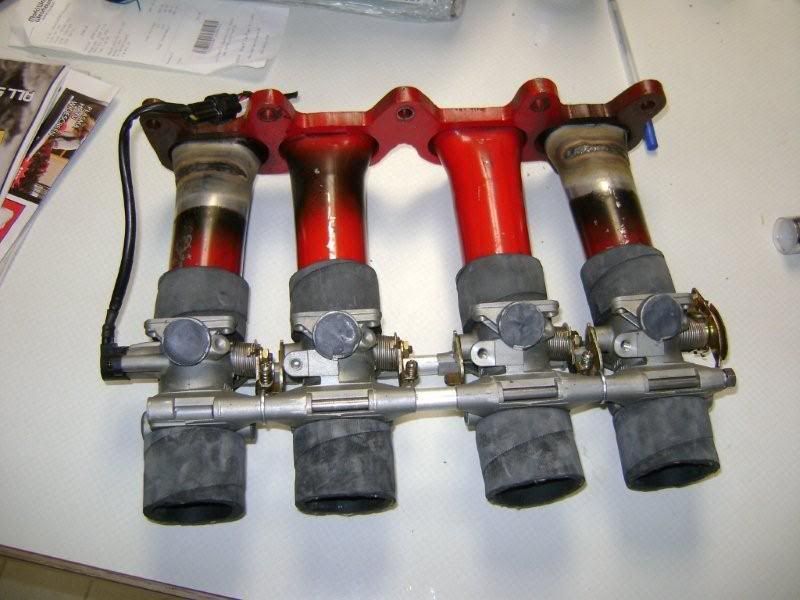
The secondary air-valve thingies were removed, as were the GSX-R injectors (since the 4AGE injectors are in the head). The holes were filled with "Quick Steel" epoxy putty, after cleaning them thoroughly and cutting threads into the holes for the putty to grip. The 4AGE throttle cable rotating thingie was cut off and welded to the ITB's as the GSX-R one was too small.

Image

Air Filters

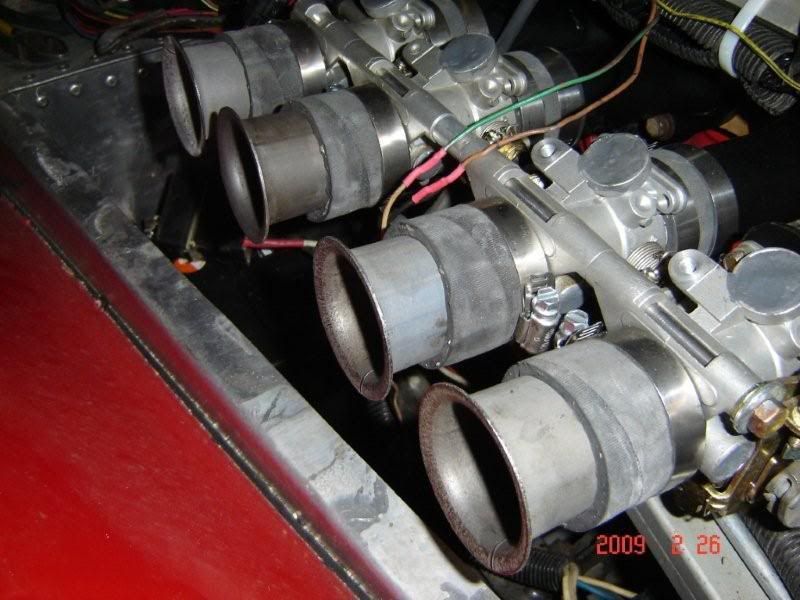
I used bulk straight rad hose to connect the ITB's to the intake runners, and some hand-made trumpets to the ITB's. K&N has air filter #RC-3510 for a Legend/Dwarf cars running Yamaha FJ1200 motors - they fit perfectly onto the hose I used to attach the trumpets. The trumpets were made out of exhaust tubing, annealed and pressed over a die I machined to the same taper as the TB's, the correct length, and as hefty a radius as I thought I could get away with.

Image
Mild steel trumpets: $5

Image
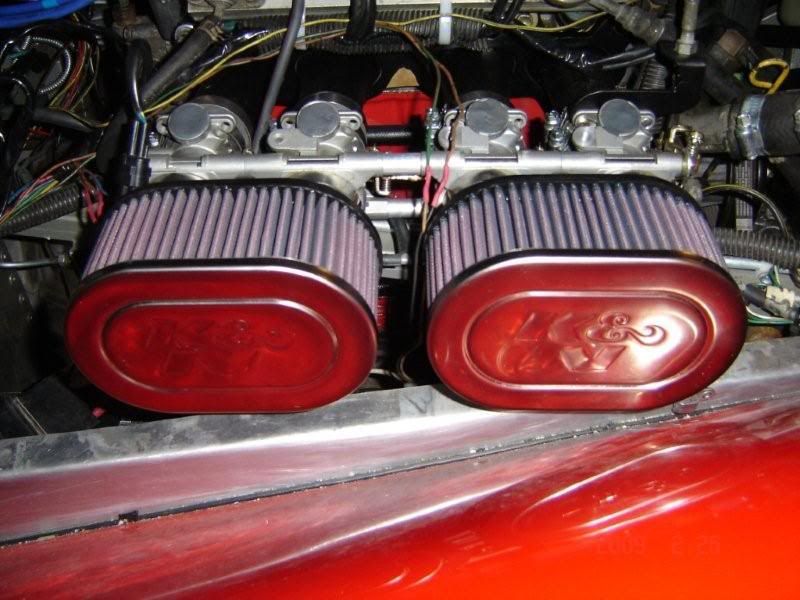
K&N filters: a bit more than $5

Re-wiring

This is where I regretted trying to use as much of the Toyota harness as I did. That was a stupid, stupid move. It made the MegaSquirt rerofit needlessly complex. I followed the factory wiring harness diagram, and matched it as best I could to what MegaSquirt needed. Luckily (or, masochistically), I really enjoy electrical.

Tuning

I had almost zero success finding base maps to begin with. The few that I found either didn't make sense to me, or not at all for a blue-top 4AGE. For an engine with such a wide fan-base, I was surprized that nobody had anything available.

You use MegaTune to set up the engine, and then use MegaLogViewer to datalog what's happening and you can let it adjust things, or you can make adjustments. I did both.

Oh yeah, you're really going to want a wide-band O2 sensor. I bought an Innovate LC-1 as it was relatively inexpensive and seemed versatile.

Many websites have mentioned how difficult it is to tune ITB's. Many give up trying to run Speed Density (MAP/RPM-based) and tune to run Alpha-N (TPS/RPM based). Other more adventurous sort run blended tables (a bit of both worlds). I'll keep you posted with where I end up. Keeping in mind this is not my daily driver, and I can afford to compromise some driveability for the sake of "fun."

I set up fuel using the default "Generate" feature of MegaSquirt, and ended up richening the "cruise" to 14.7 to get rid of some surge and stumble under light throttle, I shifted the "lean cruise" area higher in the RPM (based on the rpm ranges I previously cruised at), and had to richen up quite a few cells to smooth out the acceleration.

As of this writing, here are my tables so far (March 2009):

Image
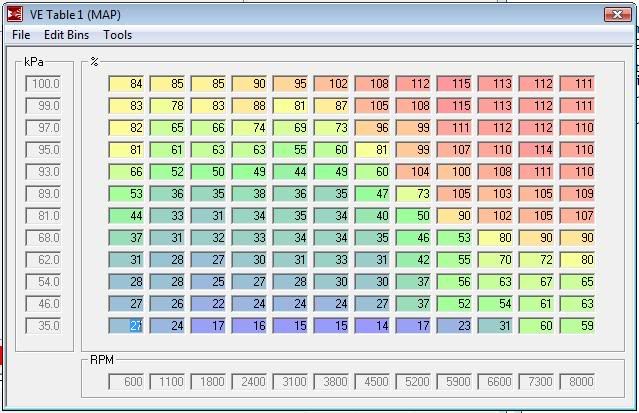
Volumetric Efficiency Table

Image
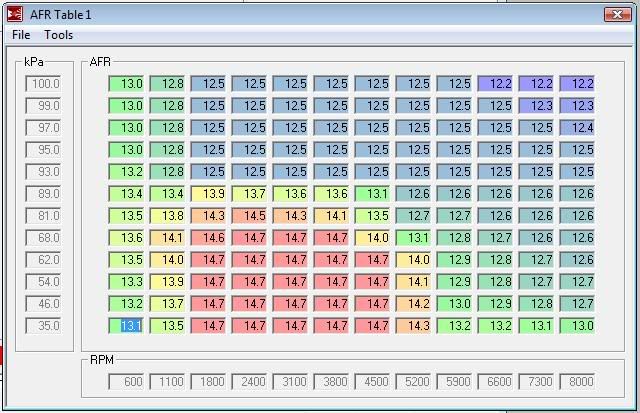
Air Fuel Ratio Table
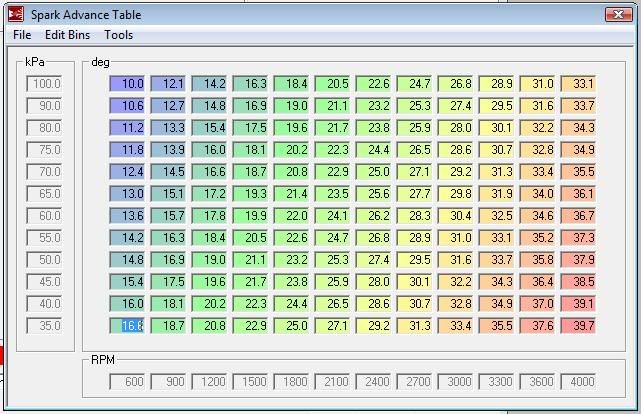
Image
Spark Advance Table

Assessment So Far

Two words: Awesome!

While I wouldn't say the tuning is perfect yet, and there are still some low-speed stumbling going on, it's better! The engine has far more torque than before. The ITB's are freaking loud. It's a very different beast to drive, you need to be much more gentle on the throttle - it's hard to be smooth at low speeds (I may need to build a more "progressive" throttle wheel).

I love the ability to tweak the tables and see improvement. I'm a tweaker and a control-freak, and this is candy for me. It will be interesting to see how this progresses.

Image

Image

_________________
The Lethal Locost
The Lethal Locost 2 - Even More Lethalerer


Top
 Profile  
Reply with quote  
PostPosted: March 20, 2009, 6:08 pm 
Offline
User avatar

Joined: April 11, 2006, 10:27 pm
Posts: 569
Location: Murfreesboro TN
Good job Skinny. It will be interesting to hear the difference in sound in you videos. :cheers:

_________________
Graham,
www.earleymotorsports.com


Top
 Profile  
Reply with quote  
PostPosted: March 21, 2009, 1:29 pm 
Offline
User avatar

Joined: January 7, 2007, 3:24 pm
Posts: 682
Location: Visalia, Ca
Nice write up, can't wait to finish my Megasquirt install, hopefully this fall. I might need to ask you some questions later :lol:

Rod

_________________
Driving a +442E with 450 Hp Ford 347 v8, T5, 8 stack EFI w/EDIS8 & MegaSquirt ITB Mode.
12,000+ enthusiastic miles as of 1/1/11
http://www.youtube.com/watch?v=jqvYJlYc4GU
http://s124.photobucket.com/albums/p3/beergodrod/
Now building a 1953 Chevy 1 ton panel with Frito Lay truck parts and a Cummins 4BTA
and a 1963 Nova SS


Top
 Profile  
Reply with quote  
PostPosted: March 22, 2009, 4:51 pm 
Offline
Automotive Encyclopedia
User avatar

Joined: December 22, 2006, 2:05 pm
Posts: 8044
Love the details. Thanks for sharing. I have the innovate LC1 also.

_________________
Miata UBJ: ES-2074R('70s maz pickup)
Ford IFS viewtopic.php?f=5&t=13225&p=134742
Simple Spring select viewtopic.php?f=5&t=11815
LxWxHt
360LA 442E: 134.5x46x15
Lotus7:115x39x7.25
Tiger Avon:114x40x13.3-12.6
Champion/Book:114x42x11
Gibbs/Haynes:122x42x14
VoDou:113x44x14
McSorley 442:122x46x14
Collins 241:127x46x12


Top
 Profile  
Reply with quote  
PostPosted: March 29, 2009, 11:07 pm 
Offline

Joined: September 15, 2007, 6:12 pm
Posts: 56
Location: Burlington,Ontario
Looks great Skinny

I'm Doing pretty much what you are doing, I have a 4age with 20v ITB and building a megasquirt for it but I had it running in the donnor car before I removed it, had it running with a map conversion and jap computer, didn't tune it or even try, just wanted to make sure I had it all hooked up right, It did sound ausume but did run very ruff at low rpms.

Anyhow I have a question, how do you have your map sensor vacuum hooked up and where ?, one from each throttle body then Tee'ed to gether ? or from the intake tubes ?,
why I asked is because I have been told that the vacuum should be taken as close to the head as possible in each intake runner then run to a vacuum tank then a sepreate vacuum line run from tank to the map sensor, was told that if this was not run to a vacuum tank the map would have a very eractic reading as it would read pulses and not run smooth at low rpms, the vacuum tank would equalize the pulses, hope this makes sense and I am only going by what I was told by someone else from club 4ag and thought if you had not done this that it may help with your tunning as I will be following right behind you, and thanks for your web site, can't count how many time I go to it for referance.
Thanks John
John


Top
 Profile  
Reply with quote  
Display posts from previous:  Sort by  
Post new topic Reply to topic  [ 61 posts ]  Go to page Previous  1, 2, 3, 4, 5  Next

All times are UTC - 5 hours [ DST ]


Who is online

Users browsing this forum: No registered users and 3 guests


You cannot post new topics in this forum
You cannot reply to topics in this forum
You cannot edit your posts in this forum
You cannot delete your posts in this forum
You cannot post attachments in this forum

Jump to:  
POWERED_BY