Yes I've looked at Racer Al's - fantastic build. I am going to try a build those windshield wiper ferrules from aluminum tube, after all my labor is cheap right?
I made templates from construction paper for the side panels. Must be doing something right, the template I made for the PS fit perfectly on the DS. Traced the pattern on the aluminum sheet using the factory straight edge for the top of the side panel, that way if my bottom cut was a bit wavey who would see it underneath the car? I marked the bottom of the panel for the 2" rivet spacing and center puched the marks. Clamped panel to the table with my 3/4" x 1 1/2" boards and bent the bottom 90* using the edge of the table. Now metal bent against a 90* will not stay at 90* because of spring back. A few posts back I said I was using a sacraficial 1\8" ply sheet on my build table. I extend this sheet 1/8" over the edge of the table an over bend the 90* which will then spring back to 90*. Without doing this you will find the side panel will want to bow away from the frame, you don't want that, you want the panel to come up against the space frame tubes. I also pre bent the panel where the frame transitions at the scuttle to prevent it from bowing away from the frame. Clamped the panel on the frame, made sure its tight to the frame on the bottom and drilled and cleco'd it in place, you can see I used a lot of clamps on the top to prevent panel distortion..
Attachment:
IMG430.jpg
Then I clamped the panel with my boards at the top of the space frame.
Attachment:
IMG431.jpg
Then using my hands I start the aluminum bend by bending it a bit at a time going down the panel.
Attachment:
IMG433.jpg
Then I use my homemade tool that has leather on it so it doesn't mark the aluminum and my soft plastic head mallet and going a few inches at a time beat it down a bit at a time, this usually take 6 - 8 passes along the length of the panel thats being bent. This gives you a nice uniform corner that you will be proud of.
.
Attachment:
IMG434.jpg
I then mark the top rivet holes, center punch them, drill and cleco. Once I'm happy with the fit I remove the sheet to clean the backside of the holes and overbend the top 90* bend on the build table (I must add that while the sheet was still flat before any work was done to it, I overhung the top edge by 1/8" on the build table and put a bit of a bend on it. This makes the cut edge flush to the frame when it's bent at 90*) . Using aluminum color caulking I caulk the side of the frame to seal the panel to the frame, prevent "oil canning", and eliminate squeeks. I installed the panel top first using cleco's then push the bottom into place then cleco it down. Now the fun part, rivet the panel in place with stainless steel rivets, very relaxing and satisfying results.
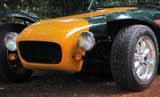
Of course I had to hang the rear fenders on and put the scuttle in place for the photo shoot.
Attachment:
IMG435.jpg
Attachment:
IMG436.jpg
I just thought I would give you an account of my learning curve working with this aluminum (I've used 6061-T6 on my plane, but it was a lot lighter gauge and stiffer). This is my first time working with .040" as body panels on a car and this is what works for me and I am very satified with the results.