LocostUSA.com

Learning how to build Lotus Seven replicas...together!
It is currently April 16, 2024, 12:04 am

All times are UTC - 5 hours [ DST ]


Post new topic Reply to topic  [ 634 posts ]  Go to page Previous  1 ... 5, 6, 7, 8, 9, 10, 11 ... 43  Next
Author Message
 Post subject: Re: Nick's MGB Build
PostPosted: April 28, 2012, 11:06 am 
Offline
User avatar

Joined: July 4, 2006, 5:40 pm
Posts: 1994
Location: Novato, CA
Thanks, I appreciate the comments. My SO has a job that takes her out of town one week a month. Those are the weeks most of the progress is made.


Top
 Profile  
Reply with quote  
 Post subject: Re: Nick's MGB Build
PostPosted: April 28, 2012, 11:21 pm 
Offline

Joined: October 19, 2009, 9:36 pm
Posts: 2199
Location: meadview arizona
beftore i started my build, i had an m.g. for a potential donor but it was so far gone i sold it.

looking good now the tubes are comming together!

the welding tips thing, try using the next size up tip, also you may have the feed too slow for the amps.

does the tip protrude from the nozzle, if it does find a longer nozzle, the tip shoul be level or just inside the nozzle.

what is your gas delivery rate, 11 litres per min is a good starter.

_________________
this story shall the good man teach his son,
and chrispin chrispian shall ne'er go by,
from this day to the end of the world.
but we in it shall be remembered.


Top
 Profile  
Reply with quote  
 Post subject: Re: Nick's MGB Build
PostPosted: April 29, 2012, 9:54 pm 
Offline
User avatar

Joined: July 4, 2006, 5:40 pm
Posts: 1994
Location: Novato, CA
The tip is recessed, about 1/8" inside the nozzle, and the wire feed rate is determined for me by the Miller 140. All the welding issues are my own.


Top
 Profile  
Reply with quote  
 Post subject: Re: Nick's MGB Build
PostPosted: April 30, 2012, 10:10 pm 
Offline
User avatar

Joined: October 24, 2008, 2:13 pm
Posts: 5326
Location: Carlsbad, California, USA
nick47 wrote:
The tip is recessed, about 1/8" inside the nozzle, and the wire feed rate is determined for me by the Miller 140. All the welding issues are my own.


I have the same welder and like it a lot. I did try out the auto selection mode, but wasn't happy with the penetration in some cases. My chassis is a mix of steel gauges. You seem like a pretty fastidious guy and you may want to try welding some scrap pieces of your chassis material (if you already haven't) that are small enough to let you look underneath and see how well you penetrated. Some simple T-joints are good to do.

You may be fully satisfied with the results, but if not, now is a good time to experiment and find something you're confident in before you actually weld up the chassis.

Cheers,

_________________
Damn! That front slip angle is way too large and the Ackerman is just a muddle.

Build Log: viewtopic.php?f=35&t=5886


Top
 Profile  
Reply with quote  
 Post subject: Re: Nick's MGB Build
PostPosted: April 30, 2012, 11:33 pm 
Offline
User avatar

Joined: July 4, 2006, 5:40 pm
Posts: 1994
Location: Novato, CA
Thanks Lonnie. I'm actually pretty happy with the welder. I spent the first week with it doing nothing but practice welds and cutting welds apart. Penetration varied a lot, but seemed to be best with a really short stickout and a vertical angle, almost like you're forcing the wire in there. The book that came with the welder said 3/8" to 1/2" stickout, but I try to keep it closer to 1/4". In fillets the nozzle is somtimes right up against the work. I think if anything the nozzle could be a little shorter.

I never thought of not using the autoset feature. I figured Miller knows way more than I do. But I'd like to try experimenting with a slightly slower wire feed. I always feel like I'm being rushed to keep the torch moving. Not sure if it'll help, but it can't hurt to try. I've got lots of scraps.


Top
 Profile  
Reply with quote  
 Post subject: Re: Nick's MGB Build
PostPosted: May 1, 2012, 9:10 am 
Offline
User avatar

Joined: January 2, 2009, 1:45 pm
Posts: 1320
Location: Halifax, Nova Scotia
Nick,

I'm no welder but I've seen sites such as Welding Tips and Tricks ( http://www.weldingtipsandtricks.com/index.html ) the suggest that any recessing of the tip relative to the nozzle makes for more difficult welding. This would seem to be consistent with your need for such close proximity to the work, and reduced stick-out relative to the Miller recommendation.

Again, there are a number of forum members who are expert welders who could offer more reliable advice than I - and I can't claim that Welding Tips and Tricks is the gospel, based on my limited experience.

_________________
Warren
Isuzu Pickup/SR20DE, +401 COLD frame
Build Log: viewtopic.php?f=35&t=11601


Top
 Profile  
Reply with quote  
 Post subject: Re: Nick's MGB Build
PostPosted: May 1, 2012, 9:48 am 
Offline
User avatar

Joined: October 24, 2008, 2:13 pm
Posts: 5326
Location: Carlsbad, California, USA
Warren Nethercote wrote:
Nick,

I'm no welder but I've seen sites such as Welding Tips and Tricks ( http://www.weldingtipsandtricks.com/index.html ) the suggest that any recessing of the tip relative to the nozzle makes for more difficult welding. This would seem to be consistent with your need for such close proximity to the work, and reduced stick-out relative to the Miller recommendation.

Again, there are a number of forum members who are expert welders who could offer more reliable advice than I - and I can't claim that Welding Tips and Tricks is the gospel, based on my limited experience.


I think personal welding style is a factor too. I don't recess the filler wire, but do cut it off as close to the end of the gun as possible. That means just laying the face of welding pliers right on the torch tip and cutting. I'd say that leaves 1/4" usually. The short wire gives me a little more time to react and get ready before the arc starts. Also, I think it gives a little better gas flow into the joint at start-up. I produce better welds using the shorter stickout.

There are definitely situations in which I've felt rushed by the wire speed too. After having to grind off a large excess of filler metal from the auto settings, I really was motivated to experiment with voltage and wire speed. It's worth trying because how quickly you move and the type of bead pattern you like to make may require adjustments to speed and/or voltage.

Cheers,

_________________
Damn! That front slip angle is way too large and the Ackerman is just a muddle.

Build Log: viewtopic.php?f=35&t=5886


Top
 Profile  
Reply with quote  
 Post subject: Re: Nick's MGB Build
PostPosted: May 8, 2012, 12:23 am 
Offline
User avatar

Joined: July 4, 2006, 5:40 pm
Posts: 1994
Location: Novato, CA
I thought I should post an update since it's been awhile. I spent the last two weeks doing pretty much only welding. And painting A-arms in anticipation of getting the suspension on someday. Welding the frame has turned out to be a lot of work. The good news is, my welding has improved to the point where I no longer wince when I see the completed bead. That's partly because I've got the torch motion figured out, and mostly because I no longer flip my helmet up between welds.

I also added the rear section of the frame, but not the bent tubes because I tried bending a tube using the vise method and failed miserably. So I need to work that out somehow. The other day I noticed that the reading lamps in the living room are made from steel tubes with a nice bend at the top, about a 6" radius. Unfortunately I made the mistake of noticing this out loud, so if the lamps were to suddenly disappear in the next week or two I'm sure I'd get the blame.

Image

Image

Image

Image

In my original plan, I figured three days to fully weld the chassis. Shows how much I know.


Top
 Profile  
Reply with quote  
 Post subject: Re: Nick's MGB Build
PostPosted: May 8, 2012, 7:43 am 
Offline
We are Slotus!
User avatar

Joined: October 6, 2009, 9:29 am
Posts: 7651
Location: Tallahassee, FL (The Center of the Known Universe)
Quote:
That's partly because I've got the torch motion figured out, and mostly because I no longer flip my helmet up between welds.

:rofl: Ain't it the truth! I'm sure you've improved with practice, we all do...

Chassis and A-Arms are looking good! About those lamps- Watch the paper for coupons from "Bed Bath and Beyond" or "Pier 1 Imports" or something similar, perhaps you can get some new lamps and "Look what I got for our den, Honey!" Or Mother's Day presents, or... Well, you get the idea. Kinda cheesy, I know, but better than staging a fake burglary! :mrgreen:

:cheers:
JDK

_________________
JD, father of Quinn, Son of a... Build Log
Quinn the Slotus:Ford 302 Powered, Mallock-Inspired, Tube Frame, Hillclimb Special
"Gonzo and friends: Last night must have been quite a night. Camelot moments, mechanical marvels, Rustoleum launches, flying squirrels, fru-fru tea cuppers, V8 envy, Ensure catch cans -- and it wasn't even a full moon." -- SeattleTom


Top
 Profile  
Reply with quote  
 Post subject: Re: Nick's MGB Build
PostPosted: May 8, 2012, 11:40 am 
Offline
User avatar

Joined: October 24, 2008, 2:13 pm
Posts: 5326
Location: Carlsbad, California, USA
Nick,

Martin Coghill did a very nice job on his Locost bending the tubes by hand with an inexpensive tube bender from Home Depot. He laid the pattern out on the garage floor as I remember, and then bent to suit. I've seen it in person and it looks very good. I think there was a very tiny bit of crimping, but with the aluminum bodywork in place, you never see it. The curves themselves were very nice. It's going to be what I try first myself.

Look about in the middle of page 2 of his build log ==> viewtopic.php?f=35&t=8967&hilit=Martin%27s&start=15

Cheers,

_________________
Damn! That front slip angle is way too large and the Ackerman is just a muddle.

Build Log: viewtopic.php?f=35&t=5886


Top
 Profile  
Reply with quote  
 Post subject: Re: Nick's MGB Build
PostPosted: May 25, 2012, 2:13 am 
Offline
User avatar

Joined: July 4, 2006, 5:40 pm
Posts: 1994
Location: Novato, CA
Over the past two weeks I've gotten the frame almost all welded up, including adding the FU tubes, the rear shock support gussets, and the last of the diagonals. I still haven't figured out what to do about bending the round tubes in back, but it looks from all angles like I don't have to worry about that for some time. One thing I'm tempted to do is add a diagonal across the nose, but it looks like it might be tricky to get the torch in there. Maybe there's another way.

I built some jigs to position the suspension brackets, and I'm planning to tack them in place this weekend. The front jig aligns the brackets at a 5 degree angle, which is the only way to build caster into the trunion-type M.G. front suspension. I'm using rubber bushings on the front suspension, and mixed rubber/rod ends in back. Pressing rubber bushings has to be one of the most difficult jobs. I haven't yelled or cussed or thrown things across the garage that much in a long time.

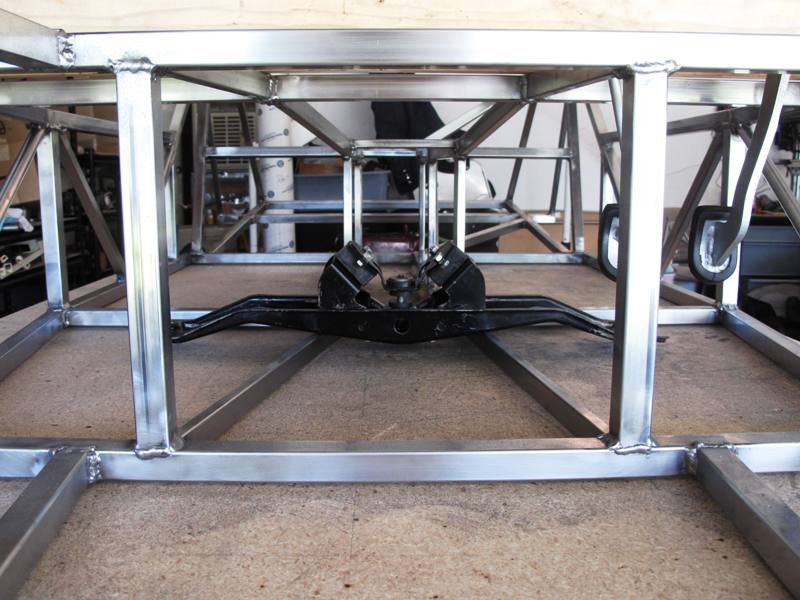
I had to modify the rear bulkhead, cutting out the O3 tube and the back of the tunnel, because the MGB rear axle is just too darn big. I never liked the welds on that section of the frame anyway. I thought the axle fit okay in my mock-up frame, but looking back I didn't actually fit it into the frame, just sort of set the frame on top of it. Modifying the frame turned out to be a good experience in the end, if only to prove to myself that nothing is really permanent and anything can be fixed.

Image

Image

Image

Image

Image

Image

Image


Top
 Profile  
Reply with quote  
 Post subject: Re: Nick's MGB Build
PostPosted: May 25, 2012, 7:56 am 
Offline
We are Slotus!
User avatar

Joined: October 6, 2009, 9:29 am
Posts: 7651
Location: Tallahassee, FL (The Center of the Known Universe)
Quote:
I haven't yelled or cussed or thrown things across the garage that much in a long time.


Yo, Nick!
Good to know that you're having a relaxing, fun time of things! :rofl:

The jig for mounting control arm brXckets* looks good, Bro!

About those brXckets-- If you make 'em just a bit wider than the ends of the arms, you can "fill in" with washers and give yourself some caster adjustment, if you wish. If you do that, use cone washers at the inner face, where washer meets control arm...

*Mustn't use that "B" word... :mrgreen:

Keep at it, things are looking great!
JDK

_________________
JD, father of Quinn, Son of a... Build Log
Quinn the Slotus:Ford 302 Powered, Mallock-Inspired, Tube Frame, Hillclimb Special
"Gonzo and friends: Last night must have been quite a night. Camelot moments, mechanical marvels, Rustoleum launches, flying squirrels, fru-fru tea cuppers, V8 envy, Ensure catch cans -- and it wasn't even a full moon." -- SeattleTom


Top
 Profile  
Reply with quote  
 Post subject: Re: Nick's MGB Build
PostPosted: May 25, 2012, 12:14 pm 
Offline

Joined: October 19, 2009, 9:36 pm
Posts: 2199
Location: meadview arizona
so the wife came home last night and said there was a spider on the ceiling and wouldn't go in the lounge, i said that is B'narde, she said Bernard and i said no, B'narde, he's from Quibec

the same can be used for the brackets, as in "Braque", but it needs the acent over the last e so it sounds like brackay.

turn up the amps till it burns through then add wire feed till it fills as quick as it welds, you are being too soft with the welding, i think you are trying to creep up on it, the welds are on the surface.

at least there is enough weld not to worry about it comming apart.

_________________
this story shall the good man teach his son,
and chrispin chrispian shall ne'er go by,
from this day to the end of the world.
but we in it shall be remembered.


Top
 Profile  
Reply with quote  
 Post subject: Re: Nick's MGB Build
PostPosted: May 25, 2012, 12:30 pm 
Offline

Joined: September 5, 2006, 11:00 pm
Posts: 769
Location: Columbia SC
I like the use of 1x1/2 in the tunnel. The originals had a piece of rolled sheet in an upside down U as I recall. Somebody here did FEA and found it was stiffer than a tube frame with riveted panels. Thought about doing that, but it restricts access to the tunnel.

_________________
Volvo 240/P1800 Based Locost
2004 Aprilia Mille Factory
1988 Volvo 240 5 Speed ( For Sale)
2002 Toyota Tacoma
1999 BMW M3


Top
 Profile  
Reply with quote  
 Post subject: Re: Nick's MGB Build
PostPosted: May 26, 2012, 2:50 pm 
Offline

Joined: January 31, 2008, 5:34 pm
Posts: 781
Location: SW Wes Consin
Trouble assembling rubber parts?
http://www.laddresearch.com/General_Cat ... rican.html
My boss turned me on to this stuff about 20 years ago. It's a miracle!


Top
 Profile  
Reply with quote  
Display posts from previous:  Sort by  
Post new topic Reply to topic  [ 634 posts ]  Go to page Previous  1 ... 5, 6, 7, 8, 9, 10, 11 ... 43  Next

All times are UTC - 5 hours [ DST ]


Who is online

Users browsing this forum: Google [Bot] and 22 guests


You cannot post new topics in this forum
You cannot reply to topics in this forum
You cannot edit your posts in this forum
You cannot delete your posts in this forum
You cannot post attachments in this forum

Jump to:  
POWERED_BY