LocostUSA.com

Learning how to build Lotus Seven replicas...together!
It is currently April 17, 2024, 10:02 pm

All times are UTC - 5 hours [ DST ]


Post new topic Reply to topic  [ 314 posts ]  Go to page Previous  1 ... 9, 10, 11, 12, 13, 14, 15 ... 21  Next
Author Message
 Post subject: Re: Martin's Locost 7 R1
PostPosted: July 29, 2015, 11:05 am 
Offline
User avatar

Joined: April 12, 2012, 11:56 am
Posts: 662
Location: Pemberton, BC
Thanks, Josh.
Yes, the bar is for mounting the handlebar switches. The R1 instrument cluster mounts in the center, while the auxiliary instruments will be in the center of the dash.
I used a 18 ga steel panel for the rear bulkhead for more strength (way overkill with a roll cage) but more so as a firewall.

_________________
Martin


My build log:
viewtopic.php?f=35&t=14520&start=0
My build video:
https://vimeo.com/143524140 password "matovid"


Top
 Profile  
Reply with quote  
 Post subject: Re: Martin's Locost 7 R1
PostPosted: July 31, 2015, 10:00 pm 
Offline
User avatar

Joined: October 24, 2008, 2:13 pm
Posts: 5326
Location: Carlsbad, California, USA
It's looking very clean and professional, Martin. I like your approach. I guess you have a lot of Cleco Pins from your aircraft build. What's the hoped-for target date for the first start-up?

Cheers,

Lonnie

_________________
Damn! That front slip angle is way too large and the Ackerman is just a muddle.

Build Log: viewtopic.php?f=35&t=5886


Top
 Profile  
Reply with quote  
 Post subject: Re: Martin's Locost 7 R1
PostPosted: August 1, 2015, 8:50 am 
Offline
User avatar

Joined: April 12, 2012, 11:56 am
Posts: 662
Location: Pemberton, BC
Thanks, Lonnie.
Clecos are handy, and it is nice to have a small bucket full. I'm hoping to have the engine in for a start up in the next few weeks. The body work is proving to take longer than anticipated; I just spent a week adjusting, fitting and filing. I must have had that hood (cowling) on and off dozens of times. Today should be the final day of this, and then I can finally start to prep the frame for painting.

_________________
Martin


My build log:
viewtopic.php?f=35&t=14520&start=0
My build video:
https://vimeo.com/143524140 password "matovid"


Top
 Profile  
Reply with quote  
 Post subject: Re: Martin's Locost 7 R1
PostPosted: August 4, 2015, 12:49 pm 
Offline
User avatar

Joined: October 24, 2008, 2:13 pm
Posts: 5326
Location: Carlsbad, California, USA
It's going to very exciting when you get that first start up, Martin. You've really got a number of unique and interesting features in the car too, including the bodywork. Also, I'm anxious to hear how your self-built header system sounds.

Cheers,

Lonnie

_________________
Damn! That front slip angle is way too large and the Ackerman is just a muddle.

Build Log: viewtopic.php?f=35&t=5886


Top
 Profile  
Reply with quote  
 Post subject: Re: Martin's Locost 7 R1
PostPosted: August 14, 2015, 6:42 pm 
Offline
User avatar

Joined: April 12, 2012, 11:56 am
Posts: 662
Location: Pemberton, BC
The frame is finally painted. A bear of a job, and no fun in any way, shape or form. When I painted my airplane frame, I swore never again, but clearly, I don't listen to my own advice.
With preparation (I used POR metal prep and sanded everything; that paint should stick like goose sh!t to a picnic blanket) it took me about 16 hours, but I am happy with the outcome. I painted it in two sessions, since the paint needs to cure for about a week, before re-coating. The first coat was focused on making sure that all tubes that will be hidden are done well, and a base coat for all the others. On the second coat, I could the focus on all the visible tubes and the roll cage, and gave those a nice finish.


You do not have the required permissions to view the files attached to this post.

_________________
Martin


My build log:
viewtopic.php?f=35&t=14520&start=0
My build video:
https://vimeo.com/143524140 password "matovid"


Top
 Profile  
Reply with quote  
 Post subject: Re: Martin's Locost 7 R1
PostPosted: August 15, 2015, 12:59 am 
Offline
We are Slotus!
User avatar

Joined: October 6, 2009, 9:29 am
Posts: 7651
Location: Tallahassee, FL (The Center of the Known Universe)
Quote:
that paint should stick like goose sh!t to a picnic blanket
:rofl: Yo, Martin! That's the first time I've heard that one! It ain't often that happens. Congratulations!

_________________
JD, father of Quinn, Son of a... Build Log
Quinn the Slotus:Ford 302 Powered, Mallock-Inspired, Tube Frame, Hillclimb Special
"Gonzo and friends: Last night must have been quite a night. Camelot moments, mechanical marvels, Rustoleum launches, flying squirrels, fru-fru tea cuppers, V8 envy, Ensure catch cans -- and it wasn't even a full moon." -- SeattleTom


Top
 Profile  
Reply with quote  
 Post subject: Re: Martin's Locost 7 R1
PostPosted: August 21, 2015, 3:22 pm 
Offline
User avatar

Joined: October 10, 2010, 10:26 am
Posts: 2044
Location: Guadalupe, CA
mgkluft wrote:
Thanks, Lonnie.
Yes the gear is part of my reverse system. You can just see the starter motor just below it. Because I'm using a two shaft drive line, I was able to do this, since the front shaft is stationary (ie. it does not move up or down with the axle). When in neutral, I will be able to engage the hi torque starter, thus driving the shaft in the opposite direction. The starter motor is mounted in the bottom of the tunnel, with some adjustment in all axis to get good engagement. I still don't know if it will work, but I'm getting close to testing it.
I talked to a drive line shop today, who felt that they should be able to balance it. We'll see.
BTW, the total cost is close to a Quaife reverse box, but I get to keep the TIG :yay:


.. (you weren't kidding Martin- you are getting close on this build :!: )

I've gone way back to page 9 because your reverse gear plan.. I saw you'd answered a new member's question about reverse solutions, and it's something I've never remedied on my own build.. Over these last few years I've just learned to get on without reverse, but if yours does end up working, it's a pretty elegant solution..

Having said that, how much machining did you have to do to the 1976 Skidoo Olympique gear to fit it to your driveshaft? Also, the high torque starter is from a what (SBC?)? How did you learn that the skidoo's teeth will mesh with your chosen starter's teeth? Finally, what is the OD of the Skidoo gear.. looks close to 6"?

Very, very clean build.. your tape measure is much more accurate than mine :lol:

Keep chipping away and she'll be humming in no time!

thanks-


--ccrunner

_________________
Dean

1972 Honda N600 Restomod "ccrunner's N600 VFR800 repower"

1963 Volvo P1800 Restomod
http://locostusa.com/forums/viewtopic.php?f=36&t=16309

1959 Berkeley SE492 Restomod...
viewtopic.php?f=36&t=19397

"ccrunner's 1960 MGA coupe Restomod" found on MGExp.com


Top
 Profile  
Reply with quote  
 Post subject: Re: Martin's Locost 7 R1
PostPosted: August 21, 2015, 4:18 pm 
Offline
User avatar

Joined: April 12, 2012, 11:56 am
Posts: 662
Location: Pemberton, BC
Thanks, ccrunner.
I came by that gear in a round about way. I had seen something similar on a UK site, but the cost of the gear and starter, plus shipping was prohibitive. http://www.abperformance.co.uk/products ... 37&scat=46 So I was looking on Ebay for just a gear (about 7 in diameter), and after much surfing saw a picture of this one. It looked like a good candidate, and for $ 20, there was not a lot of risk. If I couldn't use it, I could always sell it to a local SkiDoo enthusiast as shop wall decoration. It is from a '76 after all. Then I worked the starter motor backwards, after I learned that all SkiDoo starters use a 9 tooth bendix (IIRC); again, with the help of Ebay, I looked at a ton of starter motors, until I found one (yes, it is a HiTorque SBC). The bendix OD is within 50 thou of a SkiDoo model; so in theory it should work. Actually, I'll know within a few days. I'm that close.
The machining was not a big deal; I just had the center bored out to fit a matching stepped collar, which slips into the driveshaft tube on one end and the yoke on the other. This idea for a collar came from bobbeysr27; initially I was going to weld the gear onto the driveshaft tube, but the collar just provides much more material to weld to. With a good fit on the collar, welding the gear without distortion was a breeze.
If and when, you want to go that route, let me know. I have more pics and info. All of this is now of the top of my head, empty as it is.

_________________
Martin


My build log:
viewtopic.php?f=35&t=14520&start=0
My build video:
https://vimeo.com/143524140 password "matovid"


Top
 Profile  
Reply with quote  
 Post subject: Re: Martin's Locost 7 R1
PostPosted: August 23, 2015, 9:21 pm 
Offline
User avatar

Joined: April 12, 2012, 11:56 am
Posts: 662
Location: Pemberton, BC
Pulled some 400 rivets last weekend, and started the assembly process. The hard lines are all installed. Rear end and suspension are attached, and would be bolted, if numbnuts would have ordered fifty nuts instead of 5. :BH: 
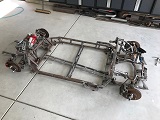
Started some real work on the harness and I'm happy how it is coming together. Other than lengthening the rear lighting, the front lighting, the horn and the fan wires, everything stays stock. I wanted the least disruption, so that the motor won't know that anything has changed. :D There will be a separate circuit for the electric reverse, but other than that, it is completely stock. Some creative routing and mounting (fuse block on the DS; main fuse, barometric probe and other relays on the PS, which is the rear of the bike; all near the battery) and bob's your uncle. Well, he's actually not my uncle, but I sure like his contributions. I never thought about pliers for the spring clamps (corbin clamps), and boy, do they work well. But that's for the next installment.
I hope to have the engine running by next weekend.


You do not have the required permissions to view the files attached to this post.

_________________
Martin


My build log:
viewtopic.php?f=35&t=14520&start=0
My build video:
https://vimeo.com/143524140 password "matovid"


Top
 Profile  
Reply with quote  
 Post subject: Re: Martin's Locost 7 R1
PostPosted: August 25, 2015, 9:43 am 
Offline
User avatar

Joined: October 24, 2008, 2:13 pm
Posts: 5326
Location: Carlsbad, California, USA
mgkluft wrote:
. . . . Rear end and suspension are attached, and would be bolted, if numbnuts would have ordered fifty nuts instead of 5. :BH:

. . . . Some creative routing and mounting (fuse block on the DS; main fuse, barometric probe and other relays on the PS, which is the rear of the bike; all near the battery) and bob's your uncle. . . .


Yeah, that numbnuts guy does some work on my build from time to time too. :mrgreen:

Barometric probe? Is this thing doubling as a weather station? What's up with that? You aviation guys! You're always up to something.

I'll tell you, Martin, your build just looks better and better. All your recent work is so clean. I'll keep my fingers crossed about the weekend start up. Just make sure that numbnuts guy doesn't check the oil level on the engine before you fire it up. :D

Cheers,

Lonnie

_________________
Damn! That front slip angle is way too large and the Ackerman is just a muddle.

Build Log: viewtopic.php?f=35&t=5886


Top
 Profile  
Reply with quote  
 Post subject: Re: Martin's Locost 7 R1
PostPosted: August 25, 2015, 1:25 pm 
Offline
User avatar

Joined: April 12, 2012, 11:56 am
Posts: 662
Location: Pemberton, BC
Thanks, Lonnie.
I can't take credit for that pressure sensor. That is all Yamaha. It actually has two, the second being in the airbox. I'm guessing, but the fuel ratio probably gets adjusted, based on the differential readings. After having read about the many trials and tribulations people had with wiring harnesses, I wanted to keep everything as close to stock as possible. So when I cut down the airbox, I re-mounted the intake air pressure sensor as close to its original location as I could. Even so, by removing the airbox, things will have changed significantly, and so I am also installing a Dobeck injection controller. This will allow me to adjust the mixture. Other electronic gadgets that I added are an EXUP valve cheater (an exhaust system valve that could not be used inside the new exhaust, and if disconnected, the engine light would stay on), a signal minder, that automatically cancels the turn signal, and a speedo healer, to account for the different gearing. Luckily, all those are plug and play, and don't require me to call the geek squad.

_________________
Martin


My build log:
viewtopic.php?f=35&t=14520&start=0
My build video:
https://vimeo.com/143524140 password "matovid"


Top
 Profile  
Reply with quote  
 Post subject: Re: Martin's Locost 7 R1
PostPosted: August 26, 2015, 10:56 am 
Offline
User avatar

Joined: October 10, 2010, 10:26 am
Posts: 2044
Location: Guadalupe, CA
....a signal minder, that automatically cancels the turn signal, and a speedo healer, to account for the different gearing. Luckily, all those are plug and play, and don't require me to call the geek squad.

Only jumping in to comment on these last bits.. I'm running a signal minder too, and just love it.. No forgotten signals left on, and a brake light strobe that gives me peace of mind (also emergency flashers and a fun wig-wag/parade mode feature).. I also have a speedo healer-- So nice to have an accurate speedo now :wink: .. you can almost infinitely adjust on it.. I've finally stopped playing with it and believe it's now giving me super-duper accurate feedback.. more fun things for you to play with as you breathe life into this thing in just a few days!!

:cheers:


--ccrunner

_________________
Dean

1972 Honda N600 Restomod "ccrunner's N600 VFR800 repower"

1963 Volvo P1800 Restomod
http://locostusa.com/forums/viewtopic.php?f=36&t=16309

1959 Berkeley SE492 Restomod...
viewtopic.php?f=36&t=19397

"ccrunner's 1960 MGA coupe Restomod" found on MGExp.com


Top
 Profile  
Reply with quote  
 Post subject: Re: Martin's Locost 7 R1
PostPosted: August 26, 2015, 11:24 am 
Offline
User avatar

Joined: April 12, 2012, 11:56 am
Posts: 662
Location: Pemberton, BC
Yes, to all of the above.
I especially like the strobe feature, since I installed a 3rd brake light on the roll bar.
However, I am installing another gadget....wait for it.....an electronic deer whistle. :shock: Not that that I'm related to the Duck Dynasty, but on the roads where I'll be travelling, we had several close encounters over the years in the mini van. It is also one of the reasons I went with a full cage.

_________________
Martin


My build log:
viewtopic.php?f=35&t=14520&start=0
My build video:
https://vimeo.com/143524140 password "matovid"


Top
 Profile  
Reply with quote  
 Post subject: Re: Martin's Locost 7 R1
PostPosted: August 30, 2015, 10:39 am 
Offline
User avatar

Joined: April 12, 2012, 11:56 am
Posts: 662
Location: Pemberton, BC
Decided to finish the panel (dash), so that I could start with the wiring. I was going to get the engine ready for starting, but I'm still waiting for a couple of small parts. Hopefully by the end of today it will be back in the frame and fully plumbed by next week.
I'm really appreciating the removable scuttle; all this extra work is now paying off. The panel to cover the front of the tunnel was originally to be riveted, but it makes more sense to have it removable as well. So I added a bunch of rivnuts. More work as usual. :BH:


You do not have the required permissions to view the files attached to this post.

_________________
Martin


My build log:
viewtopic.php?f=35&t=14520&start=0
My build video:
https://vimeo.com/143524140 password "matovid"


Top
 Profile  
Reply with quote  
 Post subject: Re: Martin's Locost 7 R1
PostPosted: August 30, 2015, 11:55 am 
Offline
User avatar

Joined: October 24, 2008, 2:13 pm
Posts: 5326
Location: Carlsbad, California, USA
That's an interesting texture on the aluminum, Martin. What is it and where did you get it?

I take it the pieces on the floor just behind your pedals are heel rests for your shoes?

Take car,

Lonnie

_________________
Damn! That front slip angle is way too large and the Ackerman is just a muddle.

Build Log: viewtopic.php?f=35&t=5886


Top
 Profile  
Reply with quote  
Display posts from previous:  Sort by  
Post new topic Reply to topic  [ 314 posts ]  Go to page Previous  1 ... 9, 10, 11, 12, 13, 14, 15 ... 21  Next

All times are UTC - 5 hours [ DST ]


Who is online

Users browsing this forum: No registered users and 34 guests


You cannot post new topics in this forum
You cannot reply to topics in this forum
You cannot edit your posts in this forum
You cannot delete your posts in this forum
You cannot post attachments in this forum

Jump to:  
POWERED_BY