LocostUSA.com

Learning how to build Lotus Seven replicas...together!
It is currently April 27, 2024, 1:25 am

All times are UTC - 5 hours [ DST ]


Post new topic Reply to topic  [ 387 posts ]  Go to page Previous  1, 2, 3, 4, 5, 6 ... 26  Next
Author Message
PostPosted: October 19, 2020, 10:52 am 
Offline
User avatar

Joined: March 19, 2011, 10:22 am
Posts: 2395
Location: Holden, Alberta, Canada
Spent some time in the shop cleaning the block and analyzing #5 cylinder issue. Could not see any visible cause either on the block or the head that would cause coolant to enter #5 cylinder other than the steel head gasket. In the pic of the block you can see #5 cylinder clearly. Honed the other cylinders. Backing up a bit with this story, this must have happened miles and miles ago because when I removed the head the eroded area was shiny like the rest of the cylinder surface area and there is no noticeable damage to the piston.
Attachment:
IMG_7789marked.jpg

Attachment:
IMG_7785.JPG


Took the time to check the valves, cleaned them, and sharpened them up. Every time I grind valves I remember my dad, who for a time worked as a parts man at my uncles Ford/Case/Versatile/New Holland dealership back in the late 50's. Said they used to charge 2 bits a valve and 2 bits a hole to do a valve grind job. So by grinding the valves myself so far I've saved $3 :rofl:
Attachment:
IMG_7784.JPG


rx7locost wrote:
Since I was doing the reassembly, they taught me how to carve the bearings to fit with a kitchen knife. Really! 20 years later, when the engine was fired up the first time, the oil pressure was great! Do you remember when mechanics used to knurl a used piston skirt to reduce piston slap?
Yes Chuck, knurling used pistons was standard repair practice when I was in Auto school. Had the pleasure of actually knurling a few myself. The big selling feature for knurling was "the knurl traps oil so the piston gets better lubrication", whether that's fact or not who knows but it did reduce piston to wall clearance. And I've also had the pleasure of carving newly installed cam brgs with a curved blade scalpel to get the cam to fit, it just takes finesse, time, and patience.
Bet people would gasp at such practices today.


You do not have the required permissions to view the files attached to this post.

_________________
Perry

'If man built it, man can fix it'
"No one ever told me I couldn't do it."
"If you can't build it safe, don't build it."

Perry's Locost Super Che7enette Build
Perry's TBird Based 5.0L Super 7 L.S.O
Perry's S10 Super 7 The 3rd
Perry's 4th Build The Topolino 500 (Little Mouse) Altered
Perry's 5th Build the Super Slant 6 Super 7
Perry's Final Build the 1929 Mercedes Gazelle


Top
 Profile  
Reply with quote  
PostPosted: October 19, 2020, 4:53 pm 
Offline
User avatar

Joined: July 17, 2008, 9:11 am
Posts: 6416
Location: West Chicago,IL
Well, I never knurled on myself. It looks like we might be brothers by a different mother with the practice of cam bearing carving by hand. :cheers:

That piston wall pitting wouldn't bother me if it were below the ring travel. But it looks like the damage is in the ring travel range. The other cyls look like a ridge or is it a corrosion ring?

_________________
Chuck.

“Any suspension will work if you don’t let it.” - Colin Chapman

Visit my ongoing MGB Rustoration log: over HERE

Or my Wankel powered Locost log : over HERE

And don't forget my Cushman Truckster resto Locostusa.com/forums/viewtopic.php?f=36&t=17766


Top
 Profile  
Reply with quote  
PostPosted: October 19, 2020, 7:32 pm 
Offline
User avatar

Joined: November 11, 2013, 4:47 am
Posts: 1630
Location: No. Nevada
Seems to me that new minimum oversize pistons would be preferable to a sleeve and %? taper remaining in the other cylinders.
Sleeves are not cheap and thermal conductivity is sometimes an issue.

_________________
If I must be a one-man PC free zone, so be it!


Top
 Profile  
Reply with quote  
PostPosted: October 19, 2020, 8:04 pm 
Offline
User avatar

Joined: March 19, 2011, 10:22 am
Posts: 2395
Location: Holden, Alberta, Canada
rx7locost wrote:
The other cyls look like a ridge or is it a corrosion ring?
That's the top ring reversal area of the cylinder. I've honed many blocks from 3.5hp lawnmower engines to 2600hp engines that had not been honed extensively to remove the top ring reversal, never had an issue that I can recall. Yeah, about honing 2600hp V12 engine, 16.25" diameter cylinders, had to hang the huge hone/drill assembly from an overhead crane with several bungee straps. You would add or remove bungee straps till you had a good balance pushing the hone/drill into the cylinder and letting the bungees help you pull it up.
RichardSIA wrote:
Sleeves are not cheap and thermal conductivity is sometimes an issue.
Just talked to a engine shop today, quoted less than $200CAN ($120US) to bore and install sleeve, hone to OEM size, price of sleeve included. Sleeves on RockAuto for the Slant 6 are $22.79US a piece.

_________________
Perry

'If man built it, man can fix it'
"No one ever told me I couldn't do it."
"If you can't build it safe, don't build it."

Perry's Locost Super Che7enette Build
Perry's TBird Based 5.0L Super 7 L.S.O
Perry's S10 Super 7 The 3rd
Perry's 4th Build The Topolino 500 (Little Mouse) Altered
Perry's 5th Build the Super Slant 6 Super 7
Perry's Final Build the 1929 Mercedes Gazelle


Top
 Profile  
Reply with quote  
PostPosted: October 19, 2020, 10:15 pm 
Offline
User avatar

Joined: November 11, 2013, 4:47 am
Posts: 1630
Location: No. Nevada
New pistons, https://www.summitracing.com/parts/slp- ... make/dodge

$95.00 - $125.00 depending on choice.

_________________
If I must be a one-man PC free zone, so be it!


Top
 Profile  
Reply with quote  
PostPosted: October 20, 2020, 12:38 am 
Offline
User avatar

Joined: March 19, 2011, 10:22 am
Posts: 2395
Location: Holden, Alberta, Canada
RichardSIA wrote:
$95.00 - $125.00 depending on choice.
Richard you must remember I live north of the 49th. That means no free shipping to Canada, that means us Canadians get raped at the border for duty and customs fees which usually increases the purchase 40-80%. I can buy pistons in Canada for $106US with free shipping, but I don't need them. Thanks for the info though.

_________________
Perry

'If man built it, man can fix it'
"No one ever told me I couldn't do it."
"If you can't build it safe, don't build it."

Perry's Locost Super Che7enette Build
Perry's TBird Based 5.0L Super 7 L.S.O
Perry's S10 Super 7 The 3rd
Perry's 4th Build The Topolino 500 (Little Mouse) Altered
Perry's 5th Build the Super Slant 6 Super 7
Perry's Final Build the 1929 Mercedes Gazelle


Top
 Profile  
Reply with quote  
PostPosted: October 23, 2020, 9:04 pm 
Offline
User avatar

Joined: March 19, 2011, 10:22 am
Posts: 2395
Location: Holden, Alberta, Canada
Small update - block is in at engine machine shop to bore and install sleeve in #5 cylinder. Received 75% of the overhaul parts for the engine.

_________________
Perry

'If man built it, man can fix it'
"No one ever told me I couldn't do it."
"If you can't build it safe, don't build it."

Perry's Locost Super Che7enette Build
Perry's TBird Based 5.0L Super 7 L.S.O
Perry's S10 Super 7 The 3rd
Perry's 4th Build The Topolino 500 (Little Mouse) Altered
Perry's 5th Build the Super Slant 6 Super 7
Perry's Final Build the 1929 Mercedes Gazelle


Top
 Profile  
Reply with quote  
PostPosted: October 27, 2020, 12:57 pm 
Offline
User avatar

Joined: August 27, 2005, 1:04 am
Posts: 1414
Location: Kamloops, BC, Canada
JackMcCornack wrote:
RichardSIA wrote:
So far as I know piston off-set is used to reduce thrust side wear.
Yes, and that's as far as I know too. That said, if a V8 has pistons with valve relief cutouts, then to reduce thrust wear, the offset is positioned so the force of the piston during combustion is more closely aligned with the direction of the rod. The 'up' side of the pistons will have the cutout for the intake valve(s) and the 'down' side of the pistons will have the cutout for the exhaust valve(s), so if there's a piston pin offset, it will be offset one way (relative to the valve cutouts) on half the pistons and the opposite way on the other half. Or so it seems to me. My guess is that V8 engines don't generally use wrist pin offsets, or I'd have run across this before.

Some of the old Ford 429's used left and right bank pistons for this reason. I don't remember for sure, but I think it was the 429 Super Cobra Jet and 429 police interceptor that did this.
Kristian

_________________
V6 in a book frame build. Now registered.
viewtopic.php?f=35&t=7587
viewtopic.php?f=33&t=18172


Top
 Profile  
Reply with quote  
PostPosted: October 27, 2020, 8:45 pm 
Offline
User avatar

Joined: March 19, 2011, 10:22 am
Posts: 2395
Location: Holden, Alberta, Canada
Felt kind of lazy, went out to the shop today, swept the floor, scratched a bit. Then I thought, this would be a good day to figure out the mathematical question I need to figure out on my ice cream cruiser builds. I set about brain figurin' the measurement for the technical term I refer to as 'arsefitment measurement'. Now the reason for this measurement is that I want comfort, I'm not sitting in this 7 for a couple minute run (NOT like there's anything wrong with that), yes I can still get in a car like a pretzel, but now a days I can't unfold from a pretzel. There's a joke about that I'll post on the joke thread, remind me.
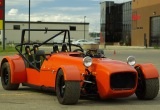
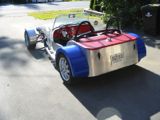
To accomplish this I mocked up the diff, old drums, wheel spacers (from experience building the TBird 7) and wheels. to me this is the most important part of a non book build, it determines frame width.
I installed the old drums, then bolted on the 1 1/2" spacers.
Attachment:
IMG_7832.JPG

Attachment:
IMG_7831.JPG

Then bolted on the wheels.
Attachment:
IMG_7834.JPG

Then I proceeded figurin' and scratchin. Measurement between the tire sidewalls = 54 1/2". Then I measured pinion offset = 1", so centreline of pinion on PS = 26 1/4" and DS = 28 1/4".
So because of the massive HP (weight) of this build I'm opting to use 1 1/4" x .100" sq tube for the frame like the TBird 7. So considering a generous gap of 1/2" space between the diff yoke and the inner tunnel (I'm using 3/4" sq tube for the tunnel), I figured on an 8" wide tunnel which centers it considering the pinion offset.
I'm giving myself 3/4" between the sidewall of the tire and the outside of the frame, so 54 1/2" - (3/4" + 3/4") = 53" outside wide frame. So take 53" and subtract the tube size (1 1/4" x 2) you get 51 1/2" width inside the office. Now remember the 8" wide tunnel, I split 51 1/2" to get 25 3/4", then split the tunnel (8"/2=4"), subtract 4" from 25 3/4" = 21 3/4". Take away 1 3/4" for some wiggle room and I get an 'arsefitment measurement' of 20". That's the width of the bucket seats for this ice cream cruiser.
Didn't use a computer program or an App, just the old noodle, measuring tape, pen and paper. NOT that there's anything wrong with computer programs and App's.
Hopefully this info will help you on your 'arsefitment measurement' on your builds :rofl:


You do not have the required permissions to view the files attached to this post.

_________________
Perry

'If man built it, man can fix it'
"No one ever told me I couldn't do it."
"If you can't build it safe, don't build it."

Perry's Locost Super Che7enette Build
Perry's TBird Based 5.0L Super 7 L.S.O
Perry's S10 Super 7 The 3rd
Perry's 4th Build The Topolino 500 (Little Mouse) Altered
Perry's 5th Build the Super Slant 6 Super 7
Perry's Final Build the 1929 Mercedes Gazelle


Top
 Profile  
Reply with quote  
PostPosted: October 28, 2020, 1:20 am 
Offline
User avatar

Joined: March 19, 2011, 10:22 am
Posts: 2395
Location: Holden, Alberta, Canada
Out to the shop after supper. Friend brought his Dodge Nitro over, slow leak on the RF tire. Popped it off the rim, cleaned the rim, brushed on some bead seal, mounted and installed back on Nitro. Noticed trans fluid dripping on the floor. R&R batt, air box, coolant/windsheild reservoir, and grill assembly. Installed 2 new o-rings on the lines to the trans cooler. Hour later we were drinking debriefing fluid (him beer me rum), all is good.
That was payment for some parts he brought for me.
After he left, back to the build. Cleaned up the front spindles earlier. I like to use a TRE as a top BJ. Problem: tapered hole is too large for the TRE I plan on using.
Attachment:
fullsizeoutput_12b7.jpeg

Just happens a 3/8 NPT tap fits nicely in the hole, cut a few threads for the next step.
Attachment:
IMG_7836.JPG

Lock tight, and screw in nipple to refusal. The nipple is the part that was brought out tonight.
Attachment:
IMG_7837.JPG

Attachment:
IMG_7838.JPG

Then trimmed the nipple flush.
Attachment:
IMG_7839.JPG

Run a 1/2" drill through to prepare for reaming. Then reamed to size.
Attachment:
IMG_7840.JPG

Attachment:
fullsizeoutput_12b9.jpeg

Once reamed test fir TRE to spindle.
Attachment:
fullsizeoutput_12b8.jpeg

Attachment:
IMG_7844.JPG

This is the reamer used.
Attachment:
fullsizeoutput_12ba.jpeg

And thats the locost way to resize a large tapered hole


You do not have the required permissions to view the files attached to this post.

_________________
Perry

'If man built it, man can fix it'
"No one ever told me I couldn't do it."
"If you can't build it safe, don't build it."

Perry's Locost Super Che7enette Build
Perry's TBird Based 5.0L Super 7 L.S.O
Perry's S10 Super 7 The 3rd
Perry's 4th Build The Topolino 500 (Little Mouse) Altered
Perry's 5th Build the Super Slant 6 Super 7
Perry's Final Build the 1929 Mercedes Gazelle


Top
 Profile  
Reply with quote  
PostPosted: October 31, 2020, 9:07 pm 
Offline
User avatar

Joined: March 19, 2011, 10:22 am
Posts: 2395
Location: Holden, Alberta, Canada
Spent a bit of time in the shop cleaning the head.
Attachment:
IMG_7855.JPG

Don't know if I'm getting older or if 6 cylinder heads are getting heavier. :?
Then set up to grind the seats.
Attachment:
IMG_7857.JPG

Attachment:
IMG_7861.JPG

Attachment:
IMG_7859.JPG


You do not have the required permissions to view the files attached to this post.

_________________
Perry

'If man built it, man can fix it'
"No one ever told me I couldn't do it."
"If you can't build it safe, don't build it."

Perry's Locost Super Che7enette Build
Perry's TBird Based 5.0L Super 7 L.S.O
Perry's S10 Super 7 The 3rd
Perry's 4th Build The Topolino 500 (Little Mouse) Altered
Perry's 5th Build the Super Slant 6 Super 7
Perry's Final Build the 1929 Mercedes Gazelle


Top
 Profile  
Reply with quote  
PostPosted: November 1, 2020, 12:51 am 
Offline
User avatar

Joined: December 24, 2007, 5:11 am
Posts: 1307
Location: Seattle area
Not everybody has a valve grinder in their garage. Somehow it doesn't surprise me that you do.

Nice job!

_________________
Larry in Seattle


Top
 Profile  
Reply with quote  
PostPosted: November 1, 2020, 1:57 pm 
Offline

Joined: February 8, 2014, 10:47 pm
Posts: 781
Location: Cornelius OR
If you have a valve grinder in the garage, why are those valves not back cut?
Low lift flow is low hanging fruit and pays off well.

Image

The lip on the back of the valve is killing low lift flow.
Use lapping compound to define the seat area, then cut off the lip at an angle between the seat angle and the angle of the back of the valve, down close to the seat area.

_________________
Honey anyone?


Top
 Profile  
Reply with quote  
PostPosted: November 1, 2020, 2:44 pm 
Offline

Joined: January 8, 2020, 4:46 am
Posts: 127
Interest build. Those slat 6 motors are about indestructible. And you can get good power out of them. Look forward to following this build..... :D

Spike


Top
 Profile  
Reply with quote  
PostPosted: November 1, 2020, 3:04 pm 
Offline
Mid-Engined Maniac

Joined: April 23, 2006, 8:26 pm
Posts: 6421
Location: SoCal
My dad's '69 Dodge Dart had 225,000 miles on it when, half way home hauling a load of bricks in the trunk, the automatic transmission let go in a big way (hole through the case). Other than than, who knows how long that engine would have kept going.

_________________
Midlana book: Build this mid-engine Locost!, http://midlana.com/stuff/book/
Kimini book: Designing mid-engine cars using FWD drivetrains
Both available from https://www.lulu.com/


Top
 Profile  
Reply with quote  
Display posts from previous:  Sort by  
Post new topic Reply to topic  [ 387 posts ]  Go to page Previous  1, 2, 3, 4, 5, 6 ... 26  Next

All times are UTC - 5 hours [ DST ]


Who is online

Users browsing this forum: No registered users and 33 guests


You cannot post new topics in this forum
You cannot reply to topics in this forum
You cannot edit your posts in this forum
You cannot delete your posts in this forum
You cannot post attachments in this forum

Jump to:  
POWERED_BY