The engine is back together again. I had a few mis-steps but nothing insurmountable. I did have one "huh?" moment. The oil o-ring between the front iron and the alloy front housing had 2 designs. Things didn't look right on Saturday so I went to the net and found a link to Mazdatrix notes on assembly. Unfortunately their site was unavailable on Sat so I couldn't see the details. Sunday I found the site was up but I couldn't follow their instructions. The correct o-ring for an S5 is supposed to have a Teflon ring surrounding it to help support it from blowing out from high oil pressure. But I must have an earlier front housing that had a smaller counter bore and couldn't fit the Teflon ring. The Mazdatrix site said to just use the o-ring and to eliminate the thick gasket. But if I used the o-ring supplied, it was sloppy in the hole and too thick to use without the gasket. I ended up running out and getting an o-ring that fit well and had the right amount of "Squish" if I replaced the thick paper gasket with Ultra Grey silicone sealant.
I used an 80/20 STP/oil mix as an assembly lube. I have had good success in the past using this. I had used straight STP years ago on a rebuild of my MGA engine. That engine sat for about 20 years before firing up.
I did have one problem on one rotor. After installing the side seals and corner seals, I assembled the rotor to the iron, Everything was fin until I tried to install the apex seal. One of the corner seals had rotated and I couldn't push the apex seal all the way down. I had to remove it and re-install the side seals etc. Other than that the engine block went together well. I was amazed at the "WHOOSH" sound when you turn the flywheel by hand.
I got the eccentric shaft trick done. I had to lap off the spacer by .001" to set the eccentric play to the minimum play.
I also found I had to assemble the water pump housing before installing the front pulley. If I had the pulley off the pulley hub, it probably wouldn't have been an issue. As I am writing this now, I think I could have separated the pulley from its hub instead of removing the hub. Oh well.
Had another problem that when I had everything together, before tightening up the front eccentric shaft bolt, you are supposed to tighten the bolt, then remove it and measure the distance from the shaft end to the pulley hub flange. This is a way to verify that you haven't slipped the Torrington bearing and trapped it with the spacer. Well I did it and the measurement was too much. It took me two tries to finally realize that I was checking it with the eccentric shaft in the vertical position. Every time I loosened the bolt, the shaft would drop about 1/16". Once I saw that, I lifted the eccentric shaft by hand and measured in spec. I realized I had it assembled right all along.
Most all of my faux pas were beginner’s mistakes. I know how to avoid them now. Actually, looking back on the re-assembly, it went amazingly smooth for being such a strange engine to me. Having one rebuild under my belt, I'm sure the second rebuild (heaven help me) would go much better. They say you are not an experienced rotary rebuilder until you rebuild the same engine for the 2nd time.
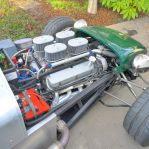
The engine/trans assembly is back in the car. From what I can tell, I am now back where I was before I tore it down for painting. All the hard brake lines and flex lines are made up, bent and in place. I should be able to fill it up with fresh brake fluid and bleed the system. Then I’ll check for leaks. Then I’ll attack the wiring!
Attachment:
rebuilt engine.JPG
Attachment:
rebuilt engine 2.JPG
Attachment:
brake lines 2.JPG
That is it for now. I’m still hoping to have a runner by the end of this year. But this rebuild delay has set me back.
_________________
Chuck.
“Any suspension will work if you don’t let it.” - Colin Chapman
Visit my ongoing MGB Rustoration log:
over HEREOr my Wankel powered Locost log :
over HEREAnd don't forget my Cushman Truckster resto Locostusa.com/forums/viewtopic.php?f=36&t=17766