LocostUSA.com

Learning how to build Lotus Seven replicas...together!
It is currently April 16, 2024, 1:27 pm

All times are UTC - 5 hours [ DST ]


Post new topic Reply to topic  [ 40 posts ]  Go to page 1, 2, 3  Next
Author Message
PostPosted: April 15, 2011, 3:03 am 
Offline

Joined: April 15, 2011, 2:44 am
Posts: 20
I started this project initially about 8 months ago. Due to an extremely limited budget (I left work when I started the design phase) I haven't moved past the initial design stage but the design is coming along nicely. Originally I had planned to run Aprilia RSV4 or Ducati 1198 running gear but the price of these meant it was a bit out of the question. The Ducati also doesn't lend itself to sitting low in a frame with a split case oil pan that looks quite difficult to modify. Anyway over the last 8 months I've learnt about Solidworks, started a TIG welding course and started to purchase the tools I'm going to need in order to make it happen. I'll be posting up lots more screenshots of my solidworks model, but here is where I started. These were my some of my later uprights and chassis. I thought what better place to start than the hardest bits to design. I'm now into my 17th design....

The car is designed to run in the Australia Group 2C or Supersports class although I will be in enough adjustability in order for the car to be able to run overseas if it were ever to become a sellable product.

I'm attaching here my very first designs. They are very basic and amateur but that's what learning is all about!

Enjoy and there will be more to follow.


You do not have the required permissions to view the files attached to this post.


Top
 Profile  
Reply with quote  
PostPosted: April 15, 2011, 11:49 am 
Offline
User avatar

Joined: November 12, 2008, 6:29 am
Posts: 3567
Forget trying to make one upright to suit 4 corners, too much compromise and will send you crazy. Your 3D should have a mirror option to make your left a right with one click surely?

I strongly suggest you use the same size wheels as F3's do in Oz as the far superior F3 tyre choice will improve you by multiple seconds at every track - thats why Mark Williams did so well there in the same class (1100cc Kawasaki powered Minetti (William's own brand) winning the Championship a few years back, nothing real special about the car in fact a Radical rip off but it was all about the tyres.

http://supersports.asn.au/Documents/SS%20Aug%2003.pdf

By the way, why are your spokes in the upright not triangulated rather than boxes?


Top
 Profile  
Reply with quote  
PostPosted: April 15, 2011, 12:28 pm 
Offline
User avatar

Joined: July 29, 2006, 9:10 pm
Posts: 3163
Location: Oregon, usually
cheapracer wrote:
I strongly suggest you use the same size wheels as F3's do in Oz...
And what size might that be? (Yes, I've googled)

_________________
Locost builder and adventurer, and founder (but no longer owner) of Kinetic Vehicles


Top
 Profile  
Reply with quote  
PostPosted: April 15, 2011, 5:04 pm 
Offline

Joined: April 15, 2011, 2:44 am
Posts: 20
I'll be posting up some more progress later today. As you mentioned I have gone for different uprights and i am using F3 wheels and tyres for that exact reason. I was just giving the readers some insight into my original thinking.


Top
 Profile  
Reply with quote  
PostPosted: April 15, 2011, 7:14 pm 
Offline
User avatar

Joined: July 17, 2008, 9:11 am
Posts: 6414
Location: West Chicago,IL
Jack, my Google found this on http://www.brspecialtuning.co.uk/Speedl ... ls.htm.....
I suspect they are the same size as Aussie F3?

Quote:
Type 2022 Formula 3
These wheels are currently the most popular wheel used in British F3.

Dallara fitment available in black, gold, silver and anthracite. Alternative PCD and offset available to special order - subject to minimum quantities.

9 x 13 - Dallara F3 front
10.5 x 13 - Dallara F3 Rear

Weights for these are nominally 3.5Kg for the 9 x1 3 and 3.95Kg for the 10.5 x 13.

They will also fit the 'Force' & 'DJ Racecars' Hillclimb and Sprint chassis.

Speedline Magnesium wheels are manufactured using a special HTC Cast Magnesium alloy.


_________________
Chuck.

“Any suspension will work if you don’t let it.” - Colin Chapman

Visit my ongoing MGB Rustoration log: over HERE

Or my Wankel powered Locost log : over HERE

And don't forget my Cushman Truckster resto Locostusa.com/forums/viewtopic.php?f=36&t=17766


Top
 Profile  
Reply with quote  
PostPosted: April 15, 2011, 11:42 pm 
Offline

Joined: April 15, 2011, 2:44 am
Posts: 20
Yep they're the same size as the F3 ones we run here. We also run the Khumo tyres.

Okay so below is a bunch more photos. After talking with my engineer friend this morning it looks like I'm going to have to redesign the front end/steering as there have been some mistakes made on my end, and although I love the complexity of the bodywork I really think I should be designing it so it's easier to make.

The suspension is double wishbones all round with pushrod activating coil-overs. The issue with the steering is because the top front wishbones lean back meaning when there is steering lock on the wheels are going to be doing some weird things.

I am still tossing up what to do with the final drive. I originally had planned to use the quaife buggy reversing unit (http://www.quaife.co.uk/shop/products/qba4r) which I still think I will, but I really wanted to do away with the chain. The quaife rear end in the radical is ideal but too $$$. Comes to about AUD$7000. That's more than the rest of the driveline. I can get the buggy unit for half that. A guy here in Australia has used the buggy unit with a belt drive, but I'll do some more research before making any decisions. The main thing for me at the moment is to get the suspension, steering, chassis and bodywork to a point where I'm happy and I think it'll be quite cost effective.


You do not have the required permissions to view the files attached to this post.


Top
 Profile  
Reply with quote  
PostPosted: April 15, 2011, 11:46 pm 
Offline

Joined: April 15, 2011, 2:44 am
Posts: 20
And now for the chassis and more mechanical bits.


You do not have the required permissions to view the files attached to this post.


Top
 Profile  
Reply with quote  
PostPosted: April 15, 2011, 11:53 pm 
Offline

Joined: April 15, 2011, 2:44 am
Posts: 20
Please note almost everything I have done to date will change. There are lots of parts that I dont like and that are just plain wrong, but I'm aware of this and plan to fix and learn along the way. Can't wait to hear responses (good and bad!)


Top
 Profile  
Reply with quote  
PostPosted: April 16, 2011, 2:06 am 
Offline
User avatar

Joined: April 26, 2008, 6:06 pm
Posts: 3268
Location: Under the weather. (Seattle)
First I've got to say those are some nice looking images! Your body styling does a great job showing the evolution of the design and your renderings just keep looking better. :cheers:

Second please note that what follows is merely an opinion coming from some schmuck who has what I would consider only a fairly basic understanding of aerodynamic principles from a variety of second hand sources, but minimal first hand experience in putting them to the test...So please take the following thoughts and opinions with a grain or two of salt:

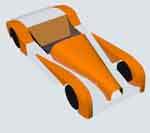
Now that being said, you seem to be pretty open to constructive criticism, so please don't take any of this negatively or personally. I really do think you've got a great start here, but wonder if it might be in need of some directional guidance. I also know that the body is certainly a work in progress, but I think that's the best place to start with what you've shown us, especially now while it's still in a continued state of flux. Unfortunately I see it moving more towards "function follows form" than the much preferable "form follows function". As you've already noted the complex body shape becomes more difficult to produce. Additionally while the aggressive curves give it an ultra-modern shape that appears to combine Formula1 funkyness in an LMP style package, by moving away from basic well known and relatively easy to follow aerodynamic principles you're more than likely hurting the aerodynamic performance of the car. Without the use of CFD, a wind tunnel, and extensive testing on countless body shape variations to finely tune the aerodynamics, such swoopy designs will more than likely only look fast compared to the competition.

Honestly, if I had to guess, I'd say that your "original" body would be the most aerodynamic. The nose appears to actually end higher than the rear bulkhead that spans the drivers and passengers shoulders and the angles on the bodywork don't promote flow separation.

The current design appears to be using the cockpit as a small parachute. I would either try to get the driver lower in the car, or at least raise the rearward section of the nose as it approaches the cockpit opening. Also if the cockpit is triangularly widening as it appears to be from the angles shown, then that is also likely promoting airflow into the cockpit...Think about an NACA duct shape designed to draw air into the opening. Basically only make the cockpit opening as big as it needs to be within the rules, or at worst within the confines of being snug without requiring the driver to be a contortionist. Since the open cockpit is one of the main drag inducing required parts of the bodywork, it should be minimized as much as possible.

I know you mention the lower area of the nose being problematic for airflow, but remember that probably the most important area for airflow to reduce drag is the trailing side of everything, not the leading side. Which brings me to the other glaring issue. Almost all of the trailing surfaces on your most recent design appear to be very aggressively sloped. Click here to see the latest Audi R15 LMP. Take particular note of the upper surfaces after both the front and rear tires. If Audi can't get the air to stick to a steeper angle than this, I would be skeptical that you can. The duck tail on the rear can be more aggressively done than the Audi has it, as seen on the Peugeot 908, however it also requires the trailing edge to have adequate kick up...and again to pull off the more challenging flow characteristics like the Peugeot 908 tail, will generally either take a lot of development ($$) or an even greater amount of luck.

Don't get me wrong either. I think the general shape continues to become more visually appealing with every iteration, and I do believe that with some modifications to the way it is implemented you could combine the general stylistic philosophy with more simple and and easily understood aerodynamic principles to create a car that hasn't lost what you've already put into it, but would also be more likely to be aerodynamically competitive. I look forward to watching your design ideas continue to evolve and improve.

I would strongly recommend going to Mulsanne's Corner and essentially clicking on every set of pictures, for every car, to read up on every technical note, so that you can learn as much as possible from those that do/did spend millions of dollars a year developing cars for this sport...and who still must continually make improvements to the aerodynamics and designs every year.

_________________
-Justin

"Orville Wright did not have a pilots license." - Gordon MacKenzie


Top
 Profile  
Reply with quote  
PostPosted: April 16, 2011, 3:02 am 
Offline

Joined: April 15, 2011, 2:44 am
Posts: 20
No offence taken what so ever. As you mentioned all the designs are very much in an early stage and it's really just gaining skills in Solidworks and general engineering practices. If all goes to plan I hope to have the finished design verified with a bit of CFD. Fingers crossed.


Top
 Profile  
Reply with quote  
PostPosted: April 16, 2011, 3:50 am 
Offline

Joined: April 15, 2011, 2:44 am
Posts: 20
Also, thank you for the tip re drag reduction. The cockpit was definitely an area I hadn't focussed much time on, and although I was aware of the drag trailing sides of objects I wasn't aware at just how sensitive this area was. My learning has come from 'Race Car Aerodynamic - Designing for Speed' by Joseph Katz. To be honest I was simply confused on my first reading (am about to do it again) so it's good to get some more advice. Layman's terms often help those who aren't familiar with the lingo! And then there's those equations...


Top
 Profile  
Reply with quote  
PostPosted: April 16, 2011, 5:10 am 
Offline
User avatar

Joined: November 12, 2008, 6:29 am
Posts: 3567
Actually with most of your body designs I see above you have mostly no greater than 80 to 85 degrees (vertical) and could build reasonably simple 2 piece upper and lower molds from the bucks. If the angle gets closer to 90 it becomes a pain in the ass to get workpieces out of the molds and of course more than 90 and you need to start splitting the molds up to enable workpiece removal.

Jack, 13 x 7 and 13 x 9 wheels I think Williams was running. The tyres and the better aero's far outweighed the smaller brakes which were Willwoods.

This is the Minetti http://www.sportsracerservices.com.au/M ... tiHome.htm

Williams copied an early Radical then proceeded to change the chassis and bodywork by 15% to legally call it his own design, stated building them on the Gold Coast but gave it an Italian sounding name to give it more credibility :lol: He has since sold off the business and makes a similar product for clients in Asia.


Top
 Profile  
Reply with quote  
PostPosted: April 16, 2011, 1:33 pm 
Offline
User avatar

Joined: April 26, 2008, 6:06 pm
Posts: 3268
Location: Under the weather. (Seattle)
bovax wrote:
Also, thank you for the tip re drag reduction. The cockpit was definitely an area I hadn't focussed much time on, and although I was aware of the drag trailing sides of objects I wasn't aware at just how sensitive this area was. My learning has come from 'Race Car Aerodynamic - Designing for Speed' by Joseph Katz. To be honest I was simply confused on my first reading (am about to do it again) so it's good to get some more advice. Layman's terms often help those who aren't familiar with the lingo! And then there's those equations...
Off hand, I recall the general (highly simplified) rule of thumb being to keep the trailing angle in the 7-10 degree range when attempting to prevent flow separation. So figure 1.5-2.0 inches down for every 12 inches back. Of course, there are a lot of other factors (and shapes) involved that will influence this actual angle of flow separation, and which can also allow you to noticeably increase the steepness when used correctly.

_________________
-Justin

"Orville Wright did not have a pilots license." - Gordon MacKenzie


Top
 Profile  
Reply with quote  
PostPosted: April 17, 2011, 6:12 am 
Offline

Joined: April 15, 2011, 2:44 am
Posts: 20
I think I must have been taking something I read the wrong way so it's back to the drawing board. When I read about the effect of air flowing over a hatch back it was my understanding that anything below about 25 degrees would keep the flow attached which is why I thought my design wasn't too bad. You learn something new everyday. Can anyone supply some online reading on the subject?


Top
 Profile  
Reply with quote  
PostPosted: April 17, 2011, 9:25 am 
Offline

Joined: April 15, 2011, 2:44 am
Posts: 20
Here's some more work that I've done tonight. I've rejigged the front suspension pick ups so that the steering arms are now parallel to the wishbone. I may modify the pick up points again but this seems to be better. With most the load going through the lower wishbones I don't see this being too much of an issue. I've also slimmed down the cockpit.

Regarding bodywork (excuse the colour!!) I've recreated the wheel tubs, side pods, nose and cockpit surround. I'm not 100% happy (who ever is?) but it might be a bit better. I'm still stuck on the high nose idea but I think I might have to re-address it.


You do not have the required permissions to view the files attached to this post.


Top
 Profile  
Reply with quote  
Display posts from previous:  Sort by  
Post new topic Reply to topic  [ 40 posts ]  Go to page 1, 2, 3  Next

All times are UTC - 5 hours [ DST ]


Who is online

Users browsing this forum: No registered users and 15 guests


You cannot post new topics in this forum
You cannot reply to topics in this forum
You cannot edit your posts in this forum
You cannot delete your posts in this forum
You cannot post attachments in this forum

Jump to:  
POWERED_BY