LocostUSA.com

Learning how to build Lotus Seven replicas...together!
It is currently April 17, 2024, 10:01 pm

All times are UTC - 5 hours [ DST ]


Post new topic Reply to topic  [ 249 posts ]  Go to page Previous  1, 2, 3, 4, 5 ... 17  Next
Author Message
 Post subject:
PostPosted: October 5, 2008, 1:33 pm 
Offline

Joined: August 15, 2005, 10:13 pm
Posts: 7043
Location: Charleston, WV
airframefixer wrote:
Nice work. What are you using to cut your steel. fab work looks great.

Andrew


I agree. Very nice indeed.

_________________
He is a wise man who does not grieve for the things which he has not, but rejoices for those which he has.


Top
 Profile  
Reply with quote  
 Post subject:
PostPosted: October 5, 2008, 9:04 pm 
Offline
User avatar

Joined: February 20, 2008, 1:24 am
Posts: 294
Location: Mahomet, Il
airframefixer wrote:
Nice work. What are you using to cut your steel. fab work looks great.

Andrew


Thanks for the compliment.

At home I use a Jet 4x6 horizontal/vertical bandsaw, and the HF tube notcher for all the tubes. All the welding is done with a Hobart Handler 180 (great welder for the money BTW). When I do heavy bracket work I do it at work on our old clausing ~20" vertical bandsaw. I work at a furniture company and we have a pretty well stocked model shop that builds prototype furniture. I have access to some fairly good basic fab machinery. There is an older lathe that I use to make the threaded tube ends. I'm trying to convince the guys that they need to let me use the CNC mills.. But so far it's unsuccessful.

Thanks again for the interest!

Daniel

_________________
MG midget bodied Locostish car in progress


Top
 Profile  
Reply with quote  
PostPosted: October 6, 2008, 1:18 am 
Offline
User avatar

Joined: February 20, 2008, 1:24 am
Posts: 294
Location: Mahomet, Il
I got all 8 A-arms done. They are currently just tack welded, but I will finish weld them soon. I Also mounted the rear's and got them adjusted so the wheel is centered on the wheel centerline. The bottoms I was able to put at the designed position, but the top had to be moved forward an inch. I think I miss measured the RX-7 upright. It was easy to fix, I just slid the mounts forward and tacked them there. I couldn't resist throwing the Diff, axle, and a wheel on to see how it looked, and see if my track width was ok, an I had full range of motion. Everything came out as designed, and I even had my 1 degree of static camber at ride height. I'm thrilled! It's really starting to look like a car now. Next step is the strut adapters for the front uprights, and the toe control/pushrod bracket for the rear upright.

Image
Image
Image
Image

_________________
MG midget bodied Locostish car in progress


Top
 Profile  
Reply with quote  
 Post subject:
PostPosted: October 6, 2008, 9:49 am 
Offline
User avatar

Joined: April 26, 2008, 6:06 pm
Posts: 3268
Location: Under the weather. (Seattle)
You've been making good progress. At this rate it won't be long until you'll be ready to take her off the build table!

_________________
-Justin

"Orville Wright did not have a pilots license." - Gordon MacKenzie


Top
 Profile  
Reply with quote  
PostPosted: October 13, 2008, 11:04 pm 
Offline
User avatar

Joined: February 20, 2008, 1:24 am
Posts: 294
Location: Mahomet, Il
Well I decided that I needed to weld the frame together before working on installing the A-arms. It just seemed to make more sense that way. So I got the frame pretty well welded. I missed a few welds, but not to many are left. I'd say I'm to that almost welded stage. But that's ok, as I still need to add the Rear, and front triangulation, and figure out how to reinforce the front sub frame mounts. I have one Rear toe bracket done, and will post pictures soon. I just can't seem to find the camera. I've got a good solid plan for the front strut adapters, so I just need to get them done. As soon as the chassis is back on the table, that's my #1 priority so I can get all the a-arms and uprights on. Then, I just might be able to get the suspension figured out, and get a roller!!
Sorry no pictures this time, But Thanks for looking anyway.

Daniel

_________________
MG midget bodied Locostish car in progress


Top
 Profile  
Reply with quote  
 Post subject: General Update madness
PostPosted: October 15, 2008, 1:52 pm 
Offline
User avatar

Joined: February 20, 2008, 1:24 am
Posts: 294
Location: Mahomet, Il
I've got a few day's worth of pictures to update. Again, more can be found on the photobucket page http://s33.photobucket.com/albums/d51/Nocones/midget/

First up is the toe adjustment bracket for the upright. I am using a set up similar to how other people have delt with the strange RX-7 uprights, however I replaced the rubber bushing with a steel bushing so there is no flex. I also made everything mounted in double shear.
Image
Drilling out the bushings (1" holesaw worked well as the metal seems to be 1.125" diameter)
Image
Nearly finished bushing, it's a Piece of 3/4" od, .120 wall piece of DOM, and a pair of flatwashers machined to the proper ID and OD.
Image
Almost Finished Bracket. I want to ad a plate over the side to stiffen it. It will also be where the pushrod is attached.

I also Finished (well all but ~6 1" welds) welding the chassis.
Image
Some of the welds aren't great, but they will hold.
Image

Bringing it totally up to date, I got the rear diff mounts done. I did them almost identical to erturbo's rear diff mounts, but I put the diff on top of the tubes. I actually have a bit of clearance issue from the halfshaft to the nut, however I shaved down the sleeves in the diff, and will grind the stubs flat on the mount sleeve to gain extra clearance.
Image
Cut 1" diameter hole with Hole saw.
Image
Insert 1" od x .120 wall tube
Image
Finish.

Well that's up to date.

Thanks, for looking!

_________________
MG midget bodied Locostish car in progress


Top
 Profile  
Reply with quote  
 Post subject: Yay, An Update!
PostPosted: November 3, 2008, 1:26 am 
Offline
User avatar

Joined: February 20, 2008, 1:24 am
Posts: 294
Location: Mahomet, Il
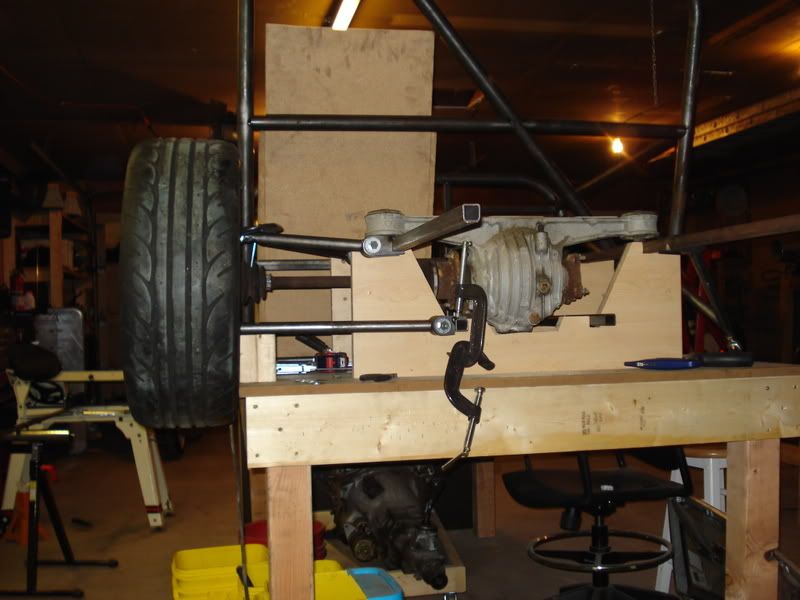
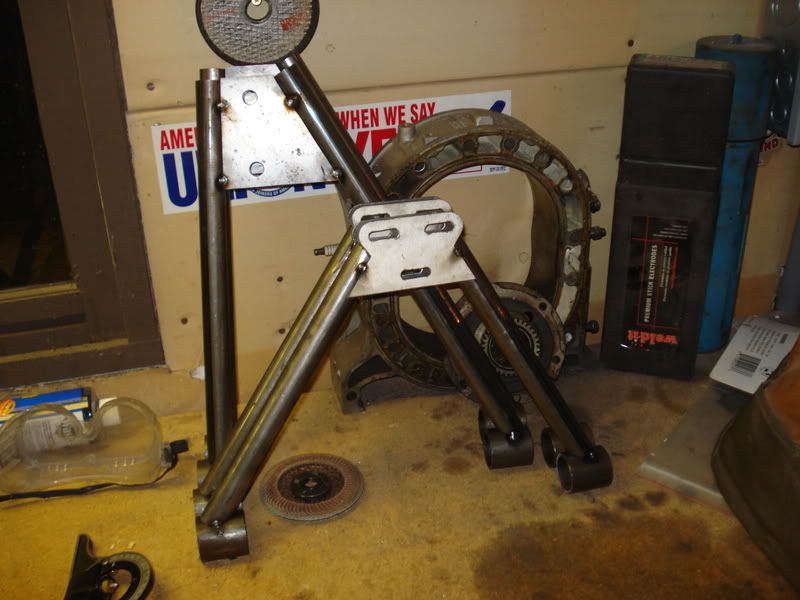
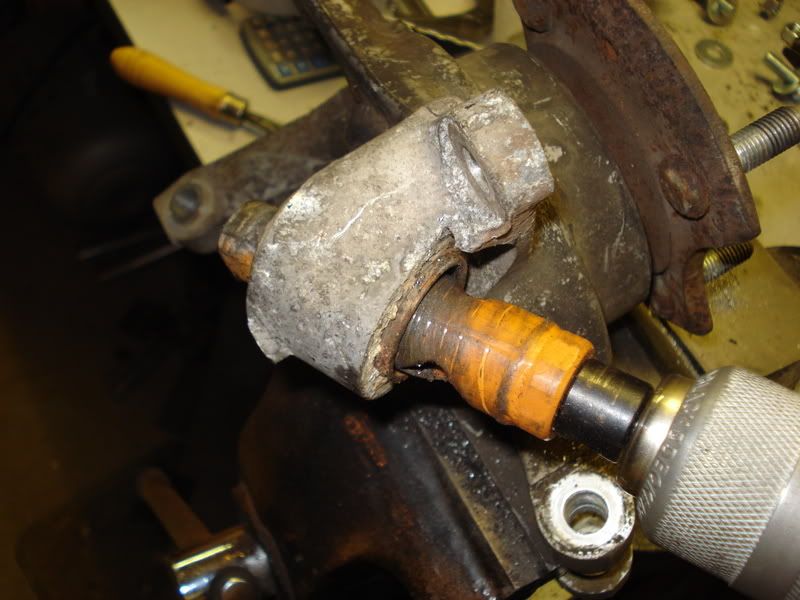
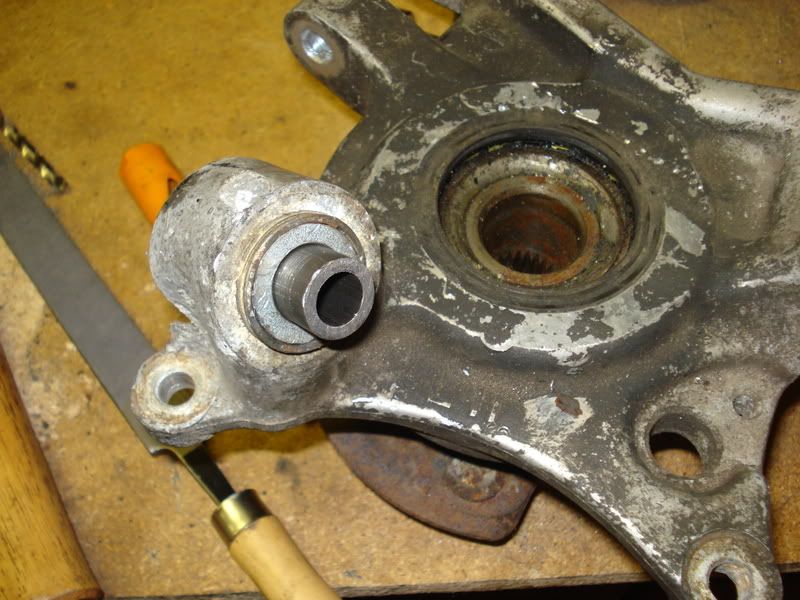
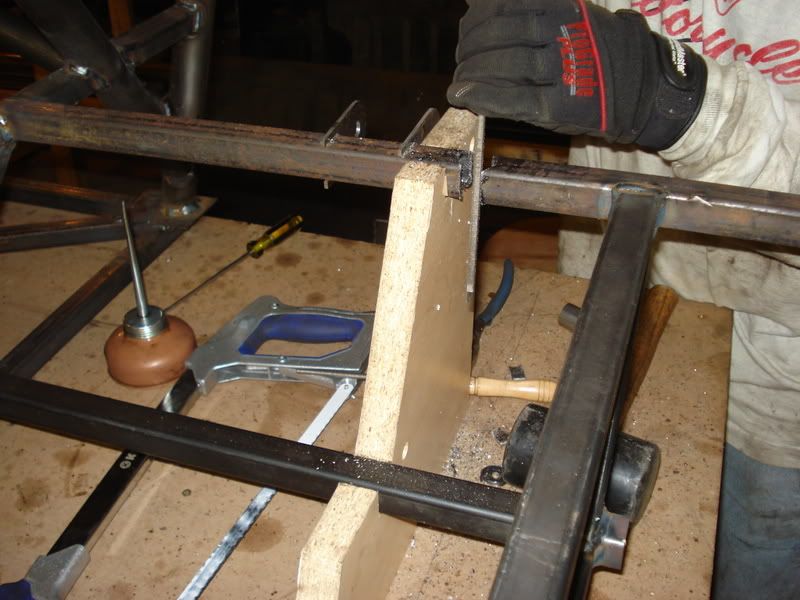
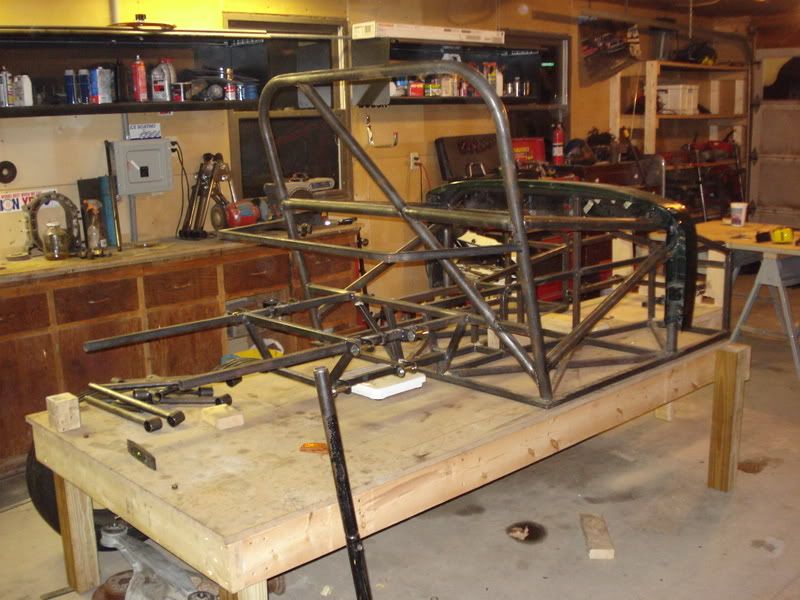
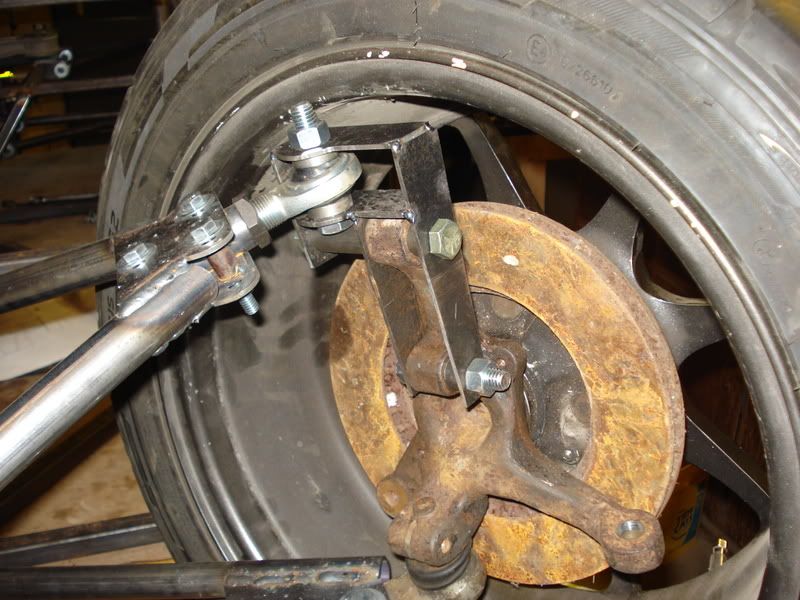
Time for another Update. It's been a little while, and that's because not a ton of picture worthy things have happened. I put on a pair of front a-arms and a-arm brackets, and mounted the upright in position with the upper ball joint adjusted for proper KPI and Caster. I then had to figure out how to build the Strut adapter. I wanted to have freedom to select the location of the UBJ, so I didn't use a strut the way some people have. And Since I'm a product of the FSAE crowd, EVERYTHING that is load bearing HAS to be in double shear.. So design of the strut adapter took a fair amount of work. I had the design almost done, and constructed out of cardboard when I decided I needed adjustable to add some amount of spindle offset addjustability. So the result is the bracket shown below.
Image
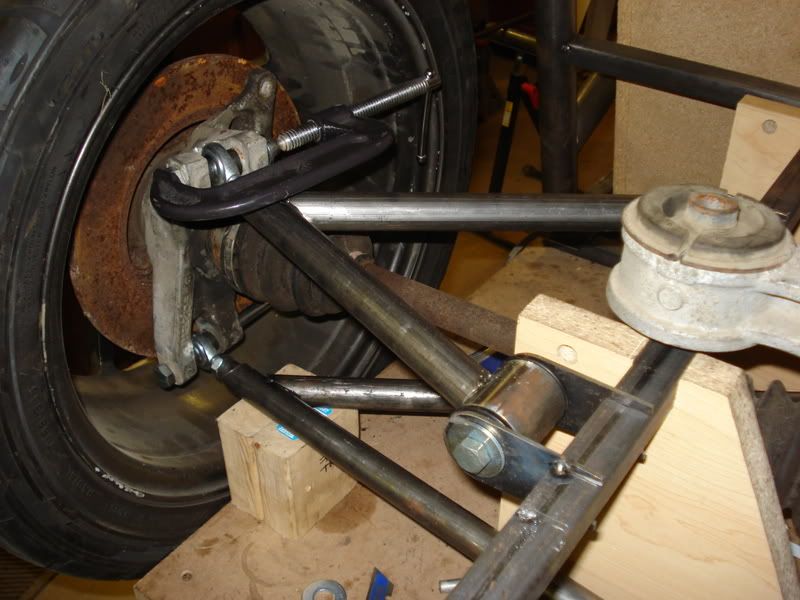
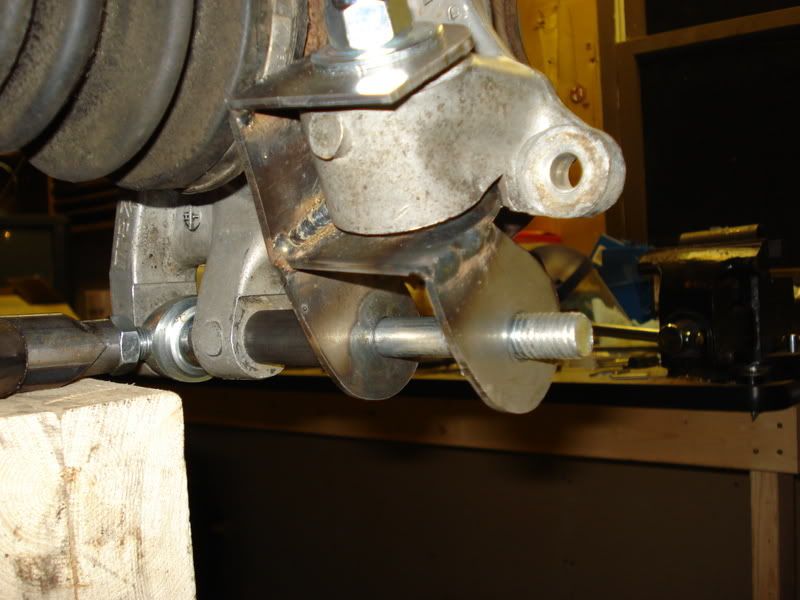
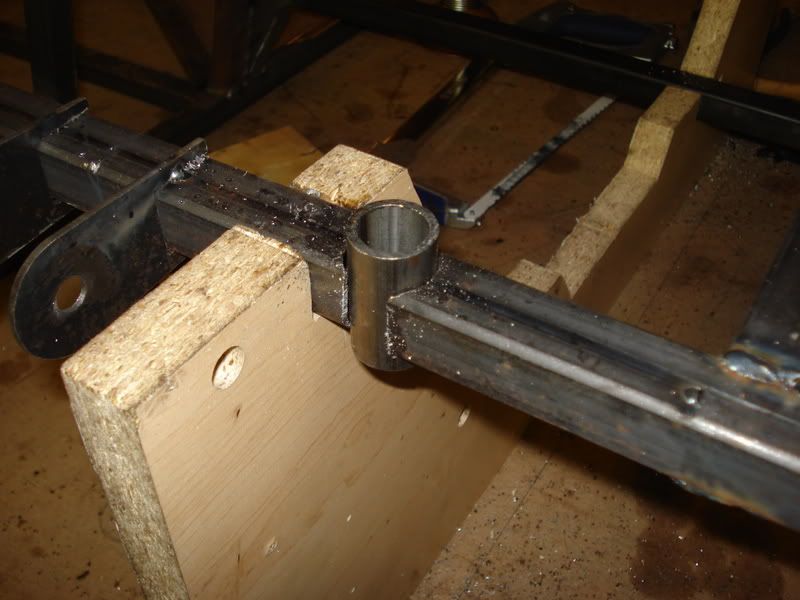
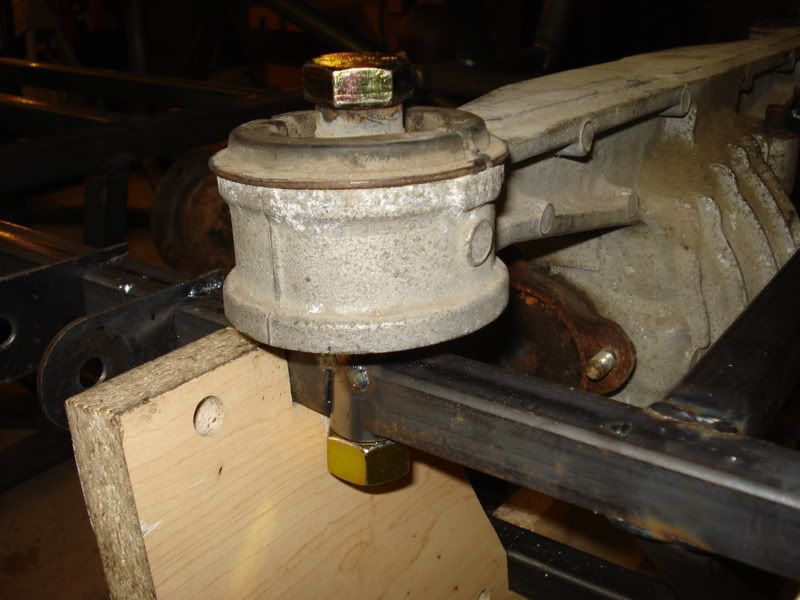
I have a half inch of spindle adjustability through the shim sleeves. The long sleeve on the left is removable so I can tighten the UBJ bolt. I Lathed the step bushings so I could use 1/2" hardware in the 3/4" UBJ. Here is the suspension shown in place, at extreme bump so I could make sure my wheels when turned didn't run into the chassis. It also allows a cleaner view of the brackets. I intend to add some webbing to the top plates to ad some strength.
Image
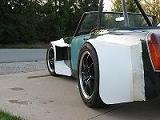
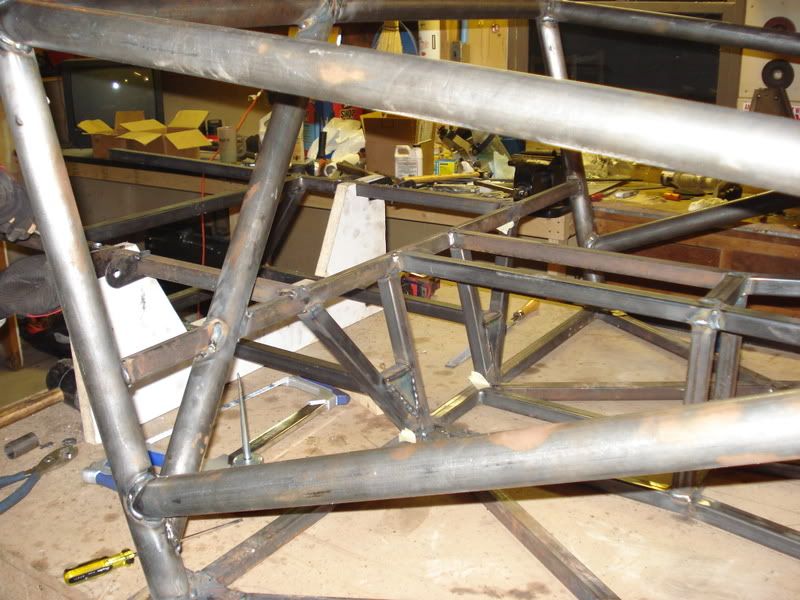
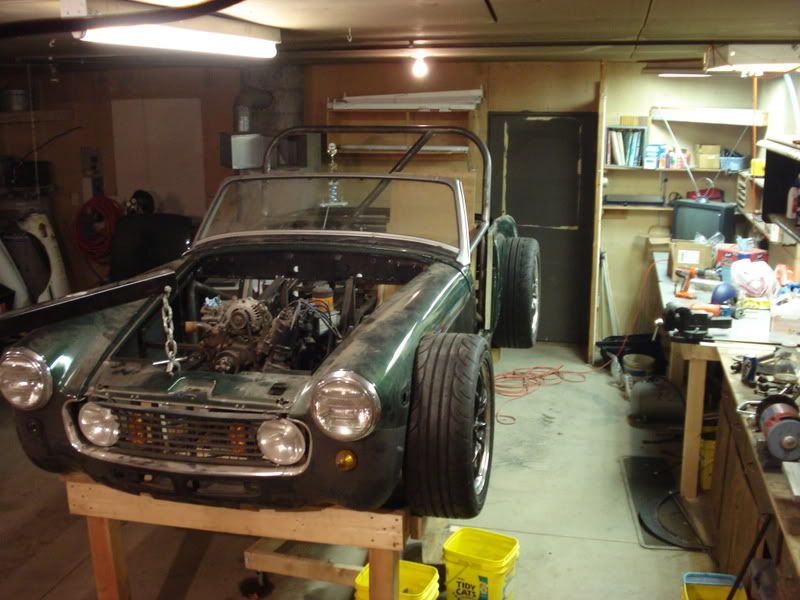
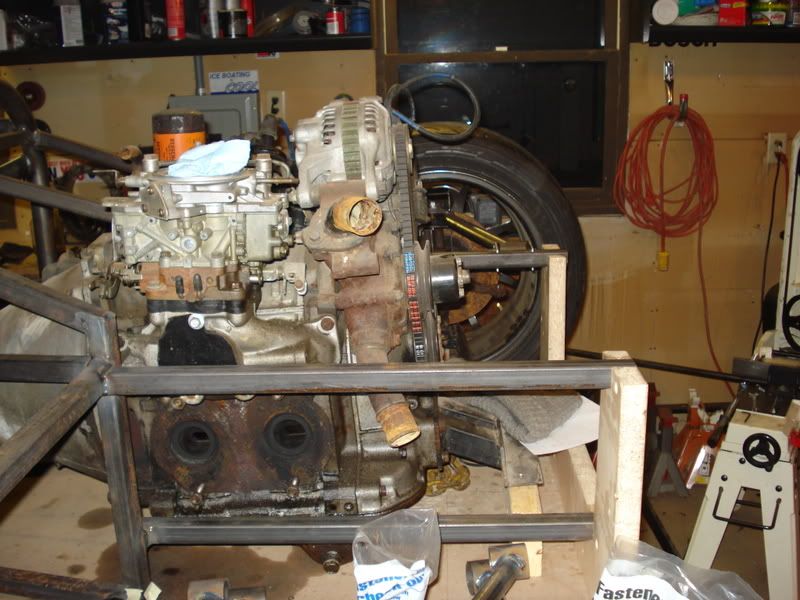
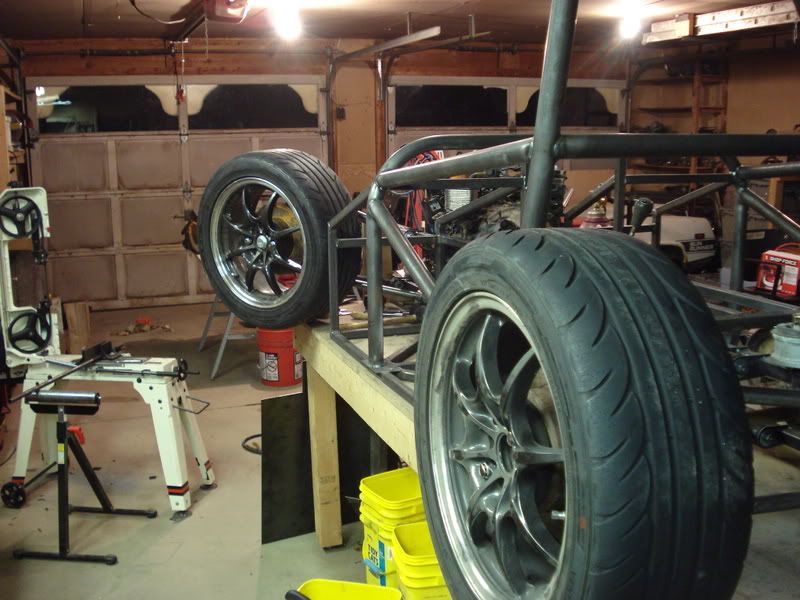
The front of the car gets a little tight with engine packaging, as the 80" wheelbase Is very short. I still managed to get the engine behind the front wheel centerline, but not by much. You can really see the difference between a Locost Chassis and the one I'm building from this side shot.
Image
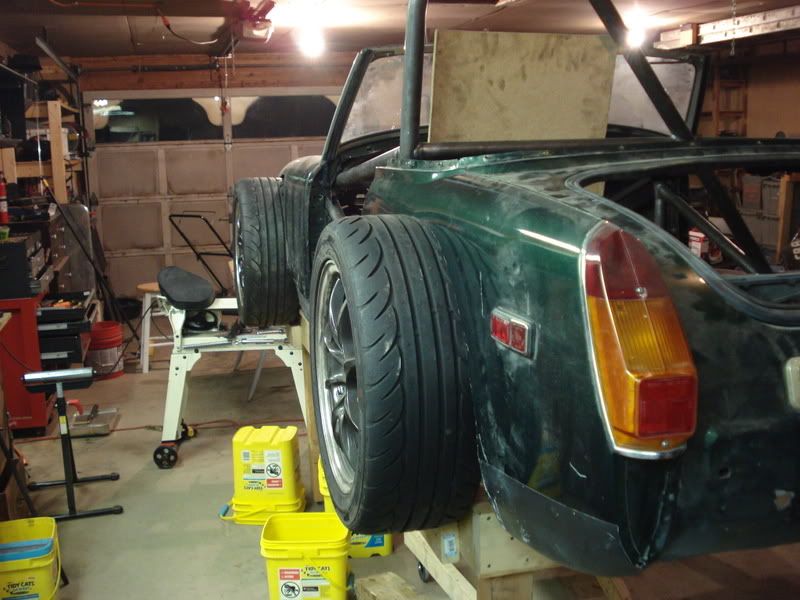
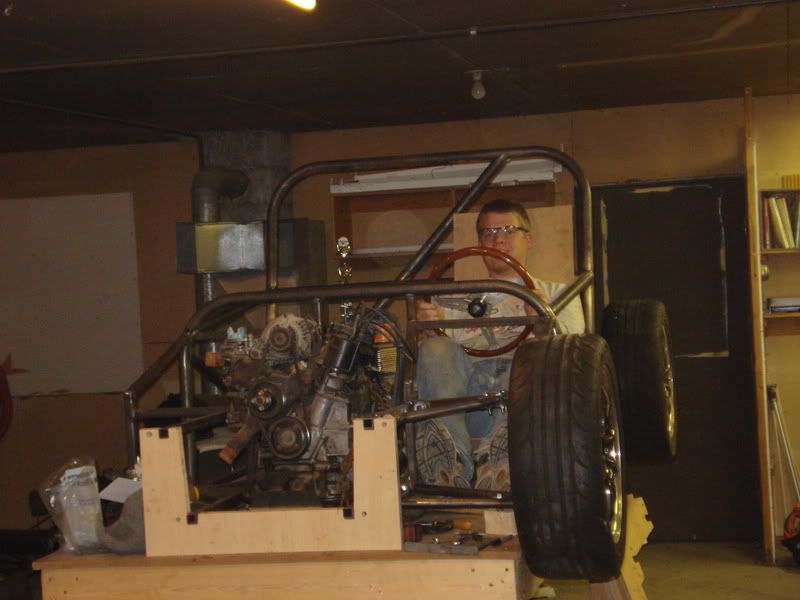
Since I now had a front and rear wheel on the car, I had to get in it and make Vroom noises. This shot gives pretty decent scale of the car.
Image

I had honestly taken a short break from the project as I started to get a little frustrated. The strut adapters where proving difficult to design, so I started to get a real case of stuckedness on them. It got me pretty down, as I started to look at the car as all the little pieces I still had to make. It's a little.. .. No A LOT intimidating when you realize that you are building a car.. .. by hand.. piece by piece.. with no real plan before you. Sometimes you get stuck on the smallest little thing, and you feel like your going to get defeated. I constantly worry that I've designed myself into a corner, and the next part I put on will just require me to re-start the whole car. It felt really good to get the strut adapters done, as it manifested itself as a very big issue to me. It finally allowed me to step back and go.. Look at that.. It really looks like a car now.
Image

Next step.. Fit the rear body so I can finish up the cage/rear subframe.

Daniel.

_________________
MG midget bodied Locostish car in progress


Top
 Profile  
Reply with quote  
 Post subject:
PostPosted: November 3, 2008, 9:59 am 
Offline
User avatar

Joined: April 26, 2008, 6:06 pm
Posts: 3268
Location: Under the weather. (Seattle)
That shot with the front wheel turned there is nice. Looks like you'll have plenty of room for that diagonal from the outside corner to help support the front suspension.

Looking at your photos, I think I see 8...oh wait, make that 9 missed welds...You should get on that. ;)

_________________
-Justin

"Orville Wright did not have a pilots license." - Gordon MacKenzie


Last edited by Driven5 on November 3, 2008, 11:06 am, edited 1 time in total.

Top
 Profile  
Reply with quote  
 Post subject:
PostPosted: November 3, 2008, 10:30 am 
Offline
Mid-Engined Maniac

Joined: April 23, 2006, 8:26 pm
Posts: 6418
Location: SoCal
Double-shear is important, but only if the second support is really doing something. In the bracket below it'll work Much better if you box in the sides of the upper rectangle. As it is it's a simple parallelogram, so it's very easy to move the left-end bracket vertically, offering very little support.

About your motivation, my problem was the exact opposite. Working on one little part at a time is okay; it was when I lift my head and the whole enormity of the project hits me. What worked for me was keeping my head down and my concentration on the next little part. Don't worry, you'll get there, as long as you keep working on it.

Image

_________________
Midlana book: Build this mid-engine Locost!, http://midlana.com/stuff/book/
Kimini book: Designing mid-engine cars using FWD drivetrains
Both available from https://www.lulu.com/


Top
 Profile  
Reply with quote  
 Post subject:
PostPosted: November 3, 2008, 11:31 am 
Offline
User avatar

Joined: February 20, 2008, 1:24 am
Posts: 294
Location: Mahomet, Il
KB58 wrote:
Double-shear is important, but only if the second support is really doing something. In the bracket below it'll work Much better if you box in the sides of the upper rectangle. As it is it's a simple parallelogram, so it's very easy to move the left-end bracket vertically, offering very little support.


I intend to add some webbing to the part to ad strength. I'll probably box in the back side on the top, and the front side on the bottom, as well as add a third vertical to the upper part as close to the rod end as possible while still allowing full turning. It should be sufficient for now until I take it apart to finish weld it.

_________________
MG midget bodied Locostish car in progress


Top
 Profile  
Reply with quote  
 Post subject: Progress
PostPosted: November 3, 2008, 12:39 pm 
Offline

Joined: January 22, 2007, 5:13 pm
Posts: 313
Location: Anchorage Alaska
Excellent to see the progress you are making!
Keep it up! :D


Top
 Profile  
Reply with quote  
 Post subject: Progress
PostPosted: November 3, 2008, 12:53 pm 
Offline

Joined: January 22, 2007, 5:13 pm
Posts: 313
Location: Anchorage Alaska
Excellent to see the progress you are making!
Keep it up! :D


Top
 Profile  
Reply with quote  
 Post subject: More Cowbell.
PostPosted: November 11, 2008, 1:09 am 
Offline
User avatar

Joined: February 20, 2008, 1:24 am
Posts: 294
Location: Mahomet, Il
I needed to fit the MG body to start to finish the chassis, so I had to do some more surgery on the poor body. I'm really just going to end up with the stampings that MG made to make the cars exterior and all origional unibody steel is going to be removed. This saves a lot of weight and makes me feel like I'm building a real racecar in that all of the body will be removable from the chassis. Here is the first overview shot of what the car will look like with the body on.
Image

It's going to be intense looking..
From the rear.
Image

Oddly enough the wheels actually are in about .5" of droop in these pictures, so the fenders will actually have to be cut another 2" or so for clerance. This means that the front fender flares will actually start level with the top of the fender. Speaking of flares.. I've got some width to add to the car..
Image

After fitting the body (well loosely, there where 2x4's and engine hoists involved) I took all of the suspension off, removed the engine, and lowered the build table from 3' to 2' off the ground. It was getting annoying reaching over the edge to try to do anything in the middle. I also extended the front 2' so I could turn the front wheels while it's on the build table. When adding the new legs I cantilevered them out a little to give more clearance in between as the engine hoist just didn't fit. It was super annoying. But now it clears straight on!
Image
Image
I also weighed the chassis. Currently as it sits it's 210lbs That includes that little bit of body. I'll probably end up adding another 25-30 in triangulation tubing. I'll be pleased if the final chassis comes in under 260-270. I used 1" .083 tubes, and the roll bar is 1-5/8 OD .120 wall. It's all very overbuilt.. but it will be street/track car, so I didn't think saving 20-50lbs on the chassis was the way to go.
Thanks for looking!

Daniel

_________________
MG midget bodied Locostish car in progress


Top
 Profile  
Reply with quote  
 Post subject: INDEED !
PostPosted: November 11, 2008, 9:34 am 
Offline
User avatar

Joined: October 2, 2008, 12:37 pm
Posts: 191
Location: Indianapolis, IN
Nocones,

MORE CowBell Indeed ! ! That first picture, 3/4 front shot of the car, just looks Awesome. You're going to have one righteous looking car when your done. I LOVE those wheels jetting out beyond the stock fenders. It's going to be a whole lot of fun when you're done, and tearing up the track.

Keep up the good work!

-Indy 'I want one too' Joe.

_________________
Starting a Scratch Build - ThunderBird Turbo Coupe Donor Car - being dismantled
Build Log Started: http://www.locostusa.com/forums/viewtopic.php?t=4914


Top
 Profile  
Reply with quote  
 Post subject:
PostPosted: November 11, 2008, 7:09 pm 
Offline
User avatar

Joined: April 26, 2008, 6:06 pm
Posts: 3268
Location: Under the weather. (Seattle)
Nice and subtle...That's what I like about this car! :mrgreen:

_________________
-Justin

"Orville Wright did not have a pilots license." - Gordon MacKenzie


Top
 Profile  
Reply with quote  
Display posts from previous:  Sort by  
Post new topic Reply to topic  [ 249 posts ]  Go to page Previous  1, 2, 3, 4, 5 ... 17  Next

All times are UTC - 5 hours [ DST ]


Who is online

Users browsing this forum: No registered users and 25 guests


You cannot post new topics in this forum
You cannot reply to topics in this forum
You cannot edit your posts in this forum
You cannot delete your posts in this forum
You cannot post attachments in this forum

Jump to:  
POWERED_BY