LocostUSA.com

Learning how to build Lotus Seven replicas...together!
It is currently April 19, 2024, 7:49 pm

All times are UTC - 5 hours [ DST ]


Post new topic Reply to topic  [ 36 posts ]  Go to page Previous  1, 2, 3  Next
Author Message
PostPosted: January 28, 2013, 12:00 pm 
Offline
Toyotaphobe
User avatar

Joined: April 5, 2008, 2:25 am
Posts: 4829
Location: Fort Worth, Texas
What's "4-6D"?

4-6 diameters of the head?

_________________
mobilito ergo sum
I drive therefore I am

I can explain it to you,
but I can't understand it for you.


Top
 Profile  
Reply with quote  
PostPosted: January 28, 2013, 12:12 pm 
Offline
User avatar

Joined: July 4, 2006, 5:40 pm
Posts: 1994
Location: Novato, CA
I think it's 4-6 diameters of the body. So 3/4" to 1-1/8" spacing for a 3/16" rivet. That sounds about right for a structural joint like the floor.


Top
 Profile  
Reply with quote  
PostPosted: January 28, 2013, 12:30 pm 
Offline
Always Moore!
User avatar

Joined: November 9, 2007, 3:40 pm
Posts: 4075
Location: Pittsburgh, PA
^ what Nick said for protruding head rivets.

It gets more complicated with countersunk rivets though since you do not have a constant diameter hole.

_________________
-Andrew
Build Log
Youtube


Top
 Profile  
Reply with quote  
PostPosted: January 29, 2013, 12:16 pm 
Offline
User avatar

Joined: October 11, 2006, 4:49 pm
Posts: 616
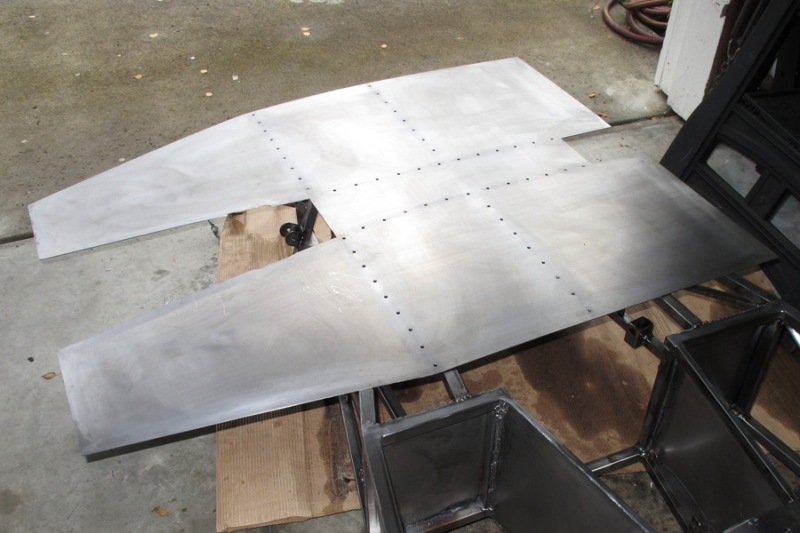
Consider the grade of aluminum as well, for structural reasons, 6061-t6, 2024-t3 or 7075 are structural grades ideal for a floor, .120 may be overkill. I used a combination of .040 and .050 2024-T3 aluminum for my floor. I bought it surplus from a metal dealer near an airport for less than 3$ a lbs. These grades tend to corrode easier than other so treatment is necessary. My prep was de-oxidize with a maroon scotch-brite pad, wash with phosphoric acid, air dry, convert with chromic acid or a similar alodyne or irridite product, air dry, wipe clean with acetone then isopropyl alcohol and apply a good expoxy primer. I use Endura or PPG super koropon primer. Super K is the same stuff used on the space shuttle. I also used a light coasting of 2 component poly-sulfide sealant between the steel frame and the aluminum panels to slow down the corrosion process. A marine urethane sealant will also work well.

I used Cherry MS rivets Part no. CR9163-5-2 and 5-3. You do not need a special puller to install these, just match the tip size up with the mandrel, not to tight or it will break low. They break flush and can be shaved down if the grip range is not accurate. If you want the correct tool to pull these, then your looking at big dollars, or course eBay is a great source but you may need to learn how to rebuild these tools, not cheap if you need more than o rings.

If you go the cherrymax route, you can use an HF or any inexpensive puller to do these as well, I wouldn't want to do any more than a few -4's by hand. There's lots on ebay aswell, just make sure you buy "max" type rivets or MIL 7885 spec. The last 4 digits will start with a CR/AF"3xxx" and you see the driving anvil on the top, looks like a washer. The Last three digits de-note material, diameter group, and head style(universal, countersink, NAS1097 shear, and unisink). Many companies make them not just cherry, but also huck, allfast, and voi-shan. You can download the process manual at the Cherry aerospace website to decode the part numbers. Avoid any CR2000 series rivets, they require a special double action gun to install these. You can also buy new certified rivets from aircraft spruce, but for more money. I could ramble all day about aircraft fasteners, but I think Cherry MS is the most economical option next to the max type rivets. Another benefit of the MS, is that is does a better job of filling the hole than a max type rivet, which is just a really fancy clamp.

As far as non aerospace grade rivets, Cherry Q is good, but haven't seen any great selection of the -5 and -6 dia. stocked anywhere. Some of the other structural rivets like the monobolt and magna-lok start at the -6 dia. Monobolts need a special nose piece as well which is not available for the lesser quality pneumatic riveters, I know as I used to own one and could get it to work. If you go with a .120 thickness floor you'll need at least -6 dia rivets with much closer spacing and maybe a second staggered row.

As for the layout, a rivet spacing fan is a time saver. I wouldn't necessarily worry about getting an exact spacing, but something close enough but equal spacing between fasteners, the fan lets you do this easily. Cleco's are a must too, yardstore has a good deals, not the best quality, but for the amount your going tot use them, they'll do.

Here some some pics of some of my tools equipment that make life easier for doing hours and hours of drilling and riveting. The egg cup type thing holds the drill bushings, makes drilling perpendicular holes in thicker materials easier. De burring tools and the spacing fan also pictured. If you can afford it get a nice light air drill, 1/4 chuck is ideal along with a light air hose, you may be holding this thing for hours.


You do not have the required permissions to view the files attached to this post.

_________________
build log http://locostusa.com/forums/viewtopic.php?t=2142


Top
 Profile  
Reply with quote  
PostPosted: January 29, 2013, 2:31 pm 
Offline
The voice of reason
User avatar

Joined: January 10, 2008, 4:47 pm
Posts: 7652
Location: Massachusetts
Fixer, thanks for the great write up!
:cheers:

_________________
Marcus Barrow - Car9 an open design community supported sports car for home builders!
SketchUp collection for LocostUSA: "Dream it, Build it, Drive it!"
Car9 Roadster information - models, drawings, resources etc.


Top
 Profile  
Reply with quote  
PostPosted: January 30, 2013, 12:34 am 
Offline
User avatar

Joined: January 31, 2012, 12:49 pm
Posts: 1713
Location: Louisville KY
I'm almost tempted to do the rivet thing 'cause it looks so good!

_________________
***************
Geek49203 aka
Tim Wohlford
Louisville, KY
Hayes front, S10 +2 rear, Lalo body.


Top
 Profile  
Reply with quote  
PostPosted: January 30, 2013, 11:53 am 
Offline
User avatar

Joined: October 24, 2008, 2:13 pm
Posts: 5326
Location: Carlsbad, California, USA
Yes, thanks for the great write-up plus the photos and the potential sources for tools, rivets, etc.

Cheers,

_________________
Damn! That front slip angle is way too large and the Ackerman is just a muddle.

Build Log: viewtopic.php?f=35&t=5886


Top
 Profile  
Reply with quote  
PostPosted: January 30, 2013, 5:06 pm 
Offline
User avatar

Joined: October 2, 2012, 11:24 pm
Posts: 176
Location: Winter Park / Orlando
Thanks guys for all the excellent input! Since my car will primarily be a street car and my wife and I will be taking trips in it, for safety sake I've decided to weld in 16 ga. steel. $68 for a 4x8 sheet delivered - be here tomorrow.


Top
 Profile  
Reply with quote  
PostPosted: February 8, 2013, 9:33 am 
Offline
User avatar

Joined: October 2, 2012, 11:24 pm
Posts: 176
Location: Winter Park / Orlando
After deciding to use 16 gauge steel, I figured I'd stitch and plug weld the floorboards, but after talking with a friend who used aluminum floorboards, I've decided to drill & use zinc coated, steel rivets instead. (All rivets will be primed & painted anyway.) Drill all the holes (using clecos) and put 3M Marine 5200 sealant (black) on the rails prior to installation & riveting the floorboards. A couple advantages include: (1) waterproofing/weatherproofing of the interior, (2) little to no chance of rattles/noise as the sealant will provide a gasket effect, and (3) if for any reason you'd want to remove or replace the floor, it would be easy to drill out the rivets. Clearly there are numerous ways to go with materials and installation...it sometimes drives me crazy trying to decide which direction to take!! I feel good that I finally made a decision and I think it will work well for my situation.
Attachment:
Steel Floorboards.jpg


You do not have the required permissions to view the files attached to this post.


Top
 Profile  
Reply with quote  
PostPosted: February 8, 2013, 8:47 pm 
Offline

Joined: May 1, 2012, 9:43 am
Posts: 336
Location: Sidney, BC, Canada
I've decided to go with a 20ga steel floor for my build, as I prefer to have the floor welded in instead of riveted. A question for those that have done it that way: is it better to stitch weld the floor along the interior tubes, or plug weld on the bottoms of those tubes? I will be stitch welding it to the outside (perimiter) tubes, but am wondering if there are any preferences for how to attache to the inner tubes (trans tunnel, seat mounting cross tubes, etc.)


Top
 Profile  
Reply with quote  
PostPosted: February 9, 2013, 2:04 am 
Offline
User avatar

Joined: July 4, 2006, 5:40 pm
Posts: 1994
Location: Novato, CA
Hard to say which is better, unless you've done both. I stitch welded the perimeter and plug welded the interior tubes. I didn't want to weld the edges of interior tubes to the floor and risk the floor pulling up. Plug welding worked fine, but I can't say welding the edges of the tubes wouldn't have worked as well.


Top
 Profile  
Reply with quote  
PostPosted: February 10, 2013, 4:13 pm 
Offline

Joined: May 1, 2012, 9:43 am
Posts: 336
Location: Sidney, BC, Canada
Thanks, Nick. When you say "the floor pulling up" you mean due to shrinkage of the weld when cooling? That's acually something I hadn't considered and it's definitely a good point. I think I'm going to do it the same as you and plug weld to the interior tubes. When you did yours, what was the layout of your plug welds (i.e. how many holes, spacing, size of holes, etc.)? I'm thinking a 3/8" hole, one at each corner/intersection and then space every 2" or so in between. Does that sound about right?


Top
 Profile  
Reply with quote  
PostPosted: February 10, 2013, 7:59 pm 
Offline
User avatar

Joined: July 4, 2006, 5:40 pm
Posts: 1994
Location: Novato, CA
I tried 3/8" on some scraps but it was too big. It took too long to fill. I used 5/16" with 2" spacing, approximately, and ended up with about 60 holes.

Image

And yes, by pulling up I meant the heat warping. My floor came out really flat.


Top
 Profile  
Reply with quote  
PostPosted: February 11, 2013, 12:13 am 
Offline

Joined: May 1, 2012, 9:43 am
Posts: 336
Location: Sidney, BC, Canada
Hey that looks really good. I started cutting mine up tonight and began drilling holes, using a 1/4" bit. Might make them bigger if I find that I have trouble welding them. Hopefully mine will come out without any wrinkles as well.


Top
 Profile  
Reply with quote  
PostPosted: February 13, 2013, 11:12 am 
Offline

Joined: May 1, 2012, 9:43 am
Posts: 336
Location: Sidney, BC, Canada
Just wanted to come back here and say that trying to plug weld that floor was one of the most frustrating experiences of the build so far. I had no issues with the stitch welding around the outside, but every few plug welds would get messed up by the sheet metal bowing out right at the weld spot as it heated up. I started with the plugs in the centre of the sheet with a plan to work my way out towards the edges but eventually I gave up on that. Even with my whole weight on the floor right next to the weld I couldn't keep the sheet from lifting at the plug. I've now abandoned the idea of not having welds on the inside of the chassis as this seemed a much easier way to keep the floor flat (was able to get most of the bowing out by placing the weight of the chassis on a wood block under the floor right where I was going to weld). All in all, the floor isn't turning out as pretty as I'd hoped, but at least it's functional.

Btw, part of the problem is that I don't have a MIG, just a 110v stick welder with 1/16" and 3/32" electrodes. I also have oxy/gas but I haven't tried with that as I thought it would warp even more from the less localized heating.


Top
 Profile  
Reply with quote  
Display posts from previous:  Sort by  
Post new topic Reply to topic  [ 36 posts ]  Go to page Previous  1, 2, 3  Next

All times are UTC - 5 hours [ DST ]


Who is online

Users browsing this forum: No registered users and 6 guests


You cannot post new topics in this forum
You cannot reply to topics in this forum
You cannot edit your posts in this forum
You cannot delete your posts in this forum
You cannot post attachments in this forum

Jump to:  
POWERED_BY