The good news is we're a Dave Ramsey family and have been for a very long time. We have zero debt and a nice emergency fund.
Anne and I took a look at the budget to see where we can instantly trim the outgo and have already made those adjustments on paper.
I'm going to enjoy this time to the max and hope all of our 401k's recover quickly.
This afternoon I honed the MGB block, so the engine will go back together as soon as the rings and bearings arrive.
That only took a few minutes, so the rest of the afternoon was taking the front suspension apart and welding up the tacked together parts.
Tomorrow I plan to yank the Miata power out of the chassis and do some clean up. Hopefully the motor parts arrive soon.
Tinker Toys - Too Busy's SVish 7
Moderators: a.moore, JackMcCornack
-
TooBusy

- Posts: 3368
- Joined: October 19, 2012, 9:25 pm
- Building: Locost D Mod
- Location: Summerville, SC
Re: Tinker Toys - Too Busy's SVish 7
Too much week, not enough weekend.
OOPS I did it again
http://www.locostusa.com/forums/viewtopic.php?f=35&t=17496
Blood Sweat and Beers
http://www.locostusa.com/forums/viewtopic.php?f=35&t=15216
OOPS I did it again
http://www.locostusa.com/forums/viewtopic.php?f=35&t=17496
Blood Sweat and Beers
http://www.locostusa.com/forums/viewtopic.php?f=35&t=15216
-
Trochu

- Posts: 897
- Joined: August 2, 2009, 3:34 pm
- Building: +442E
- Location: Alberta
Re: Tinker Toys - Too Busy's SVish 7
TooBusy wrote:The good news is we're a Dave Ramsey family and have been for a very long time.
I listen to Dave Ramsey when he's on. Gets a bit repetitive, and I sometimes wish he'd get more technical, but he generally offers good advise. Good to hear you're not in a tough spot now.
Trochu Motor League
-
Okbuckethead
- Posts: 38
- Joined: January 6, 2020, 8:28 pm
- Building: Street dragster
Re: Tinker Toys - Too Busy's SVish 7
WAY TO GO!!! I’m a Dave guy too but not there yet. Now I have more to envy you for! Lol
-
TooBusy
- Posts: 3368
- Joined: October 19, 2012, 9:25 pm
- Building: Locost D Mod
- Location: Summerville, SC
Re: Tinker Toys - Too Busy's SVish 7
As far as Dave advice goes, commit to a budget and work the baby steps. It takes time, but the plan works.
In all honesty, more than half the battle is the budget, once you actually have a plan, the rest is easy.
It took us about 7 years to pay off the house, while saving for retirement and kids college. We paid off the house not too long before Baby girl headed off to Clemson. The college savings plus no house payment allowed us to cash flow both kids through school so both kids lived the plan and are debt free. Now they are working young adults with emergency funds of their own.
In the overall scheme of things I am well and truly blessed.
Too much week, not enough weekend.
OOPS I did it again
http://www.locostusa.com/forums/viewtopic.php?f=35&t=17496
Blood Sweat and Beers
http://www.locostusa.com/forums/viewtopic.php?f=35&t=15216
OOPS I did it again
http://www.locostusa.com/forums/viewtopic.php?f=35&t=17496
Blood Sweat and Beers
http://www.locostusa.com/forums/viewtopic.php?f=35&t=15216
-
ohmite

- Posts: 159
- Joined: November 21, 2019, 12:09 am
- Building: MGiata
- Location: Wilson, NY
Re: Tinker Toys - Too Busy's SVish 7
Tommy,
Dave provides excellent advice and we are right there with you and debt free . We are also truly blessed. I’m glad you have more time to work on your projects, enjoy!
With envy,
-Eric
Dave provides excellent advice and we are right there with you and debt free
With envy,
-Eric
MGiata current build here: https://www.mgexp.com/forum/mga-forum.2 ... n.3898051/
-
TooBusy
- Posts: 3368
- Joined: October 19, 2012, 9:25 pm
- Building: Locost D Mod
- Location: Summerville, SC
Re: Tinker Toys - Too Busy's SVish 7
Yesterday Laid off day 2
Mission - get master bathroom back ready to use.
We hired a handyman to demo the shower and install the new Delta Upstile surround. The Upstile unit has a neat recess to add a decorative tile band making it look better than a standard fiberglass unit.
As soon as the surround was in and dry wall patched I ripped up the floor to be able to get it to match up with the new shower pan.
In the demo I accidentally chipped a piece of flooring in the doorway and that piece extended into the master bedroom.
When I laid the floors I didn't put any thresholds (aka tripping hazards) anywhere in the house. No threshhold means I needed to pull baseboards and 5 flows of flooring to get to the one chipped piece.
Stuff happens.
Anyway, yesterday was major milestone day. The handyman had finished his bit and I got to go in, clean, paint, and reset the toilet.
Once the paint dries the shower head goes on and it's done
You do not have the required permissions to view the files attached to this post.
Too much week, not enough weekend.
OOPS I did it again
http://www.locostusa.com/forums/viewtopic.php?f=35&t=17496
Blood Sweat and Beers
http://www.locostusa.com/forums/viewtopic.php?f=35&t=15216
OOPS I did it again
http://www.locostusa.com/forums/viewtopic.php?f=35&t=17496
Blood Sweat and Beers
http://www.locostusa.com/forums/viewtopic.php?f=35&t=15216
-
TooBusy
- Posts: 3368
- Joined: October 19, 2012, 9:25 pm
- Building: Locost D Mod
- Location: Summerville, SC
Re: Tinker Toys - Too Busy's SVish 7
Car update.
Yesterday I was going to put the MGB engine back together. I have new rings and bearings in hand.
Grabbed my file and feeler gages and gapped the compression rings all to between 11 and 12 thou at the bottom of the stroke.
Checked gap at the top of the stroke and was pleasantly surprised all 4 cylinders were still between 11 and 12 thou. I wasn't expecting no taper to the cylinders. Happy camper.
I installed the rings on the pistons and got ready to drop them down the bores aaaaannnnd I can't find my ring compressor.
Looked all over the garage and storage shed ad can't find it. Then I realized I had it in my 2 stroke stuff.
Wifey Dearest says don't be a dumb azz and go to the parts store, work on something else. So motor goes into the corner.
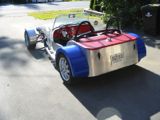
Then started working on putting the Miata Koni's on the Locost. Rears were a piece of cake. I made a simple top bracket and Boom, done.
Fronts were a bit of a challenge. First, they're longer than they need to be. Second, They are REALLY tight to the suspension in my original plan of having the tops outboard of the frame rails.
After some thought I decided I could undersling them on the LCAs and put my brackets on the inside of the frame rails. It increases the tilt and lowers the spring rate, but I decided to give it a go,
Ended the day with a tab tacked on.
Today there was rain in the forecast so I needed to rearrange the garage and move some tools down to the storage shed.
With that out of the way I got back to work making a paper template for the reinforcements for the shock tab.
Lot's of fiddling and fussing, but end of the day IT'S A ROLLER
Yesterday I was going to put the MGB engine back together. I have new rings and bearings in hand.
Grabbed my file and feeler gages and gapped the compression rings all to between 11 and 12 thou at the bottom of the stroke.
Checked gap at the top of the stroke and was pleasantly surprised all 4 cylinders were still between 11 and 12 thou. I wasn't expecting no taper to the cylinders. Happy camper.
I installed the rings on the pistons and got ready to drop them down the bores aaaaannnnd I can't find my ring compressor.
Looked all over the garage and storage shed ad can't find it. Then I realized I had it in my 2 stroke stuff.
Wifey Dearest says don't be a dumb azz and go to the parts store, work on something else. So motor goes into the corner.
Then started working on putting the Miata Koni's on the Locost. Rears were a piece of cake. I made a simple top bracket and Boom, done.
Fronts were a bit of a challenge. First, they're longer than they need to be. Second, They are REALLY tight to the suspension in my original plan of having the tops outboard of the frame rails.
After some thought I decided I could undersling them on the LCAs and put my brackets on the inside of the frame rails. It increases the tilt and lowers the spring rate, but I decided to give it a go,
Ended the day with a tab tacked on.
Today there was rain in the forecast so I needed to rearrange the garage and move some tools down to the storage shed.
With that out of the way I got back to work making a paper template for the reinforcements for the shock tab.
Lot's of fiddling and fussing, but end of the day IT'S A ROLLER
You do not have the required permissions to view the files attached to this post.
Too much week, not enough weekend.
OOPS I did it again
http://www.locostusa.com/forums/viewtopic.php?f=35&t=17496
Blood Sweat and Beers
http://www.locostusa.com/forums/viewtopic.php?f=35&t=15216
OOPS I did it again
http://www.locostusa.com/forums/viewtopic.php?f=35&t=17496
Blood Sweat and Beers
http://www.locostusa.com/forums/viewtopic.php?f=35&t=15216
-
Mnot
- Posts: 854
- Joined: September 24, 2013, 4:06 pm
- Building: Haynes roadster
- Location: Charlotte, NC
Re: Tinker Toys - Too Busy's SVish 7
Congrats on the roller Tommy!!
Amen to no debt!
Amen to no debt!
-
TooBusy
- Posts: 3368
- Joined: October 19, 2012, 9:25 pm
- Building: Locost D Mod
- Location: Summerville, SC
Re: Tinker Toys - Too Busy's SVish 7
Wednesday thru Saturday update
Wednesday I started working on steering. I have an old GM shaft that came with the project and some steel bar. I clamped the bar in the mill and machined it to make a DD slip profile that slides into the GM column. The other end got a pinned and welded collar to attach it to the stubby shaft coming off the Miata rack.
The mount bracket hangs off the bar under the scuttle. I built it so that I can unbolt and move the column fore and aft 3".
No pics from Wednesday
Thursday
I spent the day fitting the front panel of the footwell. Hanging the master cylinders and starting to work on a set of simple pedals.
The panel is 1/8" steel because I had it lying about.
Pedals are about 4:1 ratio made from the same tubes as the rest of the car. I have plenty of room for my feet and if I'm not happy with ratio, they are easy to lengthen.
Friday
Worked some more on the pedals. I got the motion worked out and adjusted for no binding with plenty of throw. Added the foot pads that are made from a section of tube cut from the driveshaft.
With that done I got busy fitting the floor panel. Clamped in place, marked with a Sharpie paint pen (Thanks Baby Girl for working for Sharpie), then laid on the build table to cut.
I was surprised how well the Horrible Fright shears did with the heavy sheet metal. Anyway, now you get a shot of the column.
Ended the day yanking the Miata powertrain out to do other work and be ready for a heart transplant.
Saturday, test fitting the Caterham panels and making mounting brackets.
The bottom support for the nose cone will do double duty as the lower support for the radiator.
Ended the day starting work framing out the rear of the car. This will be made to my eye instead of to any particular set of plans.
Ended the day with the inner section of structure built.
You do not have the required permissions to view the files attached to this post.
Too much week, not enough weekend.
OOPS I did it again
http://www.locostusa.com/forums/viewtopic.php?f=35&t=17496
Blood Sweat and Beers
http://www.locostusa.com/forums/viewtopic.php?f=35&t=15216
OOPS I did it again
http://www.locostusa.com/forums/viewtopic.php?f=35&t=17496
Blood Sweat and Beers
http://www.locostusa.com/forums/viewtopic.php?f=35&t=15216
-
benny_toe
- Posts: 1307
- Joined: December 24, 2007, 5:11 am
- Building: +4 20 valve screamer
- Location: Seattle area
Re: Tinker Toys - Too Busy's SVish 7
I know this is far from your first rodeo but I'm thinking (dangerous I know) that 4 to 1 on the brake pedal will result in a pretty hard pedal. My first pedal set up had my pedal ratio around 3-1. Car would stop OK with a boatload of effort on the pedal. Switched the setup to a bit over 6-1. Cars till stops the same but the effort is down from Godzilla effort to grade school young lady effort. YMMV
Larry in Seattle
-
TooBusy
- Posts: 3368
- Joined: October 19, 2012, 9:25 pm
- Building: Locost D Mod
- Location: Summerville, SC
Re: Tinker Toys - Too Busy's SVish 7
benny_toe wrote:I know this is far from your first rodeo but I'm thinking (dangerous I know) that 4 to 1 on the brake pedal will result in a pretty hard pedal. My first pedal set up had my pedal ratio around 3-1. Car would stop OK with a boatload of effort on the pedal. Switched the setup to a bit over 6-1. Cars till stops the same but the effort is down from Godzilla effort to grade school young lady effort. YMMV
4:1 is low and I'm well aware of the drawbacks from too low a ratio. These started as a 6:1 plan, but I had to move the master cylinders up for clearance. Worst case scenario is I'll have to make the pedals longer.
The issue I'll likely run into is height in the footwell. I have big feet, so I think that instead of a flat shelf under the bonnet, I'll have a boxed section that allows my toes some extra room.
Too much week, not enough weekend.
OOPS I did it again
http://www.locostusa.com/forums/viewtopic.php?f=35&t=17496
Blood Sweat and Beers
http://www.locostusa.com/forums/viewtopic.php?f=35&t=15216
OOPS I did it again
http://www.locostusa.com/forums/viewtopic.php?f=35&t=17496
Blood Sweat and Beers
http://www.locostusa.com/forums/viewtopic.php?f=35&t=15216
-
rx7locost

- Posts: 6423
- Joined: July 17, 2008, 9:11 am
- Location: West Chicago,IL
Re: Tinker Toys - Too Busy's SVish 7
Tommy, alternatively, you can put a 2nd pivot slightly higher on the same pedals and a 2nd set of holes in the tabs. Without having the lengthen the pedal and move the M/C's, you can get closer to 6:1 ratio. Rather unconventional solution. I haven't thought it out any further to consider any downsides.
I don't think outside the box; I ignore boxes altogether.
I don't think outside the box; I ignore boxes altogether.
-
Miatav8,MstrASE,A&P,F

- Automotive Encyclopedia
- Posts: 8133
- Joined: December 22, 2006, 2:05 pm
Re: Tinker Toys - Too Busy's SVish 7
On the clutch master, it looks like the master is mounted a couple inches too low based on the push rod sloping down toward the piston in the static pedal position. It also appears the push rod cannot achieve full piston travel, with the clevis hitting the master first.
Along with Chucks reccomendation, you could fit the brake master to a rectangular plate a little bigger than the hole with four 1/4 inch bolts and overlapping the firewall, then have a slotted arrangement that still covers the wall opening.
Along with Chucks reccomendation, you could fit the brake master to a rectangular plate a little bigger than the hole with four 1/4 inch bolts and overlapping the firewall, then have a slotted arrangement that still covers the wall opening.
Miata UBJ: ES-2074R('70s maz pickup)
Ford IFS viewtopic.php?f=5&t=13225&p=134742
Simple Spring select viewtopic.php?f=5&t=11815
LxWxHt
360LA 442E: 134.5x46x15
Lotus7:115x39x7.25
Tiger Avon:114x40x13.3-12.6
Champion/Book:114x42x11
Gibbs/Haynes:122x42x14
VoDou:113x44x14
McSorley 442:122x46x14
Collins 241:127x46x12
Ford IFS viewtopic.php?f=5&t=13225&p=134742
Simple Spring select viewtopic.php?f=5&t=11815
LxWxHt
360LA 442E: 134.5x46x15
Lotus7:115x39x7.25
Tiger Avon:114x40x13.3-12.6
Champion/Book:114x42x11
Gibbs/Haynes:122x42x14
VoDou:113x44x14
McSorley 442:122x46x14
Collins 241:127x46x12
-
rx7locost
- Posts: 6423
- Joined: July 17, 2008, 9:11 am
- Location: West Chicago,IL
Re: Tinker Toys - Too Busy's SVish 7
I saw that clutch rod angle too. I thought it might be from the camera angle. The travel restriction of the clevis doesn't look any different than the brake pedal. (?)
It just occurred to me that the idea of lengthening the pedal may reduce the piston travel as it may reduce the available arc travel.
It just occurred to me that the idea of lengthening the pedal may reduce the piston travel as it may reduce the available arc travel.
-
Miatav8,MstrASE,A&P,F
- Automotive Encyclopedia
- Posts: 8133
- Joined: December 22, 2006, 2:05 pm
Re: Tinker Toys - Too Busy's SVish 7
I guess I had the blinders on. You're right. I didn't look past the clutch.
I'd use a screw driver and a rigid piece of wire to check the full travel and mark it, then fit the pedals, fully press and note the difference. With the clutch, you will probably need full travel of the piston. With the brake or clutch, if you have a problem while driving, you're going to wish you had full travel to stop or get home pumping.
The pivot for the clevis is forward of the pedal so not a falling ratio but falling travel. Just an observation.
Miata UBJ: ES-2074R('70s maz pickup)
Ford IFS viewtopic.php?f=5&t=13225&p=134742
Simple Spring select viewtopic.php?f=5&t=11815
LxWxHt
360LA 442E: 134.5x46x15
Lotus7:115x39x7.25
Tiger Avon:114x40x13.3-12.6
Champion/Book:114x42x11
Gibbs/Haynes:122x42x14
VoDou:113x44x14
McSorley 442:122x46x14
Collins 241:127x46x12
Ford IFS viewtopic.php?f=5&t=13225&p=134742
Simple Spring select viewtopic.php?f=5&t=11815
LxWxHt
360LA 442E: 134.5x46x15
Lotus7:115x39x7.25
Tiger Avon:114x40x13.3-12.6
Champion/Book:114x42x11
Gibbs/Haynes:122x42x14
VoDou:113x44x14
McSorley 442:122x46x14
Collins 241:127x46x12
Who is online
Users browsing this forum: No registered users and 3 guests