Too Busy's Locost#6
Moderators: a.moore, JackMcCornack
-
Briggs2
- Posts: 26
- Joined: October 19, 2023, 8:40 am
- Building: Volvo redblock 442
Re: Too Busy's Locost#6
Looking forward to seeing how this one works out. If you need a hand with anything let me know. Laser cut parts, Tig welding, etc.
-
TooBusy

- Posts: 3368
- Joined: October 19, 2012, 9:25 pm
- Building: Locost D Mod
- Location: Summerville, SC
Re: Too Busy's Locost#6
Miatav8,MstrASE,A&P,F wrote:It would be practical to get the strength back into the chassis by cutting the body down the center to widen, so a backbone frame/trussed or shear panel tunnel can be installed. Much stiffer than just adding 2x3 rails.
I've already been going down that thought path. Splitting the body does quite a few things for me.
1. I can create a tunnel and get everything much lower to the ground than having body sitting on rails.
2. The extra width gives me enough shoulder room for the seats.
3. Extra width gives me foot space. Anyone who thinks the footwell in a 7 is small has never been in a t bucket.
4. I get to build in more stiffness and torsional rigidity.
5. I can add some good bolt in crash protection. A hidden front roll hoop and some side impact bars.
6. If I want I can add top rails back from front suspension to firewall. Again, more torsional rigidity. Added bonus it keeps the front suspension from looking like its just hanging in space as an after thought.
The big con is more bodywork and smoothing. I'd split it, widen to my needs, then rejoin with a cut out center floor to clear the tunnel. I "almost" left the tunnel in place, but it was just far too wide.
Looking at the Voudou rear suspension I believe I want to lower the center section. Even though I'm planning to add a tunnel I don't want it to be very tall.
I can lower the center section and put the bottom even with of very slightly above the frame rails.
You do not have the required permissions to view the files attached to this post.
Too much week, not enough weekend.
OOPS I did it again
http://www.locostusa.com/forums/viewtopic.php?f=35&t=17496
Blood Sweat and Beers
http://www.locostusa.com/forums/viewtopic.php?f=35&t=15216
OOPS I did it again
http://www.locostusa.com/forums/viewtopic.php?f=35&t=17496
Blood Sweat and Beers
http://www.locostusa.com/forums/viewtopic.php?f=35&t=15216
-
Bent Wrench
- Posts: 818
- Joined: February 8, 2014, 10:47 pm
- Building: autox Volvo 220
- Location: Cornelius OR
Re: Too Busy's Locost#6
Not sure any crash protection would be worthwhile, It will make it heavier and not likely hold up well without a full enclosure and complementing members.
Honey anyone?
-
rx7locost

- Posts: 6423
- Joined: July 17, 2008, 9:11 am
- Location: West Chicago,IL
Re: Too Busy's Locost#6
It looks like the ideal location for that diff is simply mounted under the rails it is on now. Install and removal access might be a small challenge. I'm sure you are up to the challenge though.
-
Bent Wrench
- Posts: 818
- Joined: February 8, 2014, 10:47 pm
- Building: autox Volvo 220
- Location: Cornelius OR
-
TooBusy
- Posts: 3368
- Joined: October 19, 2012, 9:25 pm
- Building: Locost D Mod
- Location: Summerville, SC
Re: Too Busy's Locost#6
I haven't updated here in a month and haven't done a great deal of work in the garage either, but I have dome some.
First I spent some time just staring at the chassis, thinking about it an envisioning what, where, how, etc.
Then the tape measure, pad, and pencil came out comparing and sketching rear pickup point locations, front pickup point locations, chassis width needed for body as it is, and chassis width needed for a 4-6" wider body. I determined fairly quickly that I shouldn't have started cutting on the chassis, as basically almost none of it was going to work on the future build.
So I began stripping the rear end. I thought I'd pull the diff and test fit it under the rails in it's current location. Turns out that it's dam near impossible to get the rear end out of a Voudou build. Apparently you put the rear end on the build table and assemble freakin every other member around it.
Sawzall to the rescue. I salvaged the control arm mounts, the diff pickup plate, and the diff reinforcing angle iron piece. The rest of the rear chassis is cut into small pieces and chucked in the trash can.
Now I'm sitting at Fusion 360 and converting by sketches into drawings. With any luck I'll cut 2x3 frame rails this weekend. There will be primary rails, kick ups, rear extensions, and outriggers similar to what you'd find on a Triumph or early Austin Healey for the body mounts. Frame rails at the front will taper to width of bottom a arm pick up brackets locations. Basically will taper from 30" wide at the rear to 20" wide at the front. If I don't like the appearance I'll make it a 26" to 20" taper, more in line with a traditional T bucket. A little narrower than some early frames, but not a ton.
If I don't like the looks of that it will get a 26" to 24" taper common for later T Bucket chassis. That will require a complete redesign of front suspension geometry. Not excited about that one as I'm quite satisfied with the current design.
Sorry for killing a Locost chassis. I should have pulled out the tape measure sooner in the process.
First I spent some time just staring at the chassis, thinking about it an envisioning what, where, how, etc.
Then the tape measure, pad, and pencil came out comparing and sketching rear pickup point locations, front pickup point locations, chassis width needed for body as it is, and chassis width needed for a 4-6" wider body. I determined fairly quickly that I shouldn't have started cutting on the chassis, as basically almost none of it was going to work on the future build.
rx7locost wrote:It looks like the ideal location for that diff is simply mounted under the rails it is on now. Install and removal access might be a small challenge. I'm sure you are up to the challenge though.
So I began stripping the rear end. I thought I'd pull the diff and test fit it under the rails in it's current location. Turns out that it's dam near impossible to get the rear end out of a Voudou build. Apparently you put the rear end on the build table and assemble freakin every other member around it.
Sawzall to the rescue. I salvaged the control arm mounts, the diff pickup plate, and the diff reinforcing angle iron piece. The rest of the rear chassis is cut into small pieces and chucked in the trash can.
Now I'm sitting at Fusion 360 and converting by sketches into drawings. With any luck I'll cut 2x3 frame rails this weekend. There will be primary rails, kick ups, rear extensions, and outriggers similar to what you'd find on a Triumph or early Austin Healey for the body mounts. Frame rails at the front will taper to width of bottom a arm pick up brackets locations. Basically will taper from 30" wide at the rear to 20" wide at the front. If I don't like the appearance I'll make it a 26" to 20" taper, more in line with a traditional T bucket. A little narrower than some early frames, but not a ton.
If I don't like the looks of that it will get a 26" to 24" taper common for later T Bucket chassis. That will require a complete redesign of front suspension geometry. Not excited about that one as I'm quite satisfied with the current design.
Sorry for killing a Locost chassis. I should have pulled out the tape measure sooner in the process.
Too much week, not enough weekend.
OOPS I did it again
http://www.locostusa.com/forums/viewtopic.php?f=35&t=17496
Blood Sweat and Beers
http://www.locostusa.com/forums/viewtopic.php?f=35&t=15216
OOPS I did it again
http://www.locostusa.com/forums/viewtopic.php?f=35&t=17496
Blood Sweat and Beers
http://www.locostusa.com/forums/viewtopic.php?f=35&t=15216
-
TooBusy
- Posts: 3368
- Joined: October 19, 2012, 9:25 pm
- Building: Locost D Mod
- Location: Summerville, SC
Re: Too Busy's Locost#6
Haven't updated this build log in ages. Week before last I picked up some 2x3 for frame rails.
A little more head scratching, then laid rails on the floor for some visualization.
Last weekend I cut some steel and tacked on lever rear suspension brackets.
Now I'm sketching a couple of pieces for the front end to cut from 1/4 plate. Need to have the upper control arm pick ups not be too ugly.
A little more head scratching, then laid rails on the floor for some visualization.
Last weekend I cut some steel and tacked on lever rear suspension brackets.
Now I'm sketching a couple of pieces for the front end to cut from 1/4 plate. Need to have the upper control arm pick ups not be too ugly.
You do not have the required permissions to view the files attached to this post.
Too much week, not enough weekend.
OOPS I did it again
http://www.locostusa.com/forums/viewtopic.php?f=35&t=17496
Blood Sweat and Beers
http://www.locostusa.com/forums/viewtopic.php?f=35&t=15216
OOPS I did it again
http://www.locostusa.com/forums/viewtopic.php?f=35&t=17496
Blood Sweat and Beers
http://www.locostusa.com/forums/viewtopic.php?f=35&t=15216
-
horchoha

- Posts: 2524
- Joined: March 19, 2011, 10:22 am
- Building: locost super seven
- Location: Holden, Alberta, Canada
Re: Too Busy's Locost#6
If you're going for an 'open' concept I love it, everything's exposed.
Too make it really pop I'd stretch that frame another 2-3 feet, long n low
Too make it really pop I'd stretch that frame another 2-3 feet, long n low
Perry
'If man built it, man can fix it'
"No one ever told me I couldn't do it."
"If you can't build it safe, don't build it."
Perry's Locost Super Che7enette Build
Perry's TBird Based 5.0L Super 7 L.S.O
Perry's S10 Super 7 The 3rd
Perry's 4th Build The Topolino 500 (Little Mouse) Altered
Perry's 5th Build the Super Slant 6 Super 7
Perry's Final Build the 1929 Mercedes Gazelle
-
TooBusy
- Posts: 3368
- Joined: October 19, 2012, 9:25 pm
- Building: Locost D Mod
- Location: Summerville, SC
Re: Too Busy's Locost#6
Long time since the last update.
Part of that I spent traveling every week to Mexico to care for a supplier in trouble. Weekends were mow, care for bees, recover, do it all again.
Don't know why but pics are refusing to upload. They may show, they may not.
Anyway, made a riser frame for the rear UCA pick ups, diff mounting points, and a base for a roll bar if I want to add one.
Front suspension I'm still scratching my head. I replicated the suspension design from the chassis I cut up and it has a ridiculous amount of bump steer and camber gain. Back to VSUSP and entered the data and yep, design was garbage.
Note to self, check bump steer before buying a rolling chassis of someone's abandoned project. I thought I learned that leson with the E Mod project I picked up in Charlotte; guess it didn't stick.
Good news is I still had my front suspension numbers from the last build saved for easy access and I can replicate them on the T bucket.
Bad news, to get rid of bump steer I had to find a happy place in 3d space for the shortened rack. The happy place meant cutting off the front frame crossbar and grinding from relief into the frame raile.
Que sera sera
You do not have the required permissions to view the files attached to this post.
Too much week, not enough weekend.
OOPS I did it again
http://www.locostusa.com/forums/viewtopic.php?f=35&t=17496
Blood Sweat and Beers
http://www.locostusa.com/forums/viewtopic.php?f=35&t=15216
OOPS I did it again
http://www.locostusa.com/forums/viewtopic.php?f=35&t=17496
Blood Sweat and Beers
http://www.locostusa.com/forums/viewtopic.php?f=35&t=15216
-
anduril3018

- Posts: 45
- Joined: June 2, 2024, 9:42 pm
- Building: Classic Style S2-S3
- Location: Los Angeles
Re: Too Busy's Locost#6
When I was little my dad raced a Turner 950S (look it up) and I noticed a lot of 7s at the Southern California tracks we went to in the early 1970s. I couldn't figure out what the 7s were. Were they antiques? Were they new? All I knew was that they were cool and I wanted one. I thought they looked like a chopped and channeled Model A. So your project is like my imagination fulfilled. Love it! Keep posting when you can.
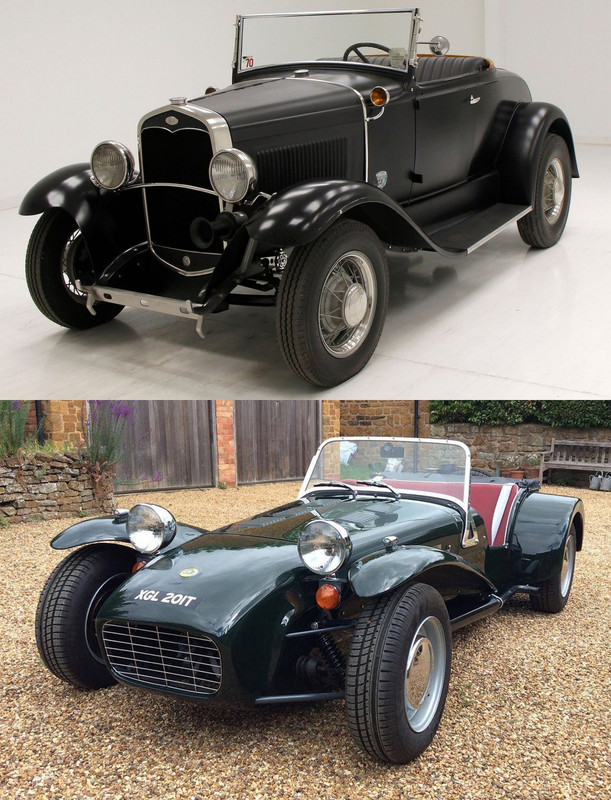 image upload site
image upload site-
TooBusy
- Posts: 3368
- Joined: October 19, 2012, 9:25 pm
- Building: Locost D Mod
- Location: Summerville, SC
Re: Too Busy's Locost#6
I've been really slack about updating this build thread. I got out of the habit when the forum was offline for a while.
Not a lot has changed with the project. I had to rework the front suspension and I'm still not 100% satisfied. I found a spot in 3D space to mount the rack for minimal bump steer.
In doing to I narrowed the front of the frame and now the engine doesn't fit between the frame rails like it did in the original layout, so I'm thinking about blowing it all apart again and lengthening the tie rods.
Meanwhile I picked up a 67 TR4A that has been occupying a lot of my thoughts. It runs. but not well, so I need to yank the engine and do a rebuild.
It had been sitting in a shed since 1977.
Too much week, not enough weekend.
OOPS I did it again
http://www.locostusa.com/forums/viewtopic.php?f=35&t=17496
Blood Sweat and Beers
http://www.locostusa.com/forums/viewtopic.php?f=35&t=15216
OOPS I did it again
http://www.locostusa.com/forums/viewtopic.php?f=35&t=17496
Blood Sweat and Beers
http://www.locostusa.com/forums/viewtopic.php?f=35&t=15216
Who is online
Users browsing this forum: No registered users and 5 guests